Create a simpsons classifier with Azure Machine learning Service

In a previous blogpost I was playing around with object detection in Custom Vision to create a model that could locate and identify Simpson characters in images.
Original article by Alex Attia on Medium
In this blogpost I want to dive into how you can create a Simpson Classification model from scratch using Azure Machine Learning service.
Download the Simpson dataset
On Kaggle there is a great project on how to train a model to classify Simpsons, wo we will start from there.
Before you go on, go and download the dataset with Simpsons images from Kaggle.
Upload the dataset to a blob storage
When you have downloaded the dataset unpack it and upload the all the characters to a blob storage container.
You can use Azure Storage Explorer for this.
Create a new Azure / Jupyter Notebook
xxx
Import dependencies
Start with importing dependencies. If you are uzing an Azure Notebook, you have all the latest versions install. If you are running your own Jupyter notebook then you have to install the azureml-sdk.
pip install azureml-sdk
import os
import azureml
import shutil

from azureml.core.model import Model
from azureml.core import Workspace, Datastore, Experiment, Run
from azureml.core.compute import ComputeTarget, AmlCompute
from azureml.train.dnn import TensorFlow
from azureml.widgets import RunDetails

# check core SDK version number
print("Azure ML SDK Version: ", azureml.core.VERSION)
Setup your AML Workspace
First we have to create our Azure Machine Learning Workspace.
The workspace is the top-level resource for Azure Machine Learning service, providing a centralized place to work with all the artifacts you create when you use Azure Machine Learning service. The workspace keeps a history of all training runs, including logs, metrics, output, and a snapshot of your scripts.
Create a workspace
azure_ml_workspace_name = "<Workspace Name>"
azure_ml_workspace_resource_group = "<Workspace Resource Group>"
azure_ml_workspace_subscription_id = '<Azure Subscription ID>'

ws = Workspace.create(name=azure_ml_workspace_name,
         subscription_id=azure_ml_workspace_subscription_id,
         resource_group=azure_ml_workspace_resource_group,
         location='westeurope',
         exist_ok=True)
Write the workspace config to a file
ws.write_config()
Load the workspace from a config file
ws = Workspace.from_config()
Create a AI Cluster
clusterName = "NV6AICluster"
try:
    computeCluster = ComputeTarget(workspace=ws, name=clusterName)
    print("Found existing compute target {}".format(clusterName))
except:
    print("Creating new compute target {}...".format(clusterName))
    compute_config = AmlCompute.provisioning_configuration(vm_size="STANDARD_NV6", min_nodes=1, max_nodes=6)
    computeCluster = ComputeTarget.create(ws, clusterName, compute_config)
    computeCluster.wait_for_completion(show_output=True)
You can get the details of your selected AI Cluster by requesting information through the get_status() method.
# Get some details from your cluster
status = computeCluster.get_status()
print("Current node count: ",status.current_node_count)
print("VM Size: ",status.vm_size)
print("Name:",computeCluster.name)
computeCluster.status.node_state_counts.serialize()
Mount datastore
ds = Datastore.register_azure_blob_container(
    workspace=ws,
    datastore_name='SimpsonDataStore',
    container_name='simpsons',
    account_name='xxx',
    account_key='xxx',
    create_if_not_exists=True)
ds = Datastore.get(ws, datastore_name='SimpsonDataStore')
Training
Create an experiment
Let's create an experiment named "Simpsons-Classification" and a folder to hold the training scripts. The script runs will be recorded under the experiment in Azure.
ExperimentName = 'Simpsons-Classification'
exp = Experiment(workspace=ws, name=ExperimentName)
script_folder = './trainingscripts'
os.makedirs(script_folder, exist_ok=True)
Create the estimator
The TensorFlow estimator provides a simple way of launching a TensorFlow training job on a compute target. It will automatically provide a docker image that has TensorFlow installed, you can even specify the TensorFlow version.
Additional pip or conda packages can be installed in the docker image by passing their names and version numbers through the pip_packages and conda_packages arguments.
script_params = {
    '--data-folder': ds.as_mount()
}

estimator = TensorFlow(
     source_directory = script_folder,
     script_params = script_params,
     compute_target = computeCluster,
     entry_script = "train_ndr.py",
     use_gpu = True,
     use_docker = True,
     conda_packages=['keras==2.2.2','opencv==3.4.2','scikit-learn'],
     framework_version='1.10'
)
Submit the training job
run = exp.submit(estimator)
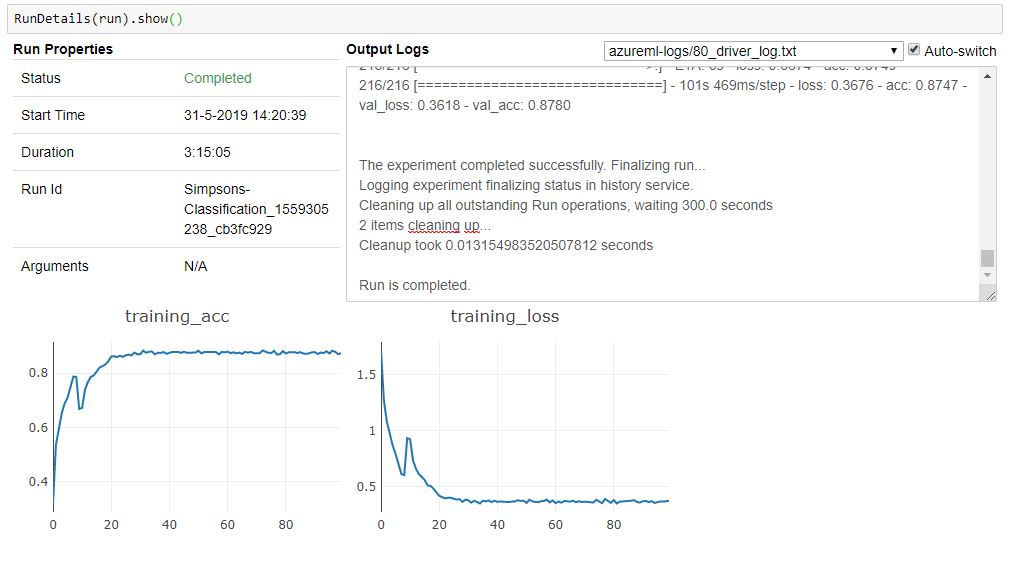
Monitor the run
By importing the RunDetails widget (from azureml.widgets import RunDetails) you can monitor the progress of the job. This is the same information as you see in the portal.
RunDetails(run).show()
Test
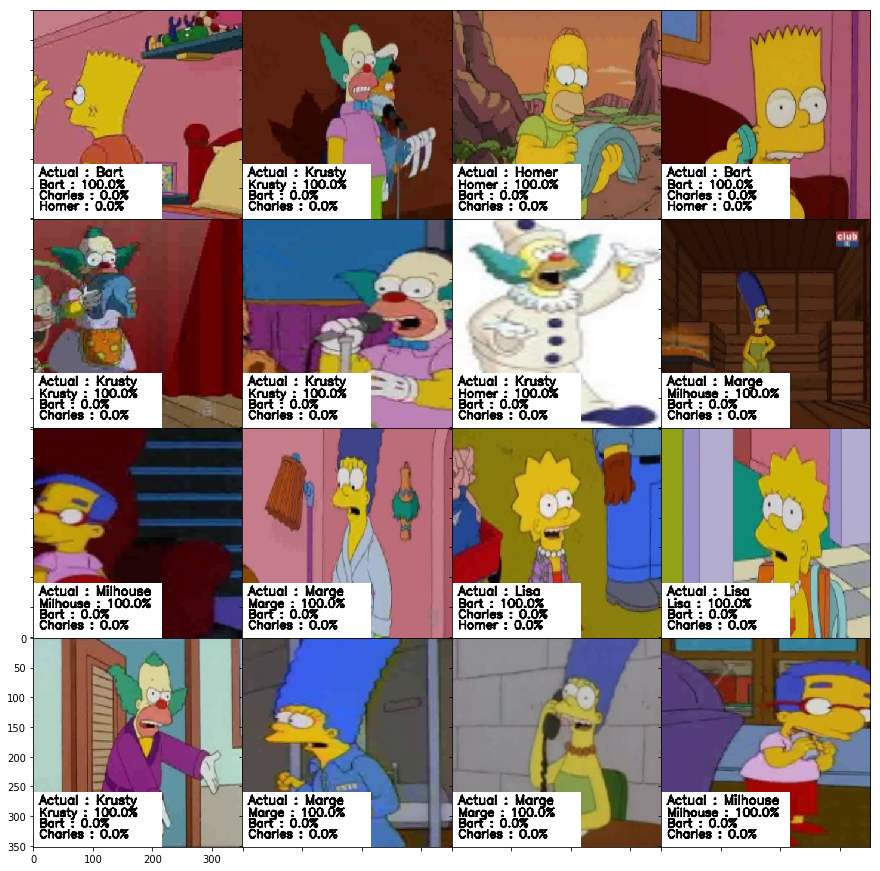
When you are done training it is time for testing the model. First you have to download the model from the experiment and secondly you need to register it. If all that is done, it is time to take the model for a spin and run some predictions against it.
Download the model
model_file_h5 = 'outputs/model.h5'
model_file_json = 'outputs/model.json'

os.makedirs('outputs', exist_ok=True)
run.download_file(name=model_file_h5, output_file_path='outputs/model.h5')
run.download_file(name=model_file_json, output_file_path='outputs/model.json')
Register the model in the model
model = Model.register(ws,
            model_name='SimpsonsClass',
            model_path='outputs',
            tags = {"key": "value"},
            description='Simpson classification model')
Making predictions
import numpy as np
import os
import cv2
import random
import keras
import matplotlib.pyplot as plt
from mpl_toolkits.axes_grid1 import AxesGrid

from keras.models import model_from_json

### Settings
json_file_path = "outputs/model.json"
model_file_path = "outputs/model.h5"
test_images_directory = "small-testset"
pic_size = 256

map_characters = { 0:'bart_simpson', 1: 'charles_montgomery_burns',
     2: 'homer_simpson', 3: 'krusty_the_clown',
     4: 'lisa_simpson',  5: 'marge_simpson', 6: 'milhouse_van_houten' }

# Load the model
json_file = open(json_file_path, 'r')
loaded_model_json = json_file.read()
json_file.close()

loaded_model = model_from_json(loaded_model_json)
loaded_model.load_weights(model_file_path)

def predict_image(img):
    image = cv2.imread(img)
    img = cv2.cvtColor(image, cv2.COLOR_BGR2RGB)
    pic = cv2.resize(image, (pic_size,pic_size))
    data = pic.reshape(1, pic_size, pic_size,3)
    return loaded_model.predict(data)[0], img

F = plt.figure(1, (15,20))
grid = AxesGrid(F, 111, nrows_ncols=(4, 4), axes_pad=0, label_mode="1")

testimages = os.listdir(test_images_directory)
random.shuffle(testimages)

i = 0
for img_name in testimages[0:16]:
    a, img = predict_image(os.path.join(test_images_directory,img_name))

    actual = img_name.split('_')[0].title()

    text = sorted(['{:s} : {:.1f}%'.format(map_characters[k].split('_')[0].title(), 100*v) for k,v in enumerate(a)],
       key=lambda x:float(x.split(':')[1].split('%')[0]), reverse=True)[:3]
    img = cv2.resize(img, (352, 352))
    cv2.rectangle(img, (0,260),(215,352),(255,255,255), -1)
    font = cv2.FONT_HERSHEY_SIMPLEX
    cv2.putText(img, 'Actual : %s' % actual, (10, 280), font, 0.7,(0,0,0),2,cv2.LINE_AA)
    for k, t in enumerate(text):
        cv2.putText(img, t,(10, 300+k*18), font, 0.65,(0,0,0),2,cv2.LINE_AA)
    grid[i].imshow(img)
    i = i +1