Serverless AI with Custom Vision & Azure Functions
After using the Microsoft Custom Vision API for some time now it was time to explore the possibilities a bit more. I decided to find out if it was possible to run a exported model from the Custom Vision Service in an Azure Function and create "Serverless AI".
It turned out this is very well possible and quite easy as well when having the right tooling in place.
In this blog you will find a tutorial on how to use a model, trained with Microsoft Custom Vision, in an Azure Function.
Setup your environment
The first thing that needs to be done is to setup the dev environment. This was a bit of a struggle because the dependency "TensorFlowSharp" needed the Azure Function to be compiled for the x64 platform. I wrote these steps in a seperate blog, so before continuing please read this blog. Read the blogpost - Azure Function x64 dev setup
Create your model
The Custom Vision service from Microsoft offers the ability to export your model as a TensorFlow model. If you have experience with the Custom Vision service, go ahead train a model and export it to a TensorFlow model. If everything has gone well you should end up with two files (labels.txt and model.pb).
Don't know how the Custom Vision service work? Then you can read this tutorial on how to create your own custom vision model and export them as a TensorFlow model.
Infuse the AI into the Azure Functions
Now that we have a model and our dev-environment is ready we can start building our Function.
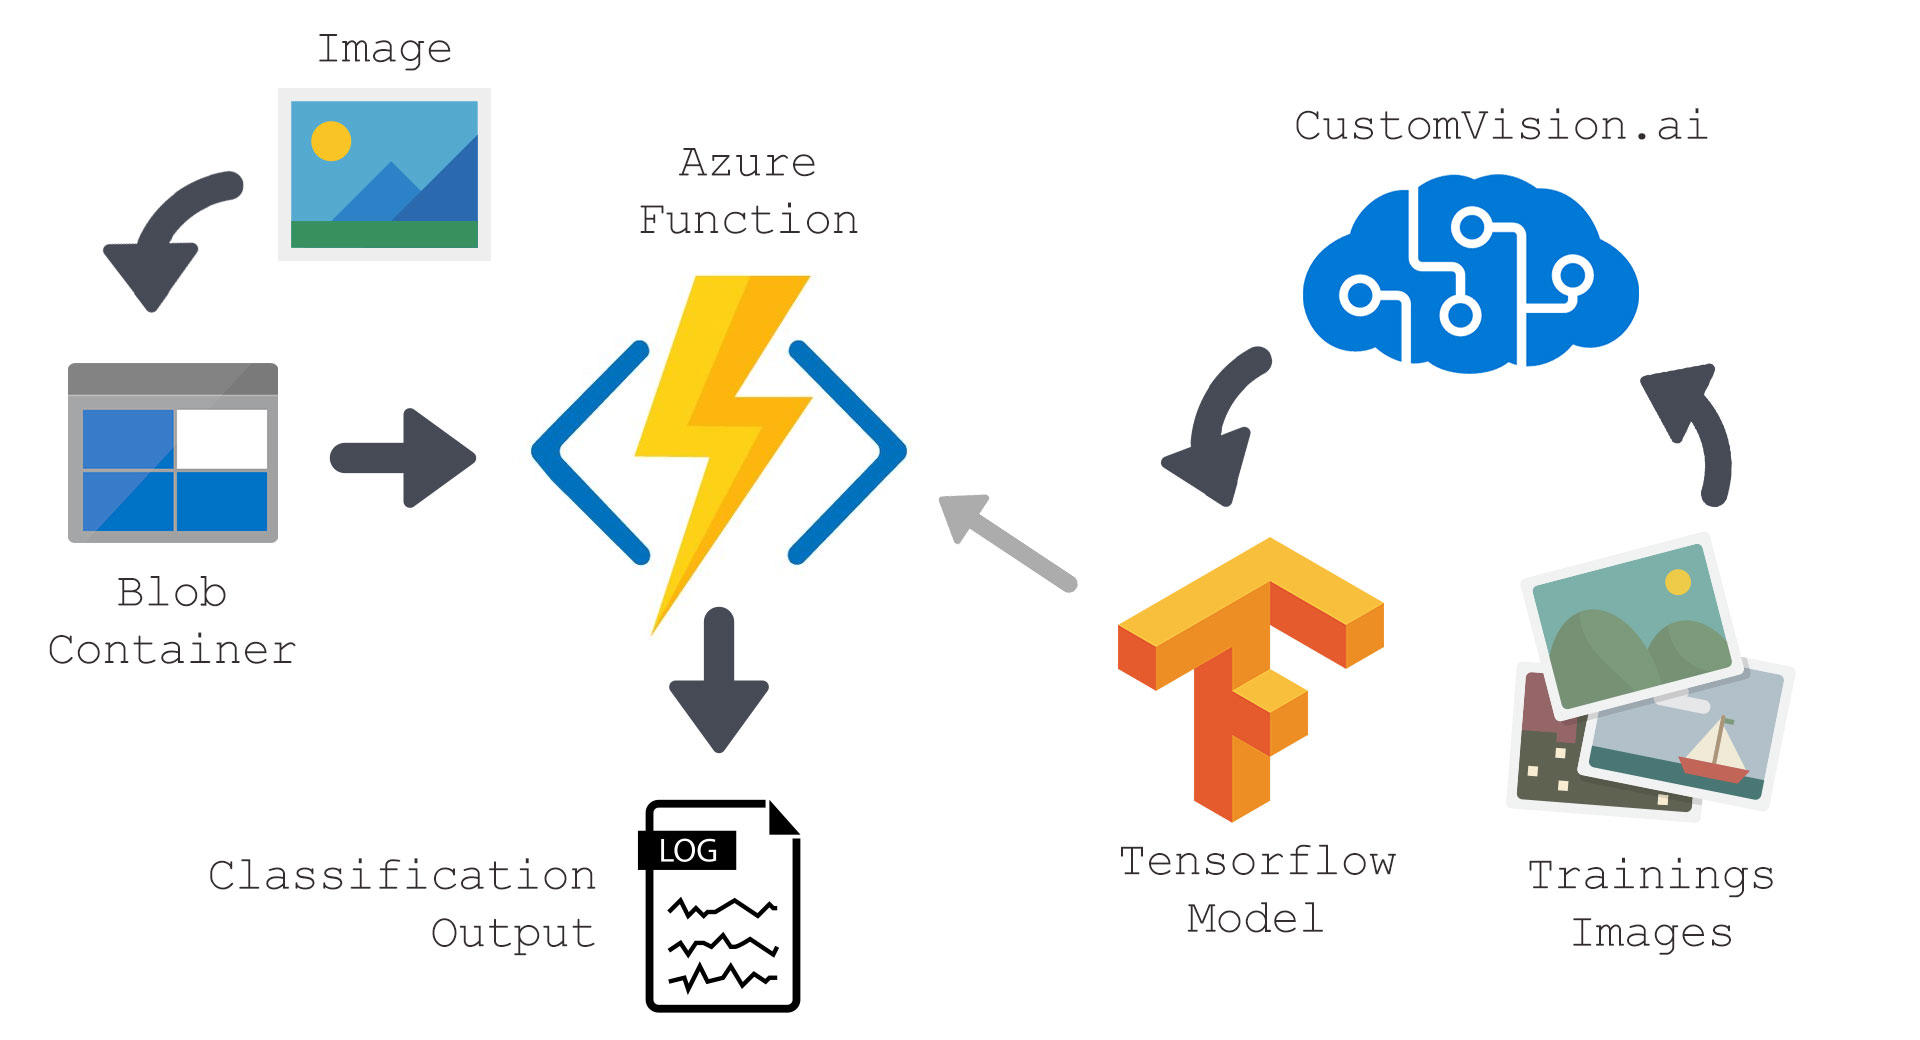
For this Function we will make one that executes when an Image is stored in a blob container and logs the classification result.
So we start with creating the Function:
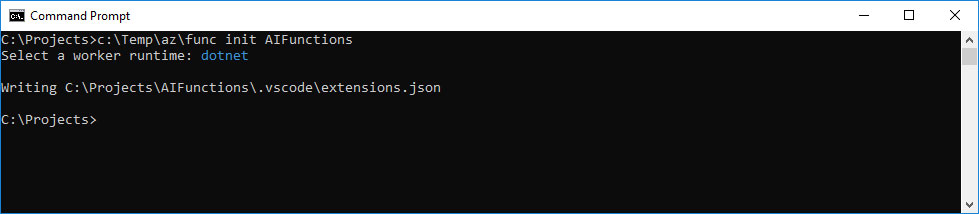
Open a command prompt and type:
- Run:
- Select "dotnet"
- Run:
- Create a storage account in Azure
- Copy the storage connection string
- Put them in local.settings.json (You can open your project with visual studio or VSCode)
{
  "IsEncrypted": false,
  "Values": {
    "AzureWebJobsStorage": "<INSERT HERE>",
    "AzureWebJobsDashboard": "<INSERT HERE>",
    "FUNCTIONS_WORKER_RUNTIME": "dotnet"
  }
}
- Run:
- Select: "BlobTrigger"
- Enter the Function name: "CustomVisionFunction"
- Open the project "CustomVisionFunctions.csproj" in VisualStudio
Now we have a new empty Azure Function that is triggerd when a blob is uploaded in a container.
- Create a folder "Assets" and place the "labels.txt" and "model.pb" in this folder.
- In Visual Studio set the properties of the 2 files to:
- Build Action: Content
- Copy to output directory: Copy if newer
- Open the properties of your project and go to: build and set the Platform target to x64.
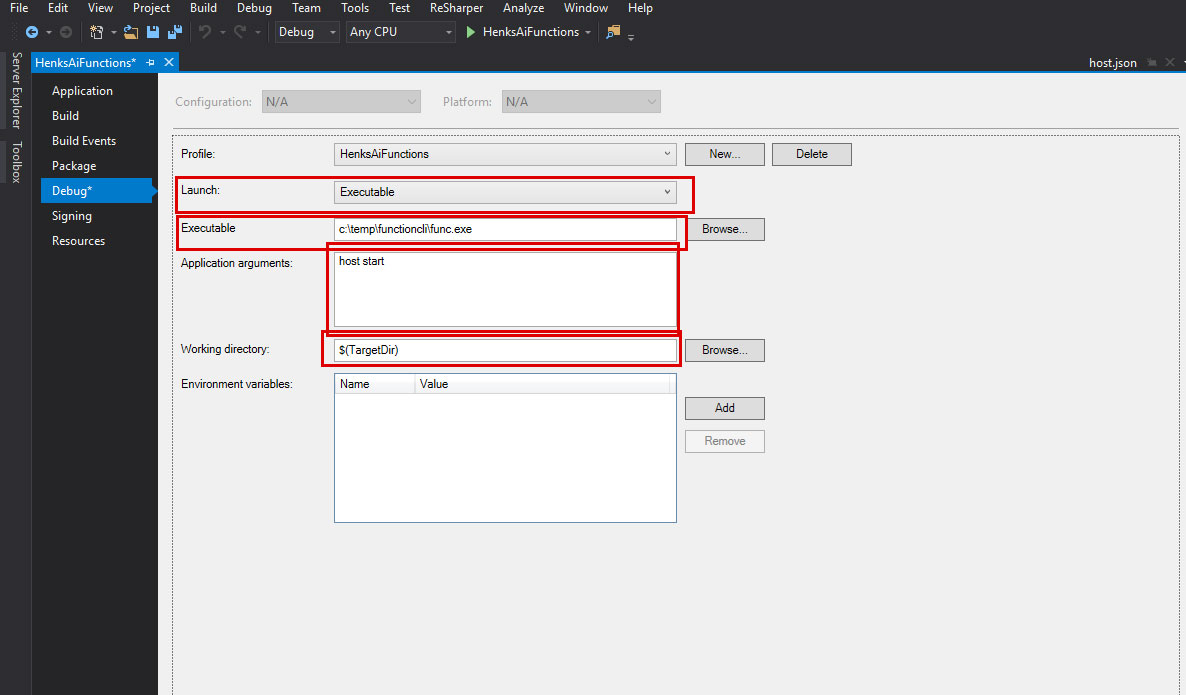
- Then open the Debug properties
- Select in the dropdown: Launch the value "Executable"
- By executable type:
- By Application Arguments type: host start
- By working directory type: $(TargetDir)
Now we have setup our dev environment with an empty blob triggered function
- Add the NuGet Package "TensorFlowSharp"
- Create a new file "ImageUtil.cs" and paste the code below:
namespace TensorFlow
{
    using System.IO;

    // Taken and adapted from: https://github.com/migueldeicaza/TensorFlowSharp/blob/master/Examples/ExampleCommon/ImageUtil.cs
    public static class ImageUtil
    {
        // Convert the image in filename to a Tensor suitable as input to the Inception model.
        public static TFTensor CreateTensorFromImageFile(Stream file, TFDataType destinationDataType = TFDataType.Float)
        {
            byte[] contents = ReadFully(file);

            // DecodeJpeg uses a scalar String-valued tensor as input.
            var tensor = TFTensor.CreateString(contents);

            // Construct a graph to normalize the image
            using (var graph = ConstructGraphToNormalizeImage(out TFOutput input, out TFOutput output, destinationDataType))
            {
                // Execute that graph to normalize this one image
                using (var session = new TFSession(graph))
                {
                    var normalized = session.Run(
                        inputs: new[] { input },
                        inputValues: new[] { tensor },
                        outputs: new[] { output });

                    return normalized[0];
                }
            }
        }

        public static byte[] ReadFully(Stream input)
        {
            byte[] buffer = new byte[16 * 1024];
            using (MemoryStream ms = new MemoryStream())
            {
                int read;
                while ((read = input.Read(buffer, 0, buffer.Length)) > 0)
                {
                    ms.Write(buffer, 0, read);
                }
                return ms.ToArray();
            }
        }

        // Additional pointers for using TensorFlow & CustomVision together
        // Python: https://github.com/tensorflow/tensorflow/blob/master/tensorflow/examples/label_image/label_image.py
        // C++: https://github.com/tensorflow/tensorflow/blob/master/tensorflow/examples/label_image/main.cc
        // Java: https://github.com/Azure-Samples/cognitive-services-android-customvision-sample/blob/master/app/src/main/java/demo/tensorflow/org/customvision_sample/MSCognitiveServicesClassifier.java
        private static TFGraph ConstructGraphToNormalizeImage(out TFOutput input, out TFOutput output, TFDataType destinationDataType = TFDataType.Float)
        {
            //const int W = 227;
            //const int H = 227;
            const int W = 224;
            const int H = 224;
            const float Scale = 1;

            // Depending on your CustomVision.ai Domain - set appropriate Mean Values (RGB)
            // https://github.com/Azure-Samples/cognitive-services-android-customvision-sample for RGB values (in BGR order)
            var bgrValues = new TFTensor(new float[] { 104.0f, 117.0f, 123.0f }); // General (Compact) & Landmark (Compact)
            //var bgrValues = new TFTensor(0f); // Retail (Compact)

            var graph = new TFGraph();
            input = graph.Placeholder(TFDataType.String);

            var caster = graph.Cast(graph.DecodeJpeg(contents: input, channels: 3), DstT: TFDataType.Float);
            var dims_expander = graph.ExpandDims(caster, graph.Const(0, "batch"));
            var resized = graph.ResizeBilinear(dims_expander, graph.Const(new int[] { H, W }, "size"));
            var resized_mean = graph.Sub(resized, graph.Const(bgrValues, "mean"));
            var normalised = graph.Div(resized_mean, graph.Const(Scale));
            output = normalised;
            return graph;
        }
    }
}
- Create a blob container named "images" on the storage account you have created earlier.
- Add in your "local.settings.json" a new connection string "ImagesStorage" with the connection string to the blob where your images are stored (This is likely the same as the AzureWebJobsStorage connection string).
- Open the file: "CustomVisionFunction.cs" and paste the code below:
using System;
using System.Diagnostics;
using System.IO;
using Microsoft.Azure.WebJobs;
using Microsoft.Azure.WebJobs.Host;
using TensorFlow;

namespace CustomVisionFunctions
{
    public static class CustomVisionFunction
    {
        [FunctionName("CustomVisionFunction")]
        public static void Run([BlobTrigger("images/{name}", Connection = "ImagesStorage")]Stream myBlob, string name, TraceWriter log, ExecutionContext context)
        {
            log.Info($"C# Blob trigger function Processed blob\n Name:{name} \n Size: {myBlob.Length} Bytes");

            Stopwatch stopwatch = new Stopwatch();
            stopwatch.Start();

            var graph = new TFGraph();

            var model = File.ReadAllBytes(Path.Combine(context.FunctionDirectory, "../Assets/model.pb"));
            var labels = File.ReadAllLines(Path.Combine(context.FunctionDirectory, "../Assets/labels.txt"));
            graph.Import(model);

            log.Info($"{name}");

            using (var session = new TFSession(graph))
            {
                var tensor = ImageUtil.CreateTensorFromImageFile(myBlob);
                var runner = session.GetRunner();
                runner.AddInput(graph["Placeholder"][0], tensor).Fetch(graph["loss"][0]);
                //    runner.AddInput(graph["input"][0], tensor).Fetch(graph["final_result"][0]);
                var output = runner.Run();
                var result = output[0];
                var threshold = 0.25; // 25%

                var probabilities = ((float[][])result.GetValue(jagged: true))[0];
                for (int i = 0; i < probabilities.Length; i++)
                {
                    // output the tags over the threshold
                    if (probabilities[i] > threshold)
                    {
                        log.Info($"{labels[i]} ({Math.Round(probabilities[i] * 100.0, 2)}%)");
                    }
                }
            }

            stopwatch.Stop();
            log.Info($"Total time: {stopwatch.Elapsed}");
        }
    }
}
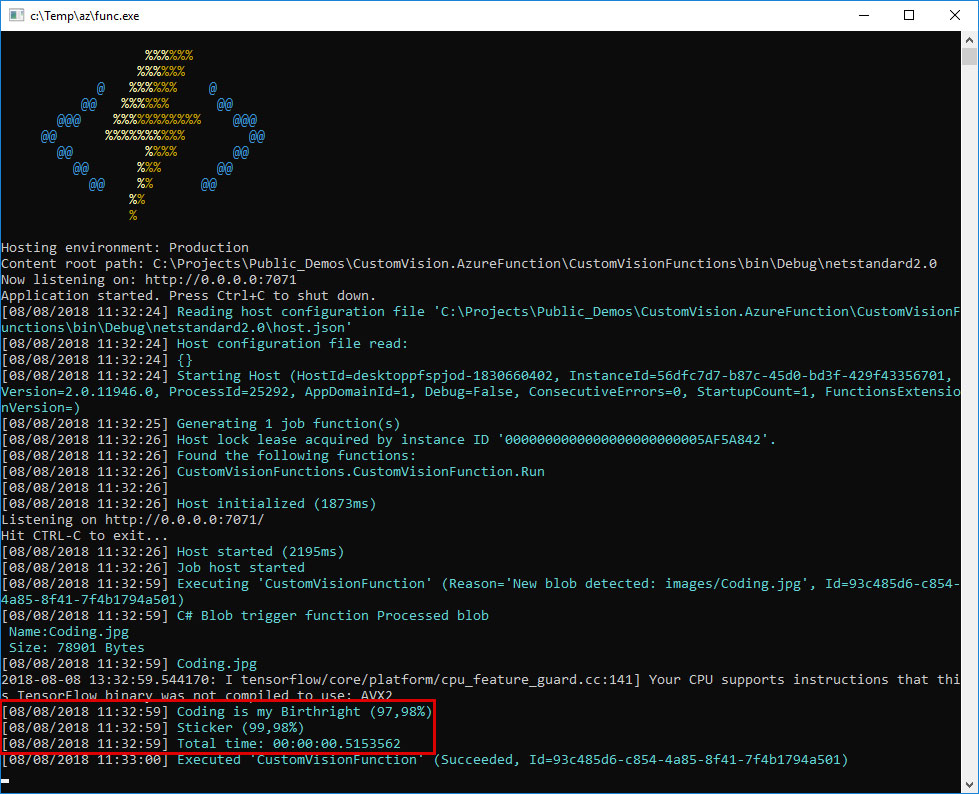
- Run the Function in debug mode
- Upload a Image to the image folder on your blob container (you can do this with the Storage Explorer)
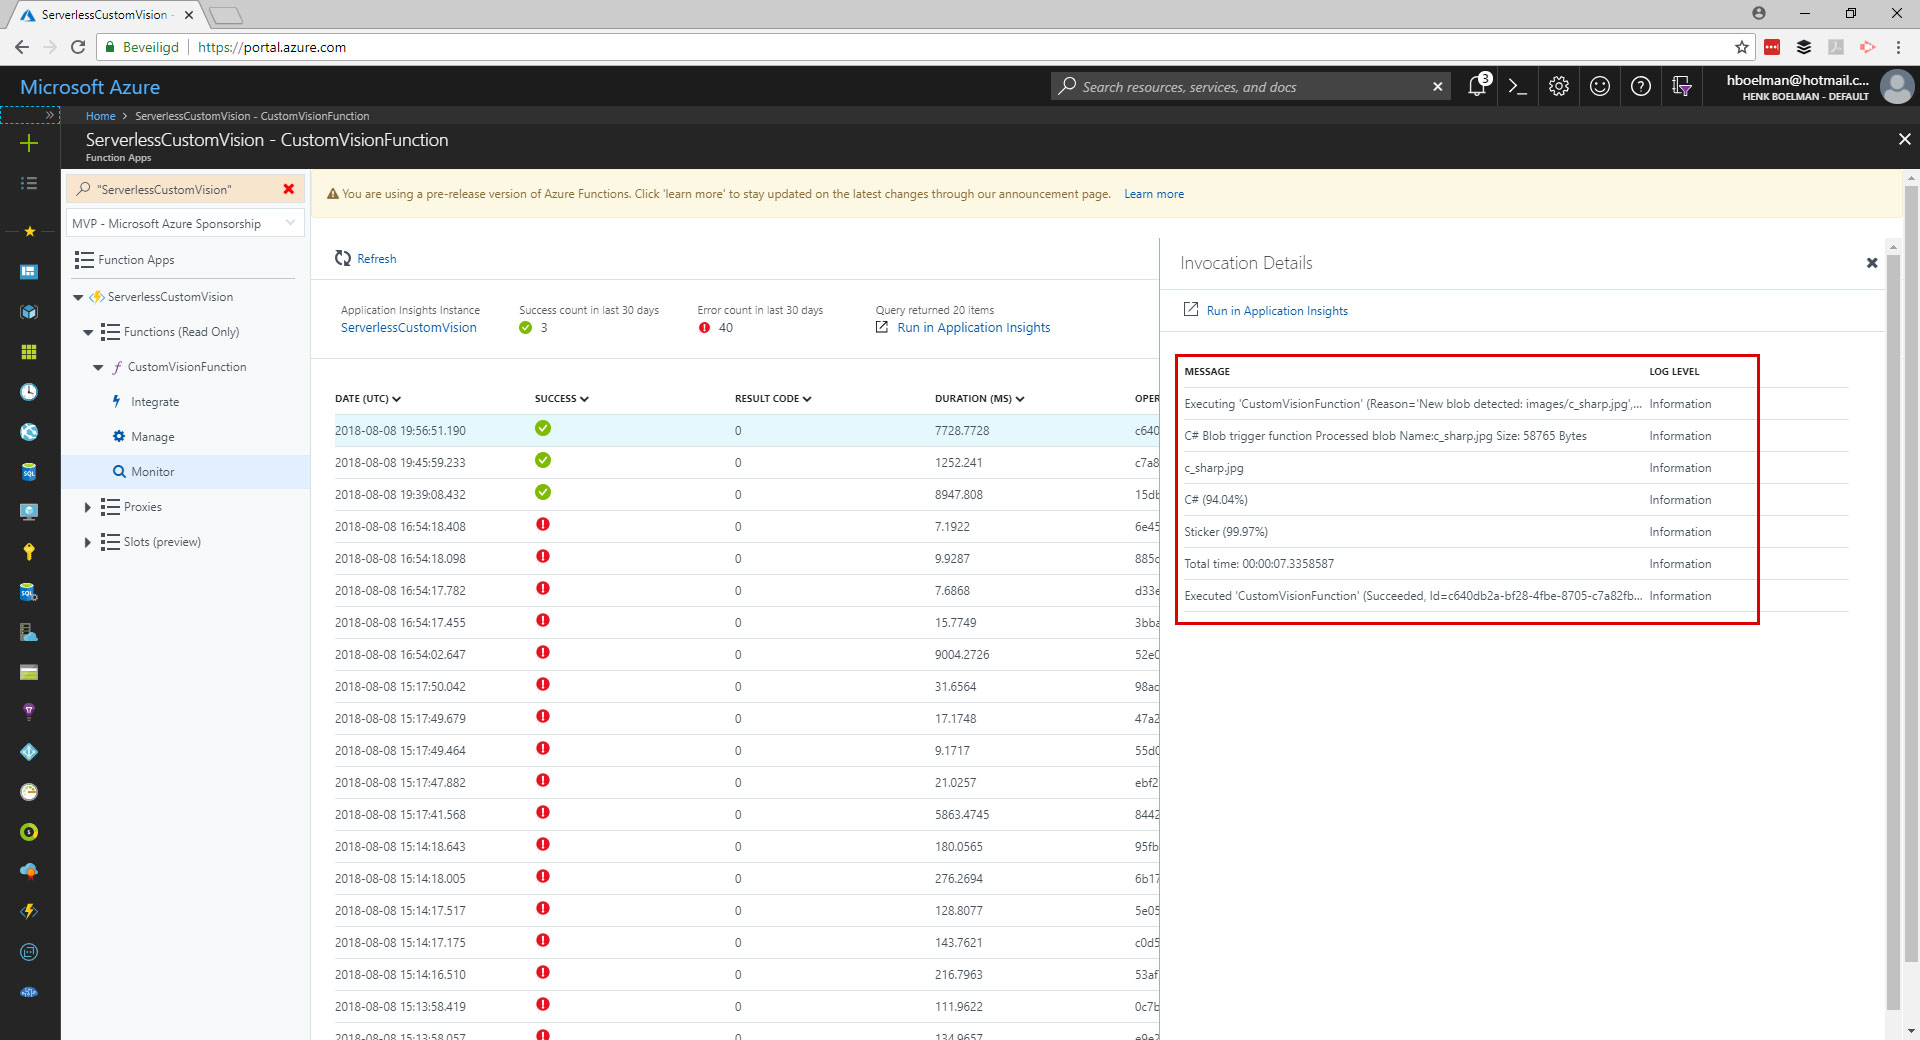
- And watch in de console the response from your classifier!
The complete source code is available on my GitHub
Running it in Azure
When running it in Azure take note of a few settings before you deploy your Function.
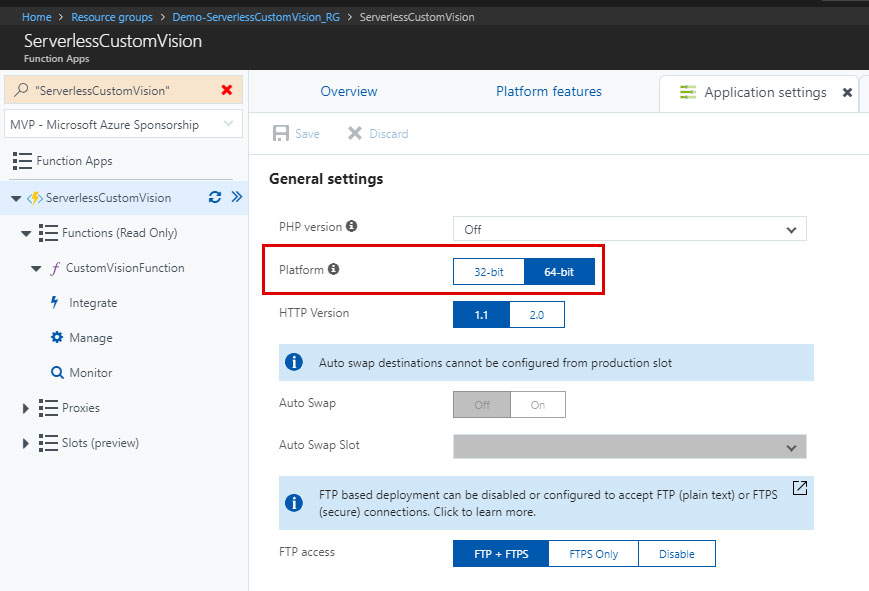
- Setup your Azure Function to x64 in "Application Settings"
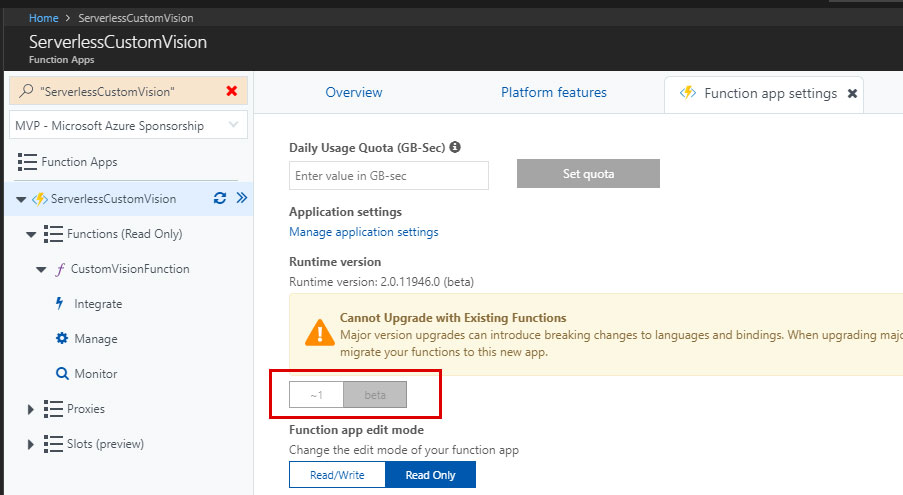
- Set your framework to 'beta' in "Function App Settings"
- Under "Application Settings" add your connectionstrings and other settings from the "local.settings.json"
- Don't right click and publish but use some source control ;)
Source code on Github
You can find the sample code with a trained model and a few control images on my Github.
Any thoughts or suggestions please let me know in the comments or tweet me.