Online meetups with OBS and Skype
In a previous blog I talked about how you can stream your meetup from a physical location. But now that we live in a time where meetups cannot take place physically, we need to move our meetups online.
There are lots of ways of doing it. Definitely the easiest ways are to setup a live teams meeting or a zoom meeting. But if you want to have the same control over your layout as you do when streaming your meetup live this blog is for you.
Let's first talk about how to run a regular online meetup, with a regular online meetup I mean you have one host, that introduces the speakers, handles questions and two or three speakers.
We dive in running a conference online a bit later, when the Global AI Community On virtual tour is done.
Streaming location
This is the first thing you have to think about. Can you stream from your home in full HD 30 frames per second? Does your internet provider likes that, do you have wired in your house or wireless. Trust me, lots of things can go break when streaming from your home. To avoid all this hassle setup a virtual machine in the cloud. Yes a VM with enough specs can be expensive if you look at the price per month, but remember you only stream for a few hours. A decent VM with a GPU costs around 1 / 2 euro a hour, just don't forget to shut it down when your are done.
If you are using a Windows 10 VM with a GPU, don't forget to install the GPU drivers
Step 1
Create a Virtual Machine in the cloud, running Windows 10.
Streaming software
Now that we have a machine to run our streaming software on, we need to to install the software that will enable us to stream to an online platform. My pick is OBS (Open Broadcaster Software). There are multiple versions available. There is StreamLabs OBS and there is an opensource version OBS Studio. At the time of writing you have to pick the opensource OBS Studio, because later we are use a plugins that only work correctly in OBS Studio.
Step 2
Download and install OBS Studio in your VM.
Connection with your host and speakers
To connect with our host and speakers we are going to use Skype for Windows. Not Skype for Business, not Skype for Windows 10. You need Skype for Windows. In this version of Skype you can enable NDI. NDI gives you the ability to access the individual video streams in OBS Studio. To avoid a lot of hassle with creating / editing scenes all the time in OBS I have create 4 Skype accounts that I hand out to people to dial in.
Step 3
- Download and install Skype
- Enable NDI support in Skype. (Settings > Calling > Advanced > Allow NDI usage)
- Create 4 Skype accounts. (obsstudio/host1/presenter1/presenter2)
Enable NDI Support in OBS
To get access to all the individual video feeds from Skype in OBS you must install the NDI Plugin for OBS.
Step 4
Download and install NDI support for OBS
- Download and install the NDI 4.0+ Runtime
- Download and install the latest: obs-ndi-X.X.X-Windows-Installer.exe
- Reboot your VM
Setup OBS
In OBS you can create scenes, this are the screens you can switch between during your live events. You need at least some things like this.
Scenes
- Welcome with countdown
- Host 1 & Presenter 1
- Presenter 1 (Video + Screen)
- Host 1 & Presenter 2
- Presenter 2 (Video + Screen)
- No broadcast
Step 5
Now let’s get the Skype videos streams in OBS.
- Start Skype for Windows on the VM and create a meeting.
- Get 2 other laptops to join the call using the Host 1 and Presenter 1 account.
- In OBS Studio > Click the + button under sources > Select NDI Source > Select the Skype video stream
- When you have the source in your scene, you want to make sure you transform it the right way. Read this Skype FAQ
Tip: At the time of writing you get all the video feeds as a different NDI stream. This is not the case for the audio, every NDI source gets all the audio from the conversation. So, make sure per scene you only have one audio source active.
Broadcast!
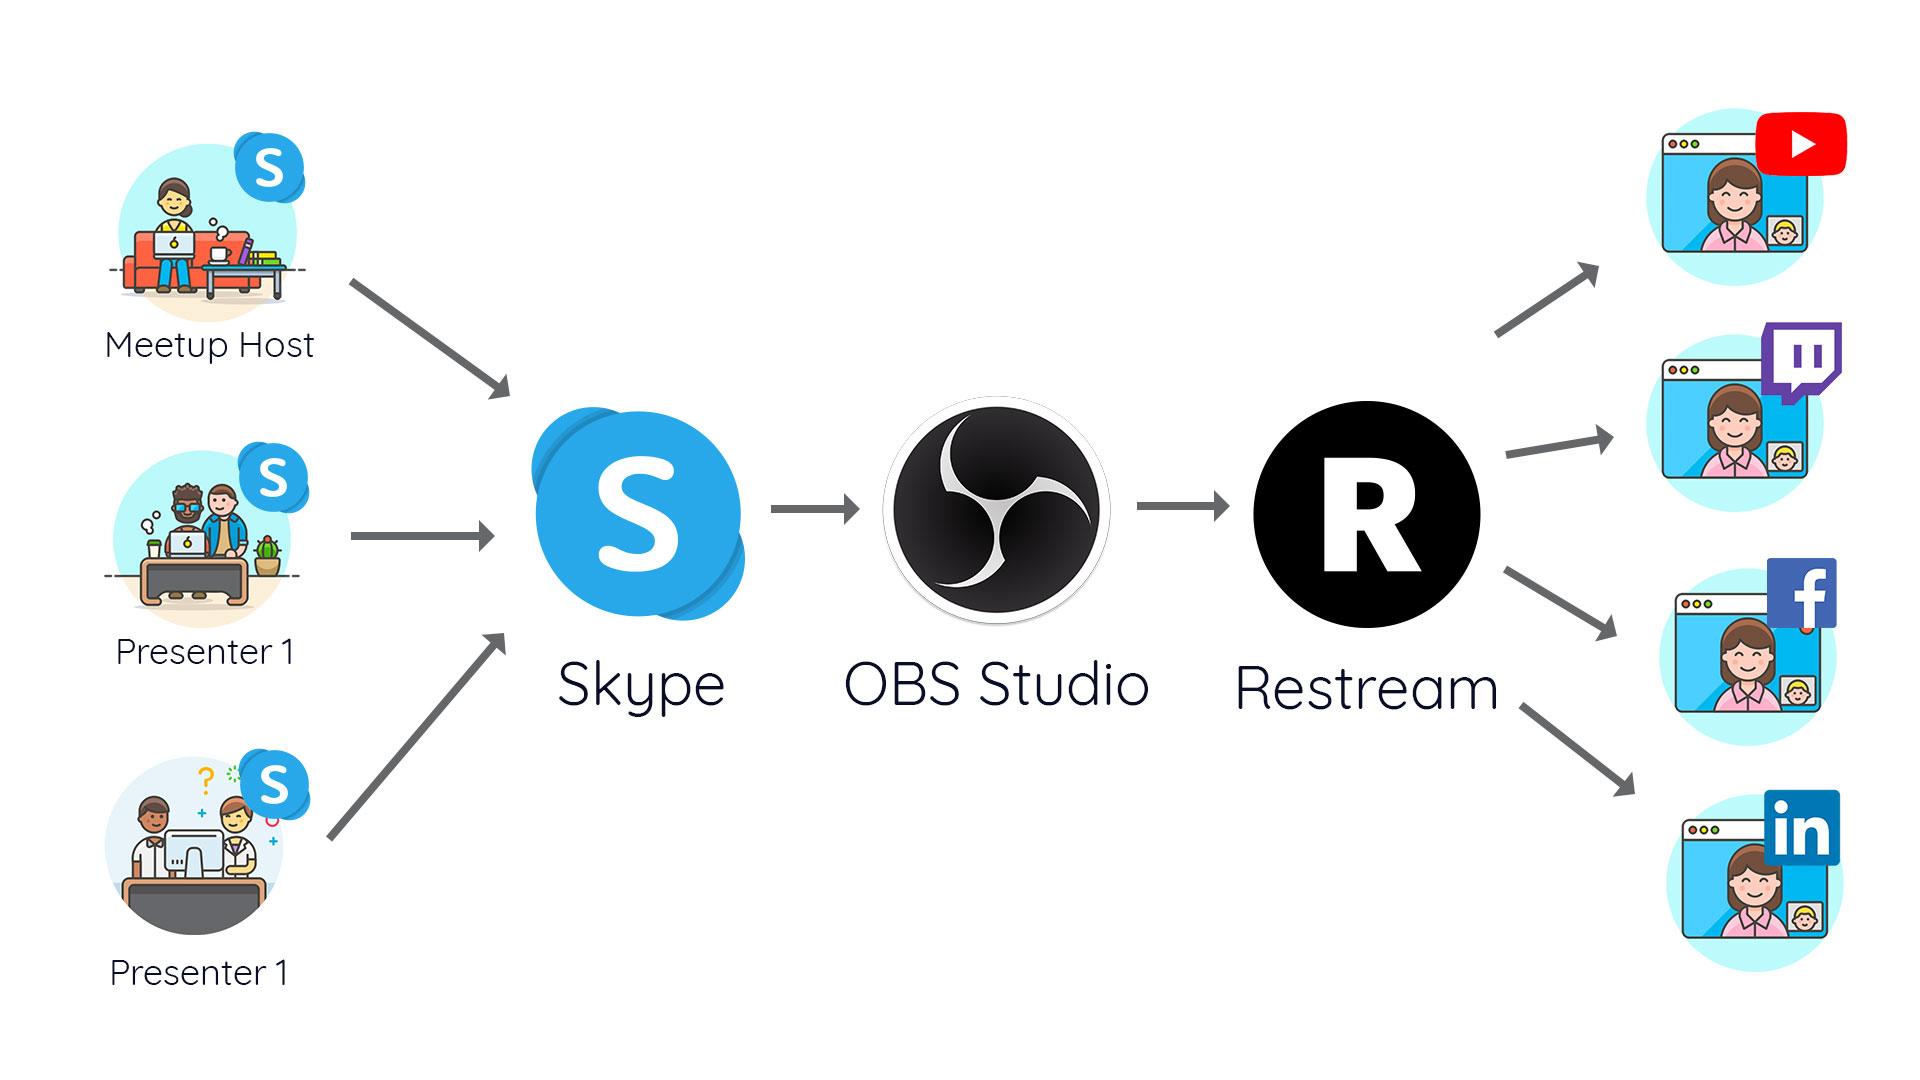
Everything is now ready to start broadcasting. You can do this directly from OBS to multiple channels, but you can also add a 3th party service like Restream in between, meaning that OBS Studio sends the stream to Restream and from there your video is broadcast-ed to many different platforms.
Summarize
- Get a Virtual Machine in the cloud to be sure of a stable Internet connection.
- Install OBS Studio
- Install the OBS NDI plugin
- Install Skype for Windows
- Create accounts for your host and speakers
- Create your scenes in OBS
- Setup ReStream for multi platform streaming
I hope this was helpful to get you started with streaming your user group meeting, without leaving your home. If you have any add-ons or other tips let me know!