Microsoft Machine Learning Studio 101 - A used car price predictor
I have been playing around with Microsoft Cognitive services for some time now, seeing what they are capable of and how easy it is to use them in your applications is stunning. But what is underneath these API's, how can I train my own model and make it available through an API?
In this blog there is a tutorial on how to create your own Trainend Machine Learning Model and expose it trough an API with the help of Microsoft Machine Learning studio.
What are we solving?
In this example I'm going to train a model that can predict the price for a second hand car based on brand, model, year of build, fuel type and gearbox.
Download dataset
The start of every machine learning project is gathering data and cleaning this up. A great resource for datasets is the website Kaggle
I have downloaded the dataset Used Cars Database and cleaned it for easier use. From the dataset I have removed some colums and removed the rows with empty values.
Download my cleaned dataset here.
Microsoft Machine Learning Studio
For the training of the model I'm using Microsoft Machine Learning Studio. With a lot of presets and available algorithems you can create a model just by dragging a few steps on the canvas and hit train.
You can access it through this url https://studio.azureml.net/, sign in with any Microsoft account and use a free Workspace. When you are all setup you should see the screen below.

Upload your dataset
First thing todo is import your dataset in Machine Learning Studio. In the left menu click on datasets and then add a dataset by clicking new in the bottom left.
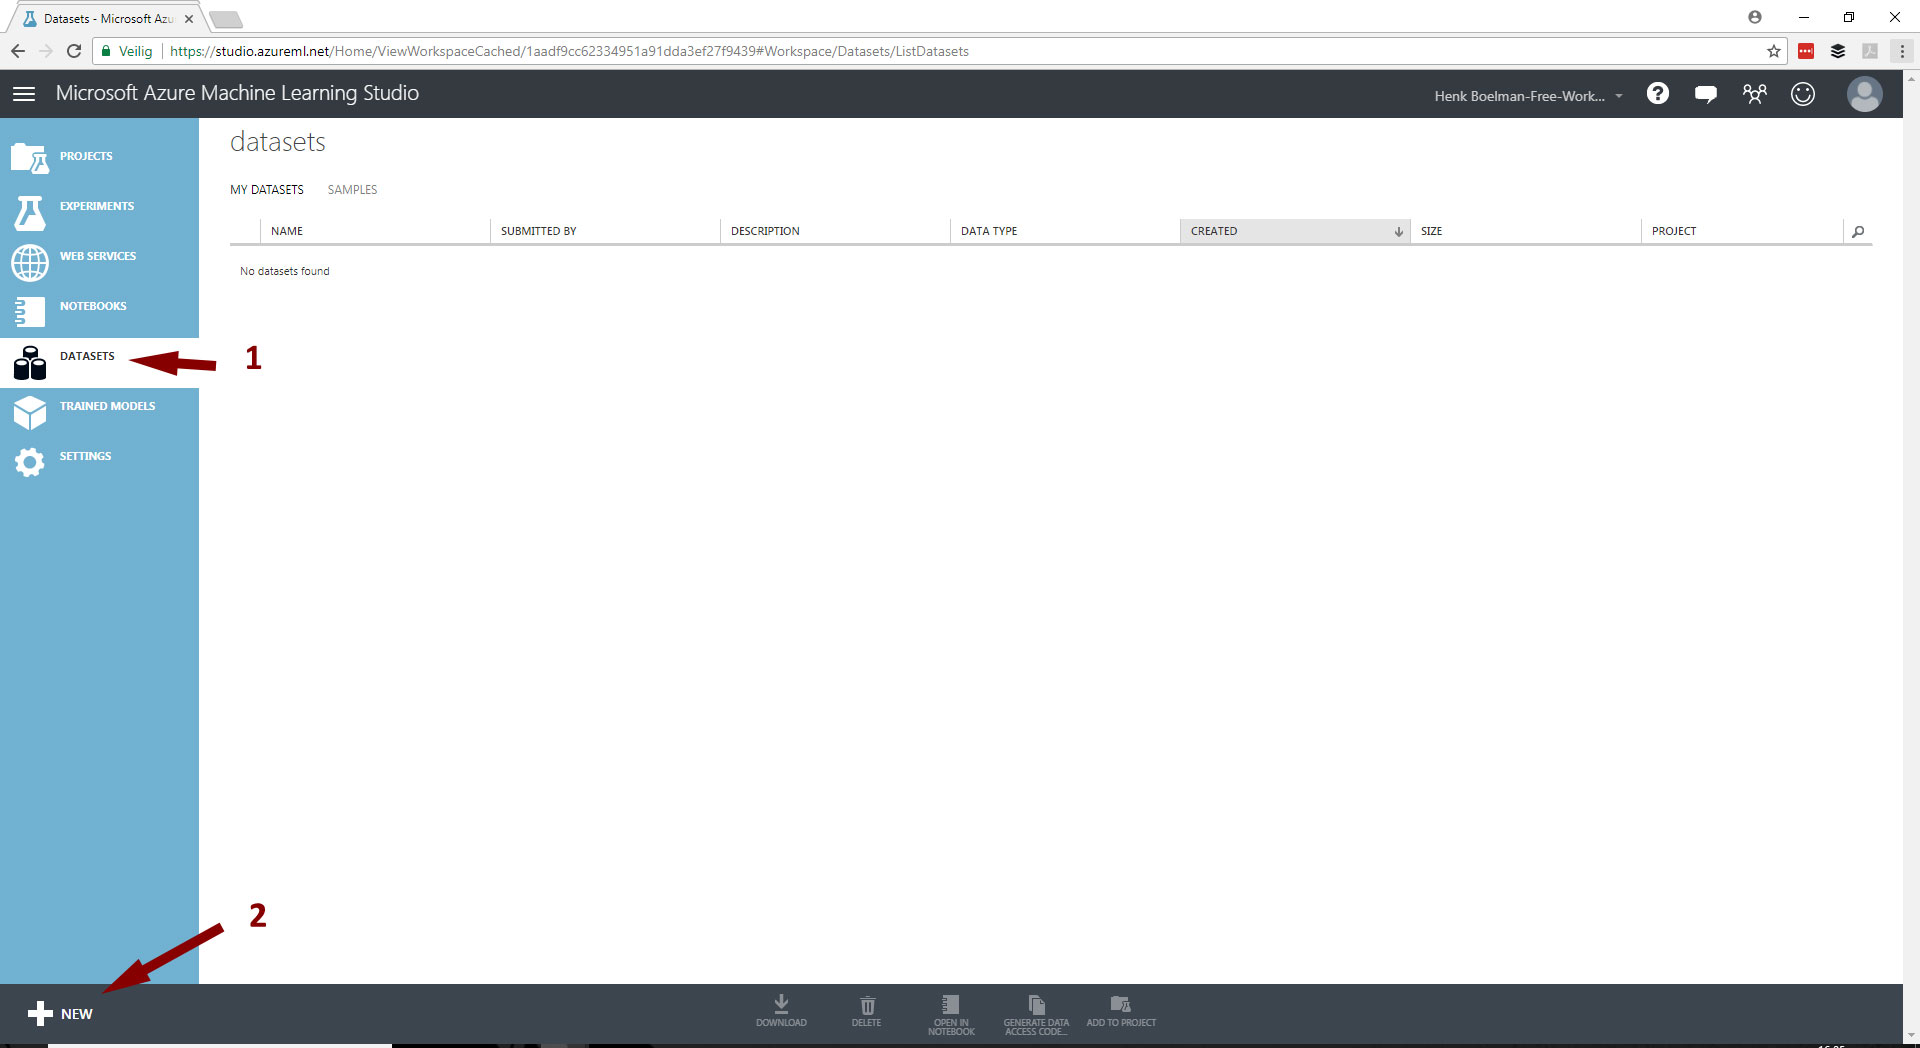
Next click From local file and select the clean dataset. Select Generic CSV file with a header (.csv) as type for the dataset. Click the submit checkbox in the bottom right corner to upload.

First step is done, you have uploaded a dataset that is going to be used to train and test your model.
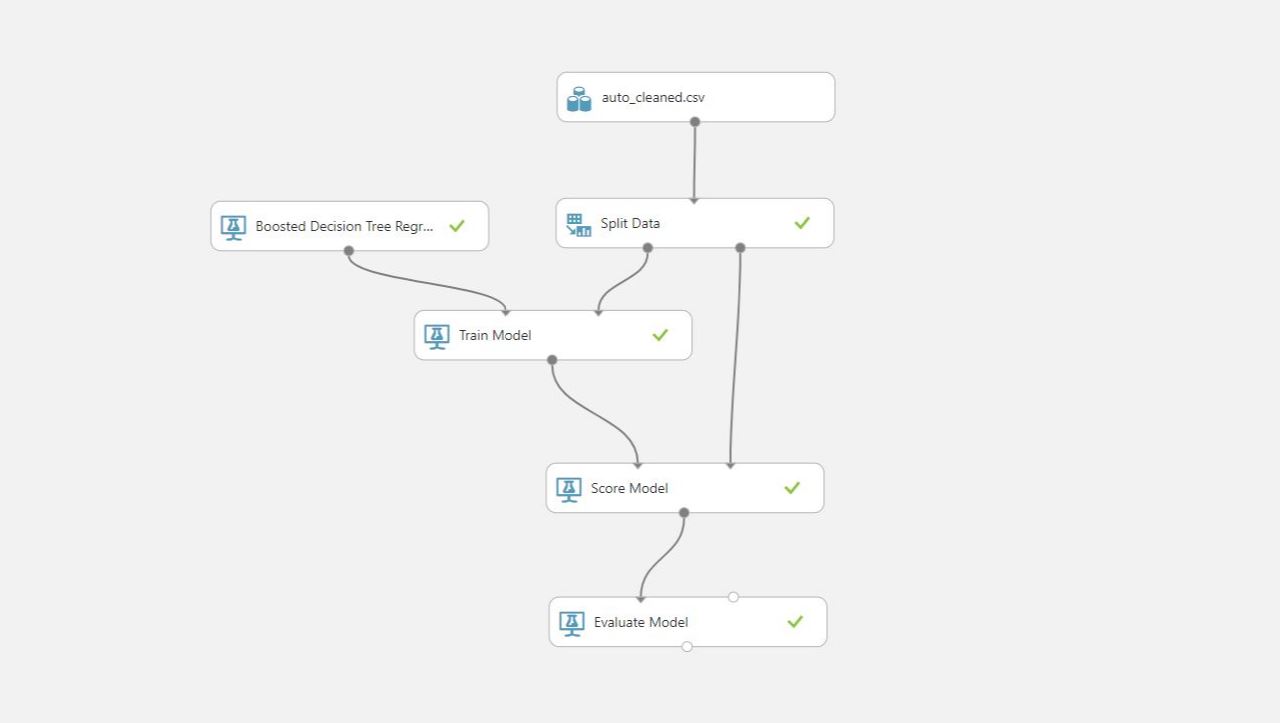
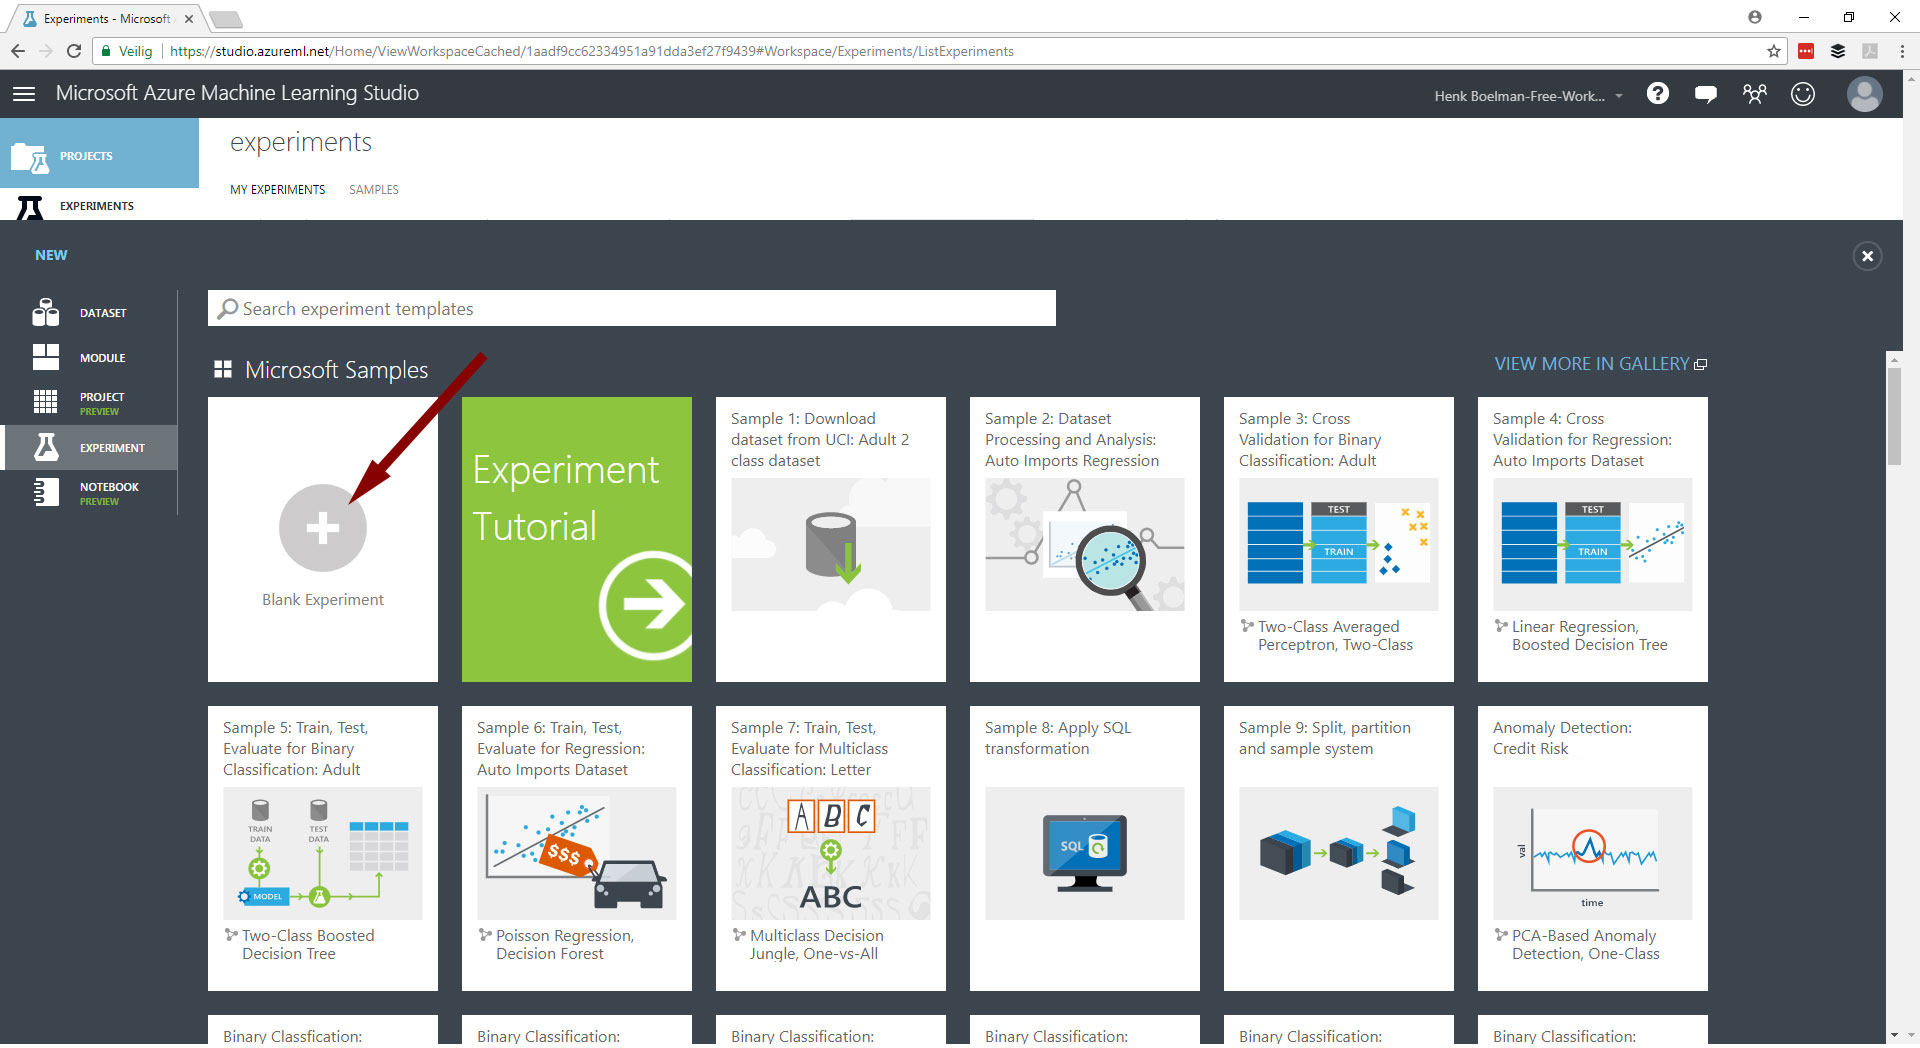
Create the model
This is the place where we are going to train our model. In the left menu click on Experiments and then create a new experiment by click the new button in the bottom left corner. When the menu opens choose for "blank experiment".
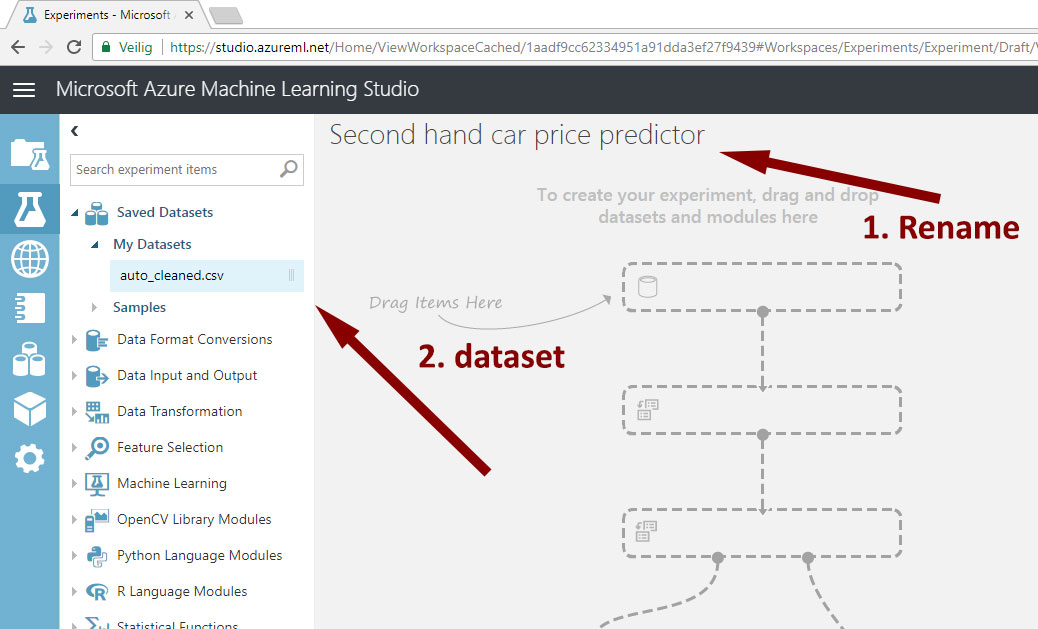
After the experiment is created you can rename it to a nicer name.
1. Select your dataset
Every experiment starts with a dataset, in this case the car data uploaded in the previous step. In the left open Saved Datasets > My Datasets and drag the auto_cleaned.csv to the experiment.

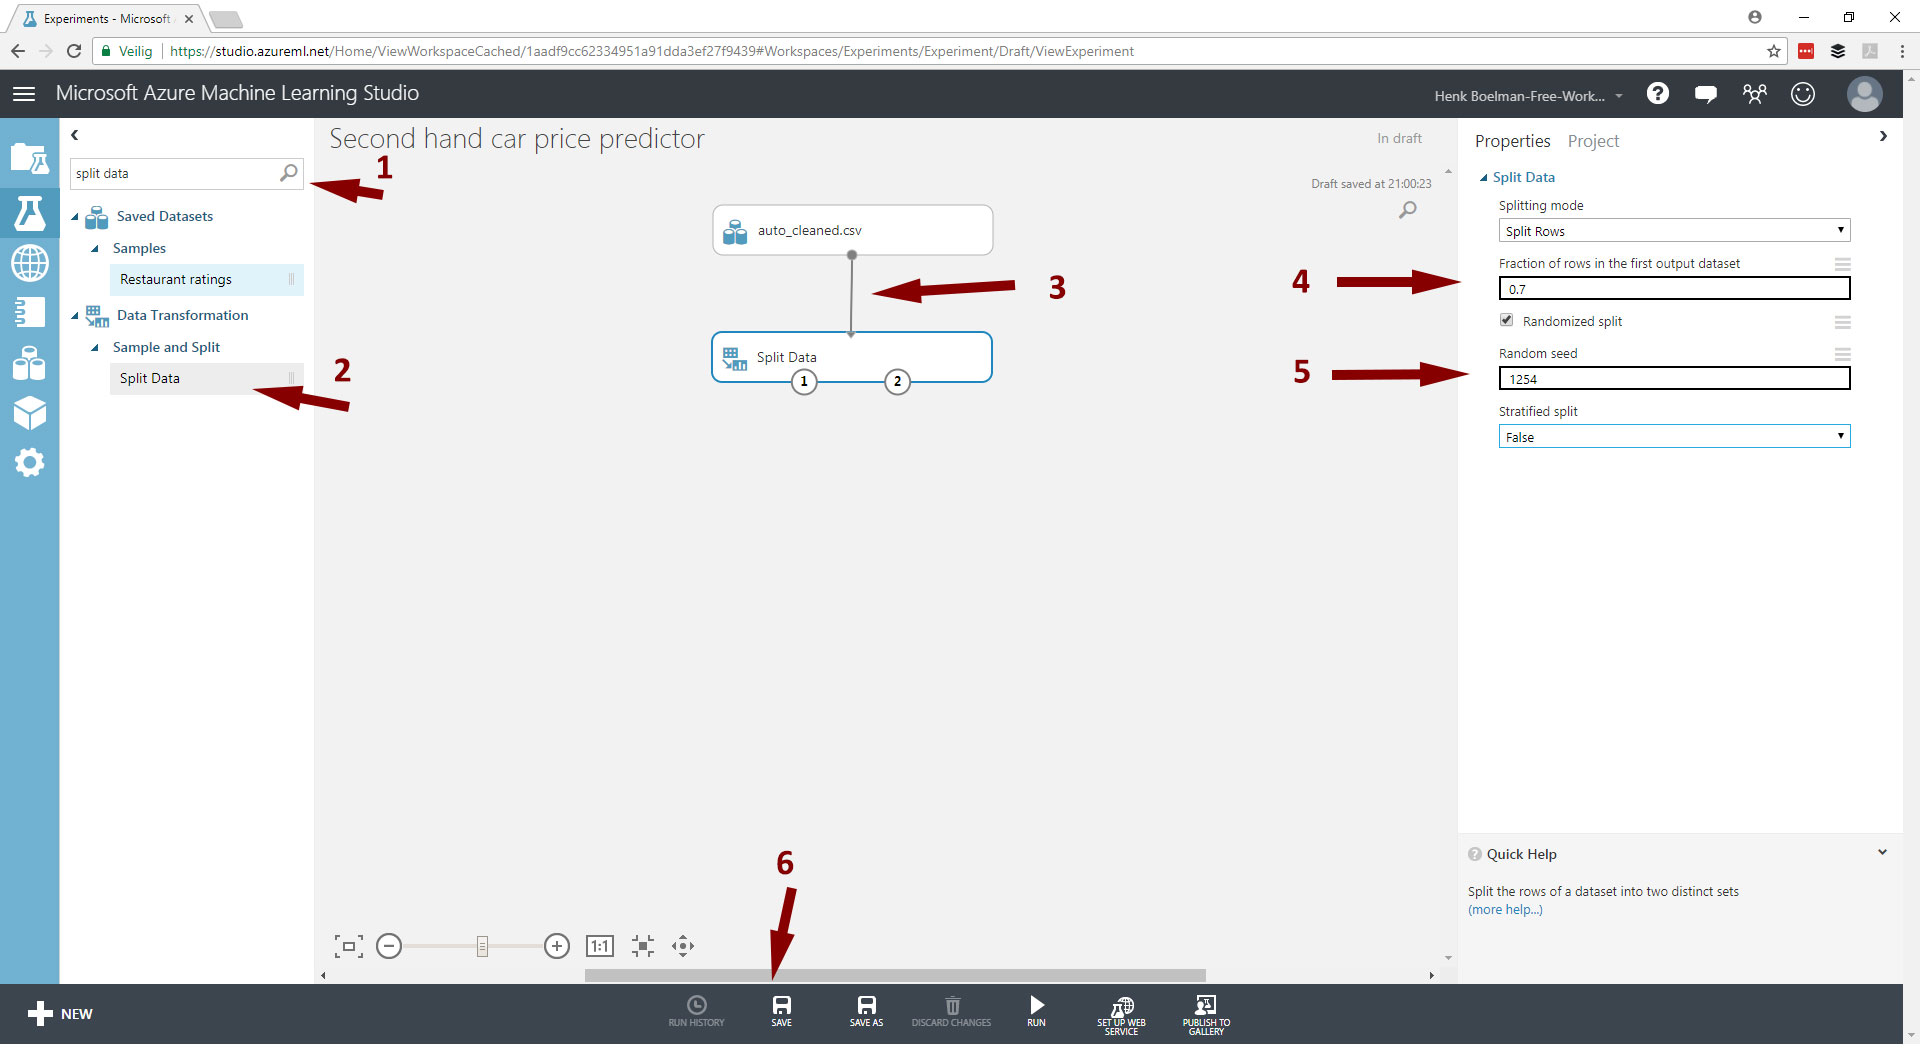
2. Split the data
Now that we have data we have to split it into trainings-set and a validation-set. The most common approach for this is to use 70% of the data for training and 30% for validation.
- In the search box search for: split data
- Drag the split data step to the screen.
- From the first step drag a line to the split data step.
- Click on the split data step and adjust the value at Fraction of rows in the first output dataset from 0.5 to 0.7. This indicates that the set will be devided in 70% and 30%.
- At the field Random seed put a random number.
- Click save at the bottom.
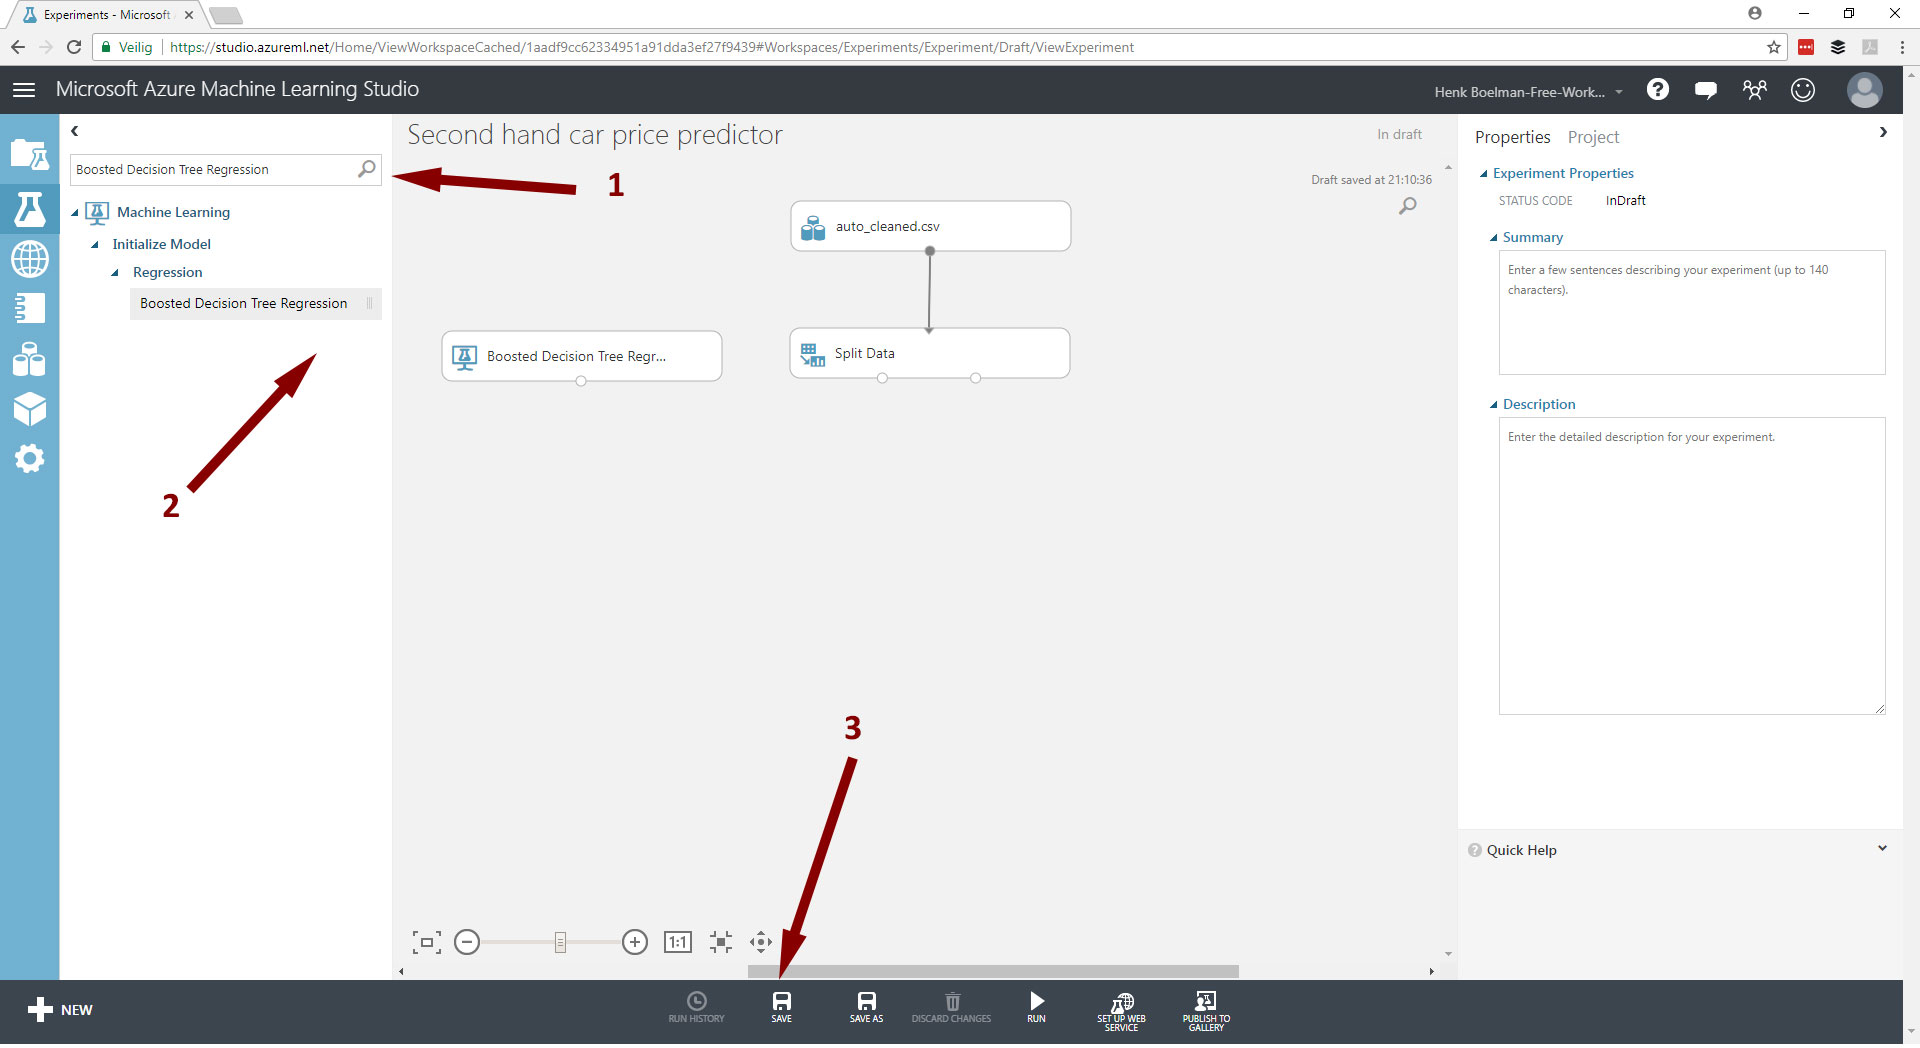
3. Add an algorithm
For this case I choosen the Boosted decision tree regression algorithm.
Boosting means that each tree is dependent on prior trees. The algorithm learns by fitting the residual of the trees that preceded it. Thus, boosting in a decision tree ensemble tends to improve accuracy with some small risk of less coverage.
This regression method is a supervised learning method, and therefore requires a labeled dataset. The label column must contain numerical values.
More about this algorithm you can read here.
- In the search box search for: Boosted Decision Tree Regression
- Drag it next to the split data step.
- Click save at the bottom
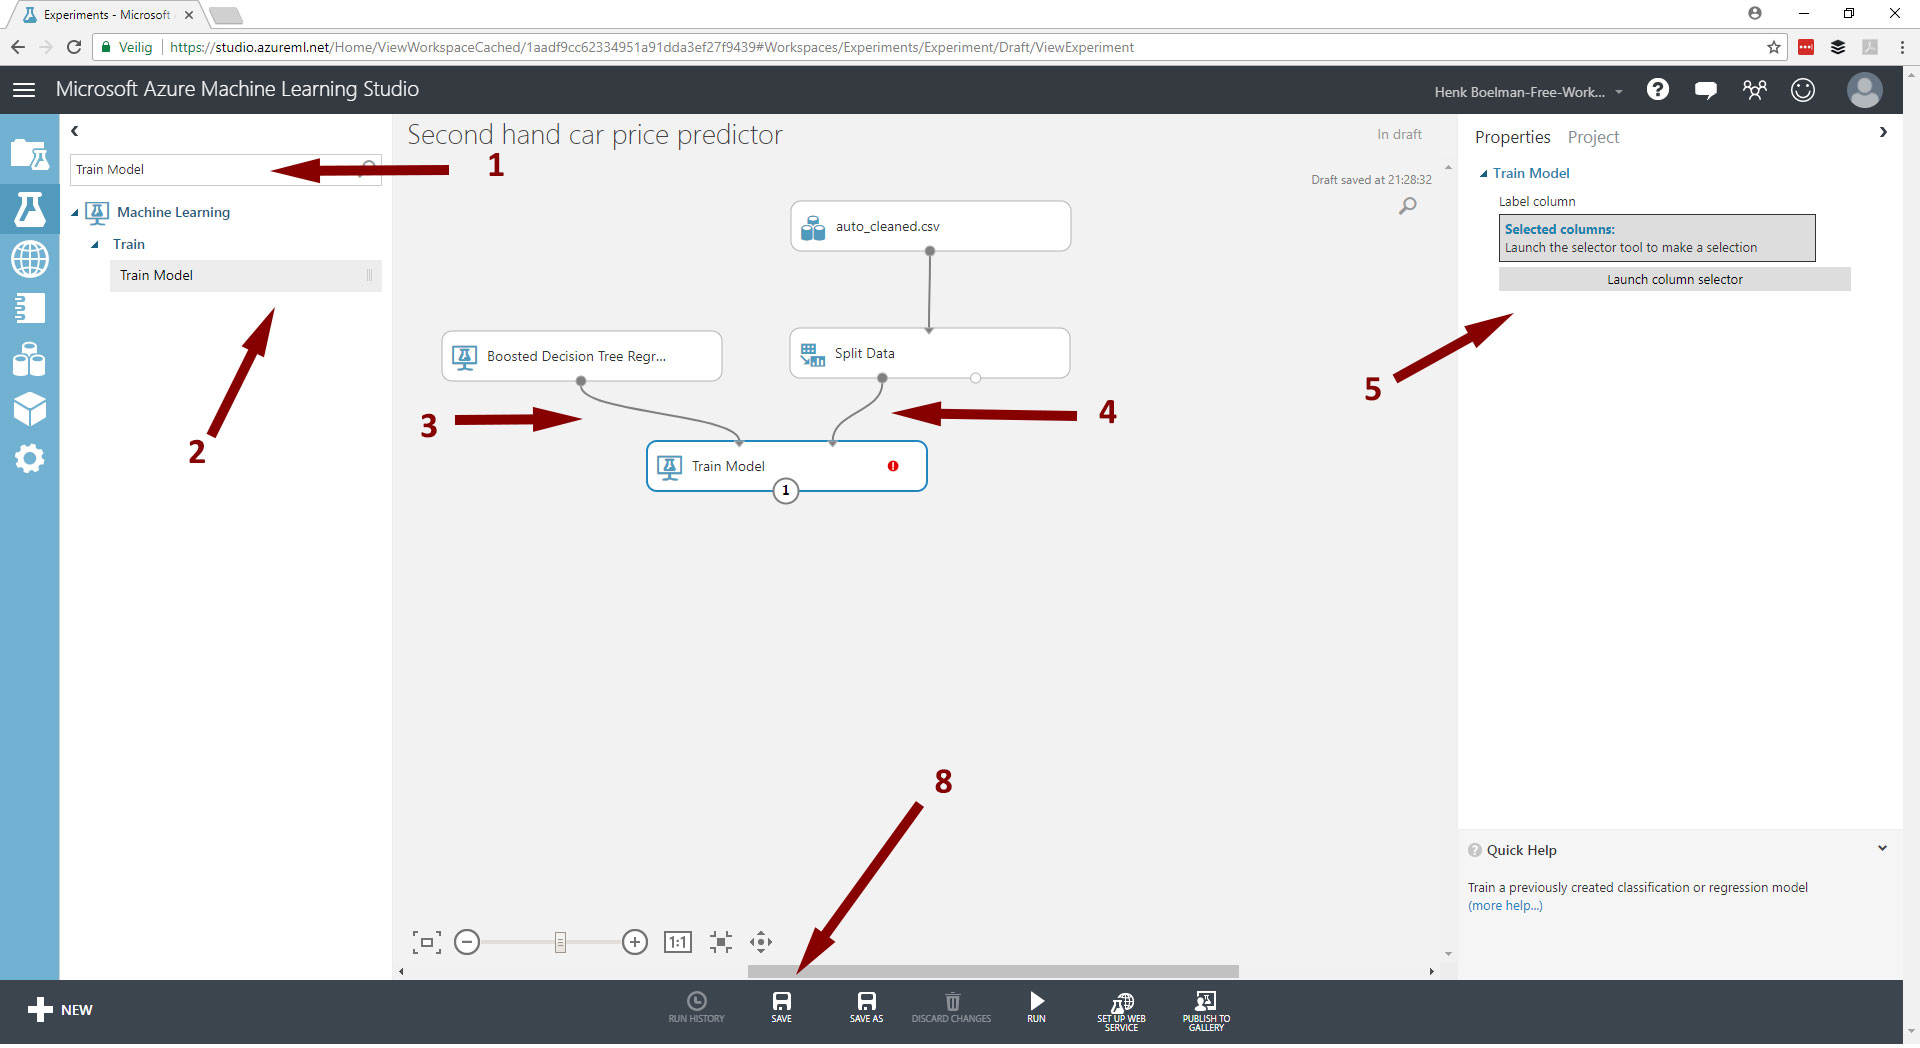
4. Train the model
In this step the actual magic happens.
- In the search box search for: Train Model
- Drag it under the 2 steps
- Drag a line from Boosted Decision Tree Regression step to the Train Model step
- Drag a line from Split Data step to the Train Model step.
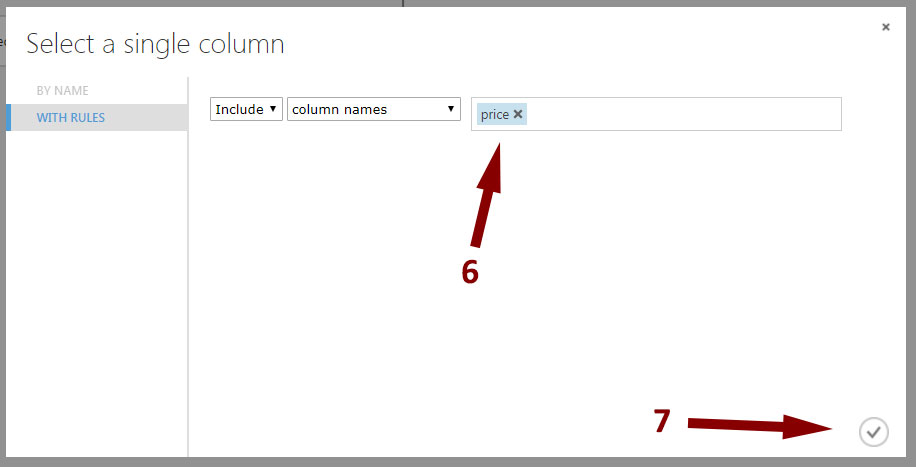
- Click on the Train Model step and click on the right on the "Launch colum selector"
- In the panel that opens select the price field.
- Confirm the selection by clicking on the button in the bottom right.
- Click save at the bottom
5. Score the model
This step scores the predictions for the trained regression model.
- In the search box search for: Score Model
- Drag it under the steps
- Drag a line from Train Model step to the Score Model step.
- Drag a line from Split data step to the Score Model step.
- Click save at the bottom

6. Evaluate the model
The last step to be added is the Evaluate Model. This step evaluates the results of the regression model with standard metrics.
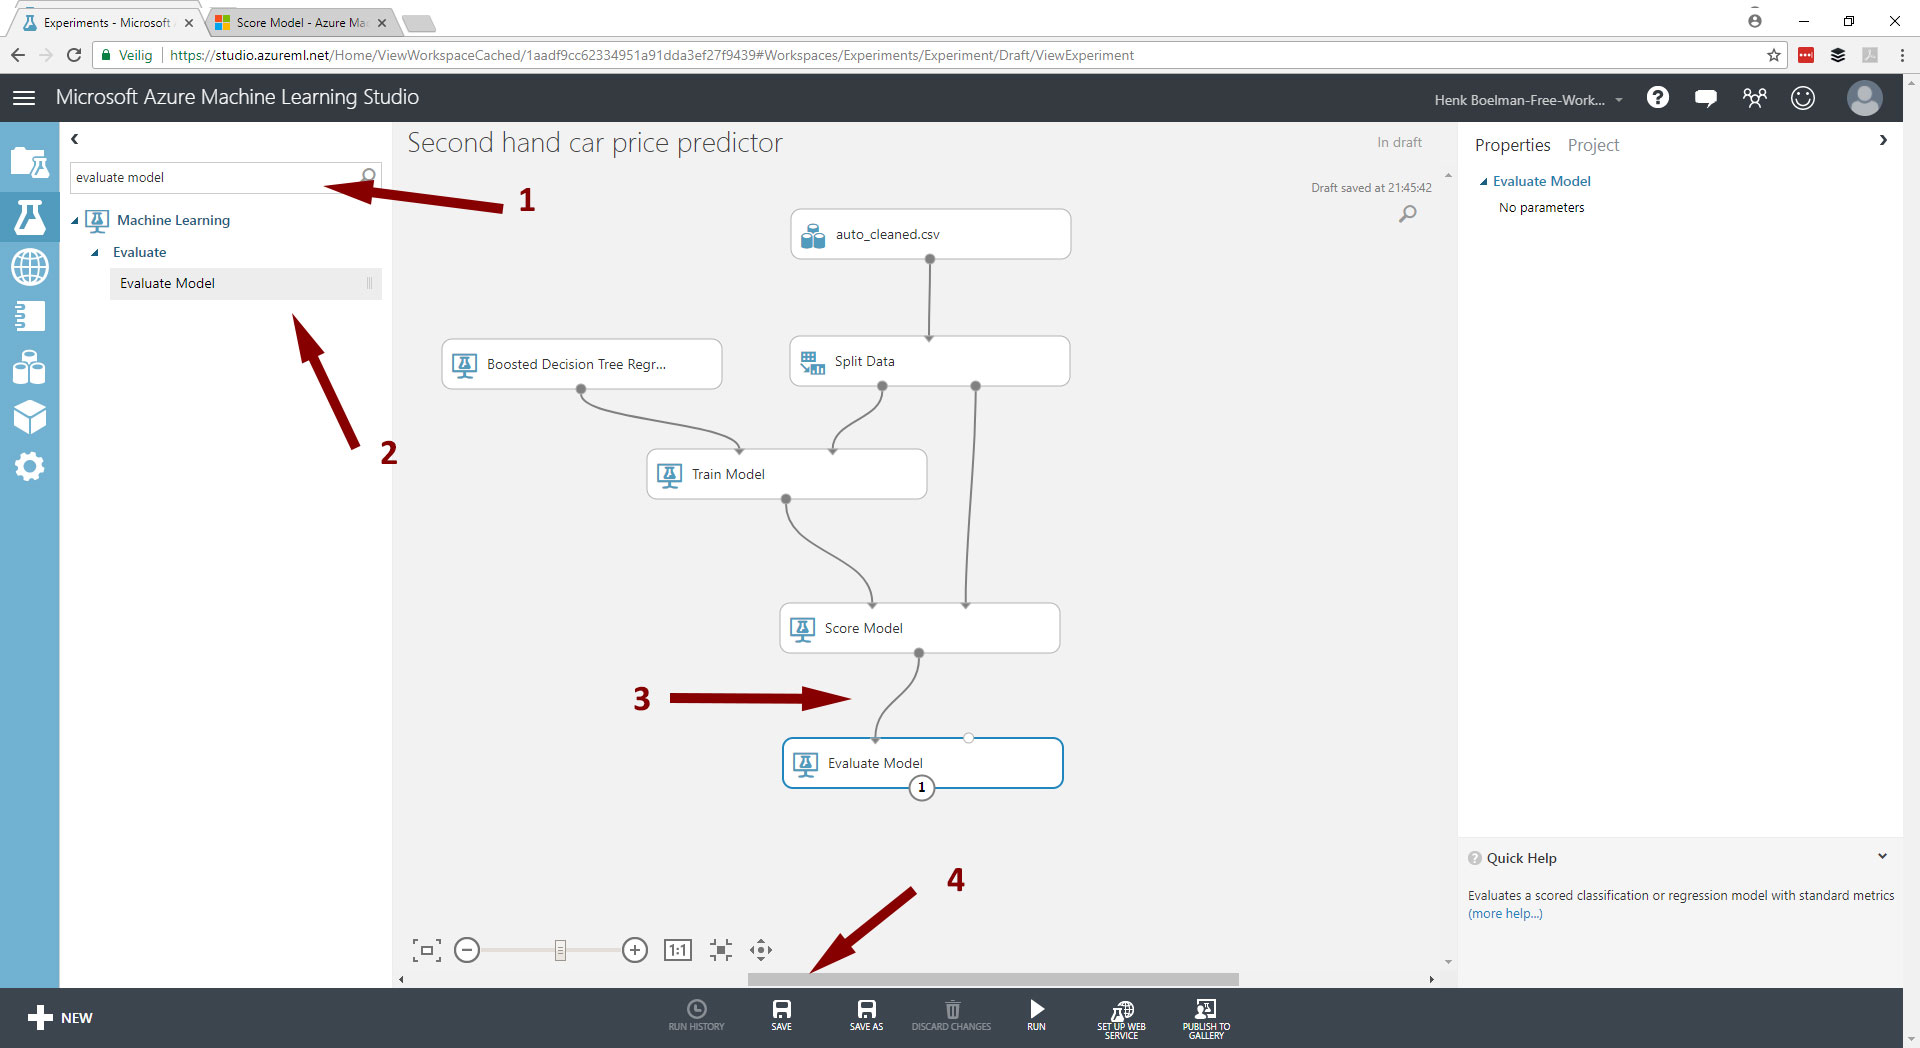
- In the search box search for: Evaluate Model
- Drag it under the steps
- Drag a line from Score Model step to the Evaluate Model step.
- Click save at the bottom
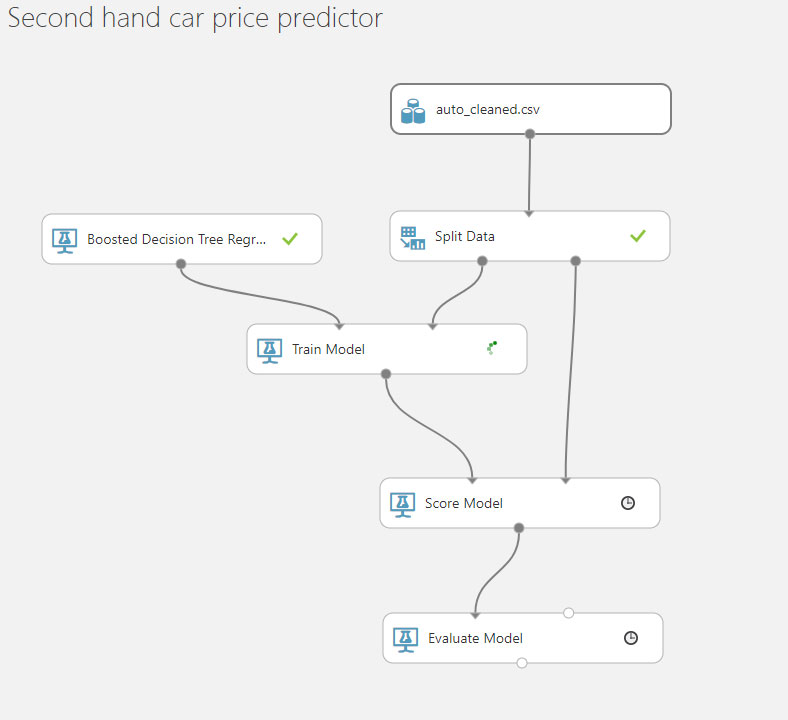
7. Train
The experiment is done and now it is time to see the results. Click in the bottom on the RUN Button.
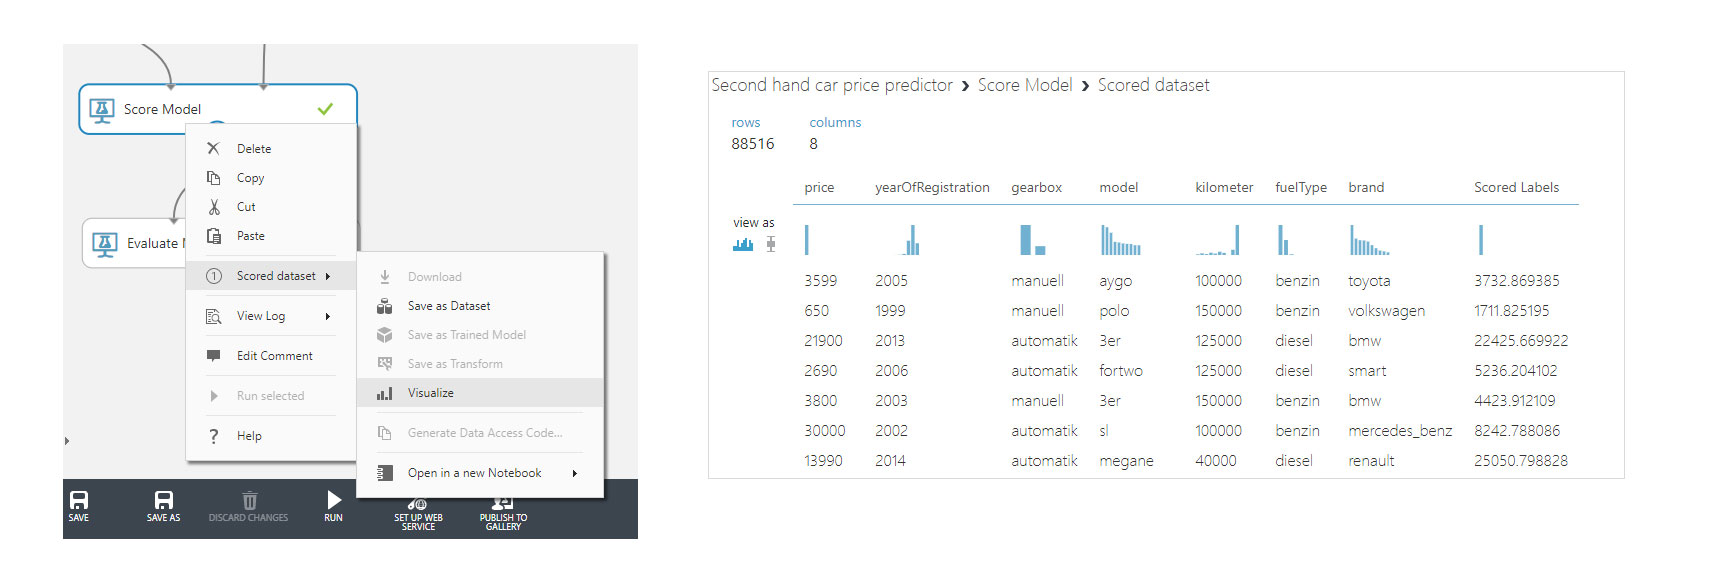
To see the results from the model you can right click on a step and click on visualize.
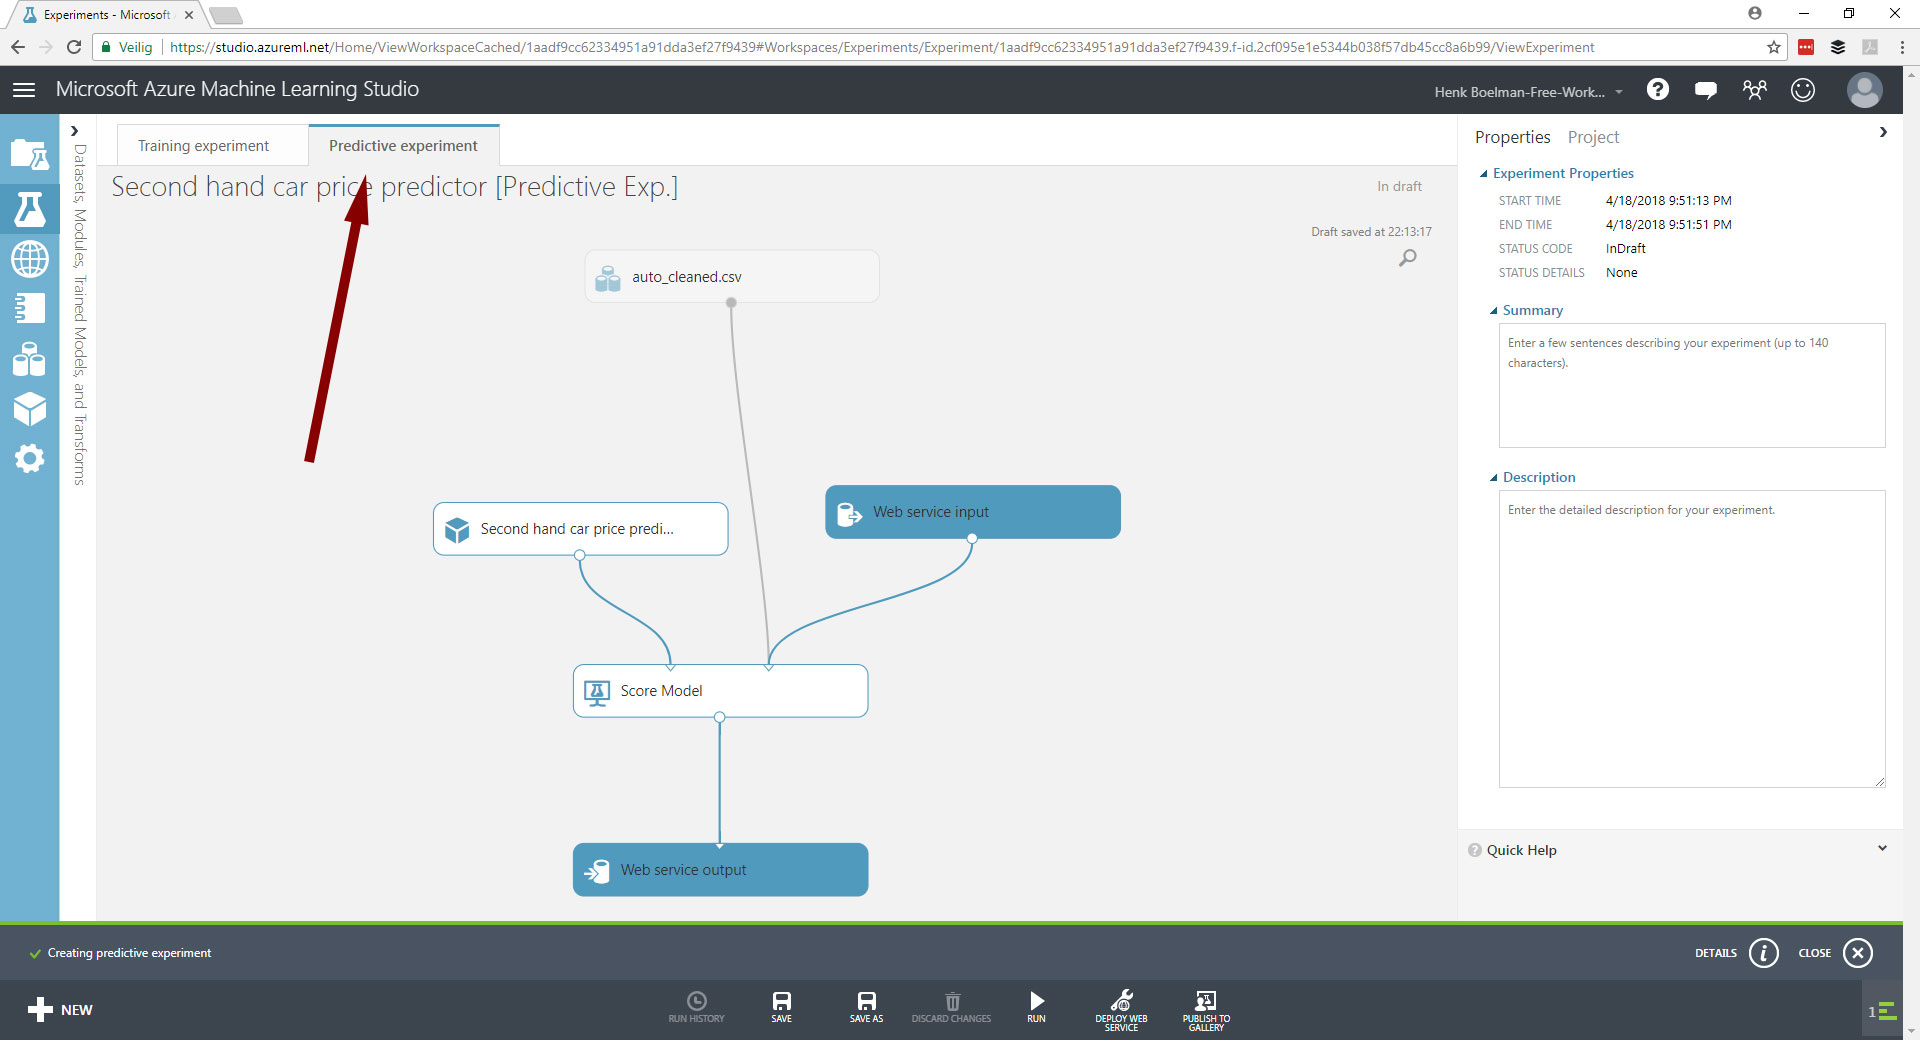
Create the Predictive Web Service
Now the model is trained, we can expose it as a web service. To do this click Setup Web Service and Predictive Web Service.

This takes a little while and you will see some steps moving around on the screen. Notice that you have got now two tabs in the top of the page.
Select Columns in Dataset
To finalize the endpoint the input and output colums need to be specified.
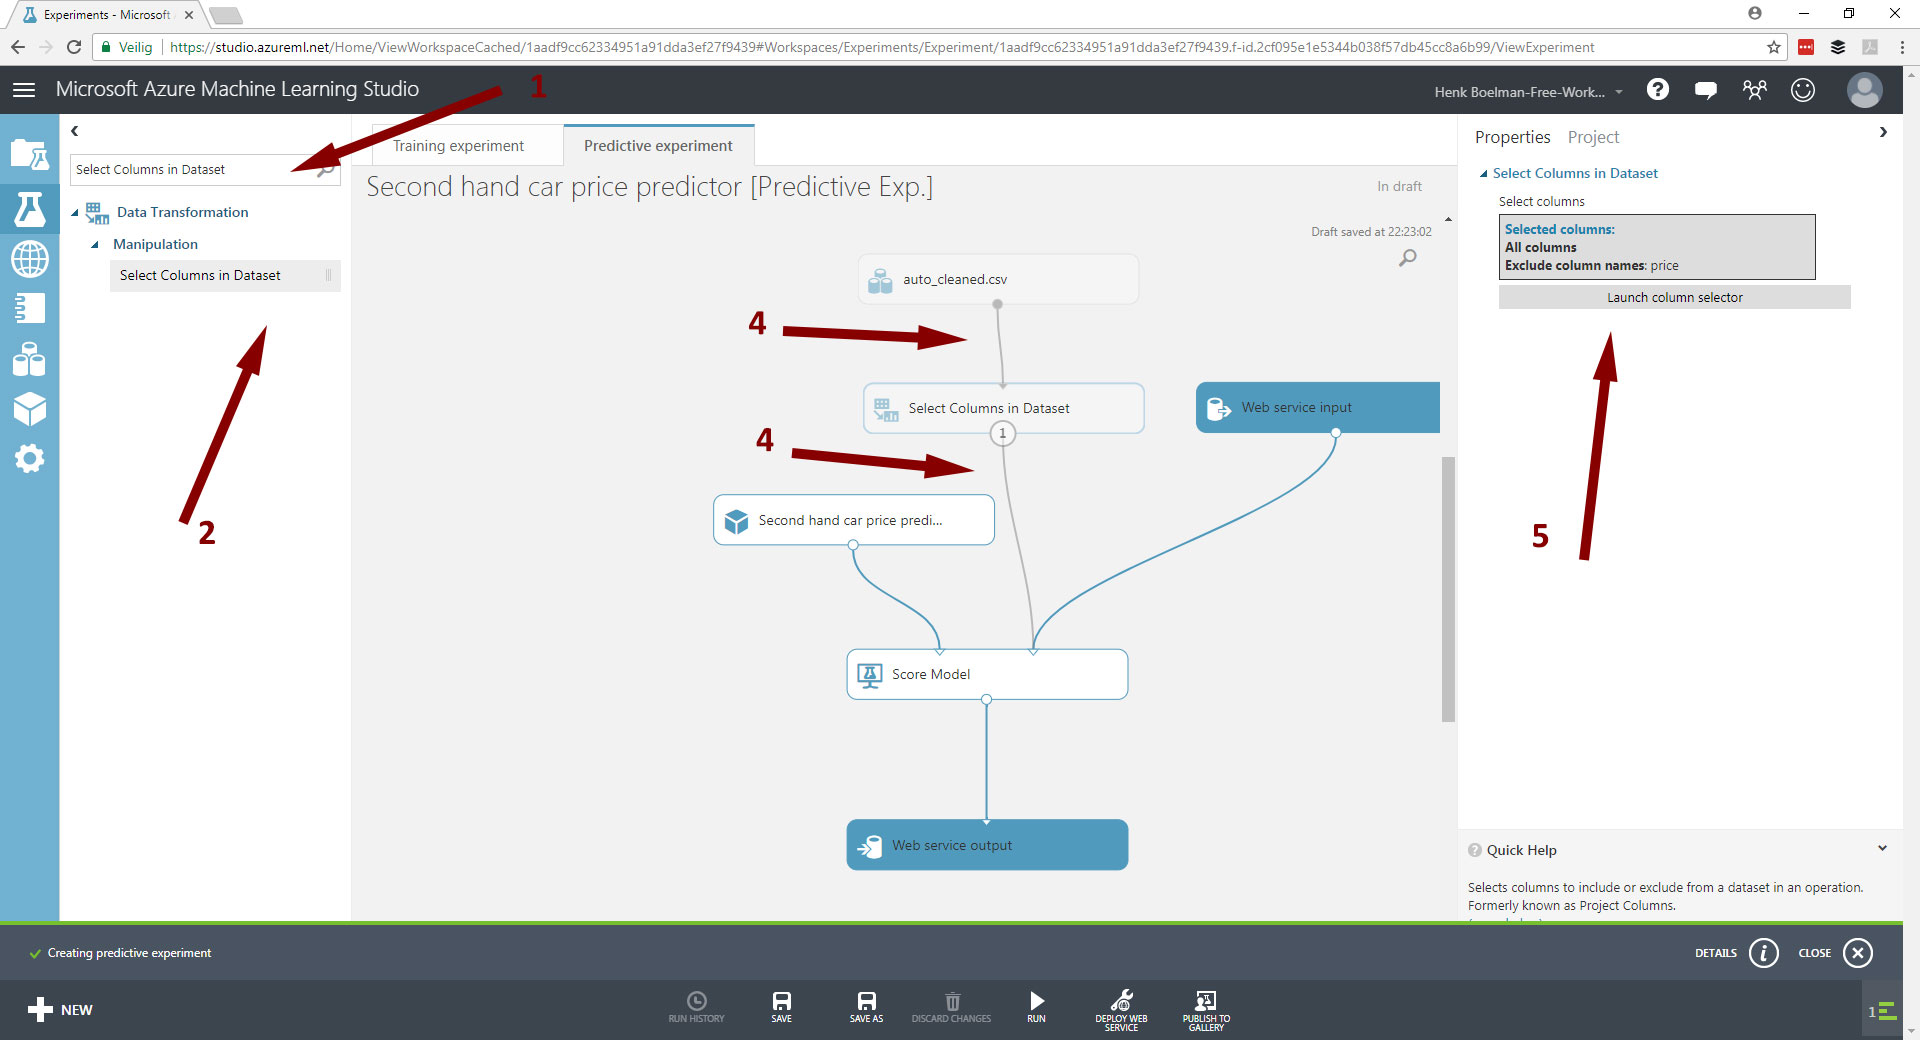
1. Input columns
- In the search box search for: Select Columns in Dataset
- Drag it under the auto_cleaned.csv step
- Delete the line between auto_cleaned.csv and Score Model
- Draw a line from auto_cleaned.csv to Select Columns in Dataset to Score Model
- Click on the Select Columns in Dataset and click on the Launch column selector in the right pane.
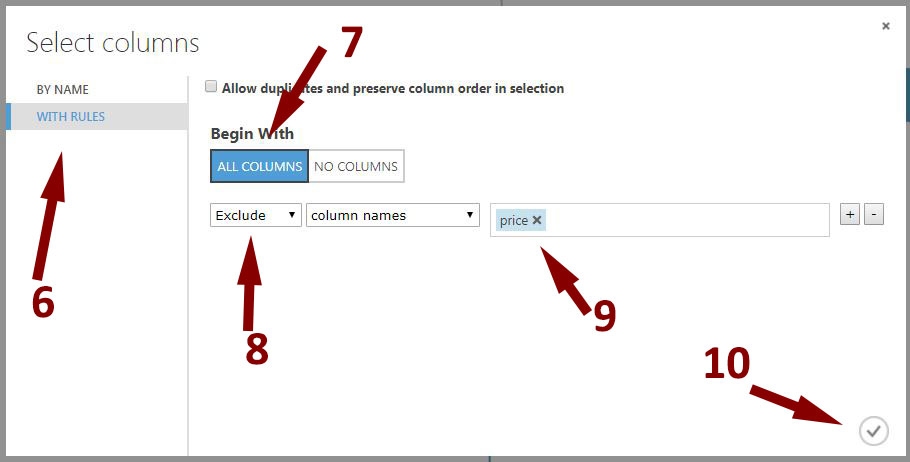
- In the panel click With rules
- Click All Colums
- Select exclude
- Select the price column
- Click the confirm button
- Click save at the bottom
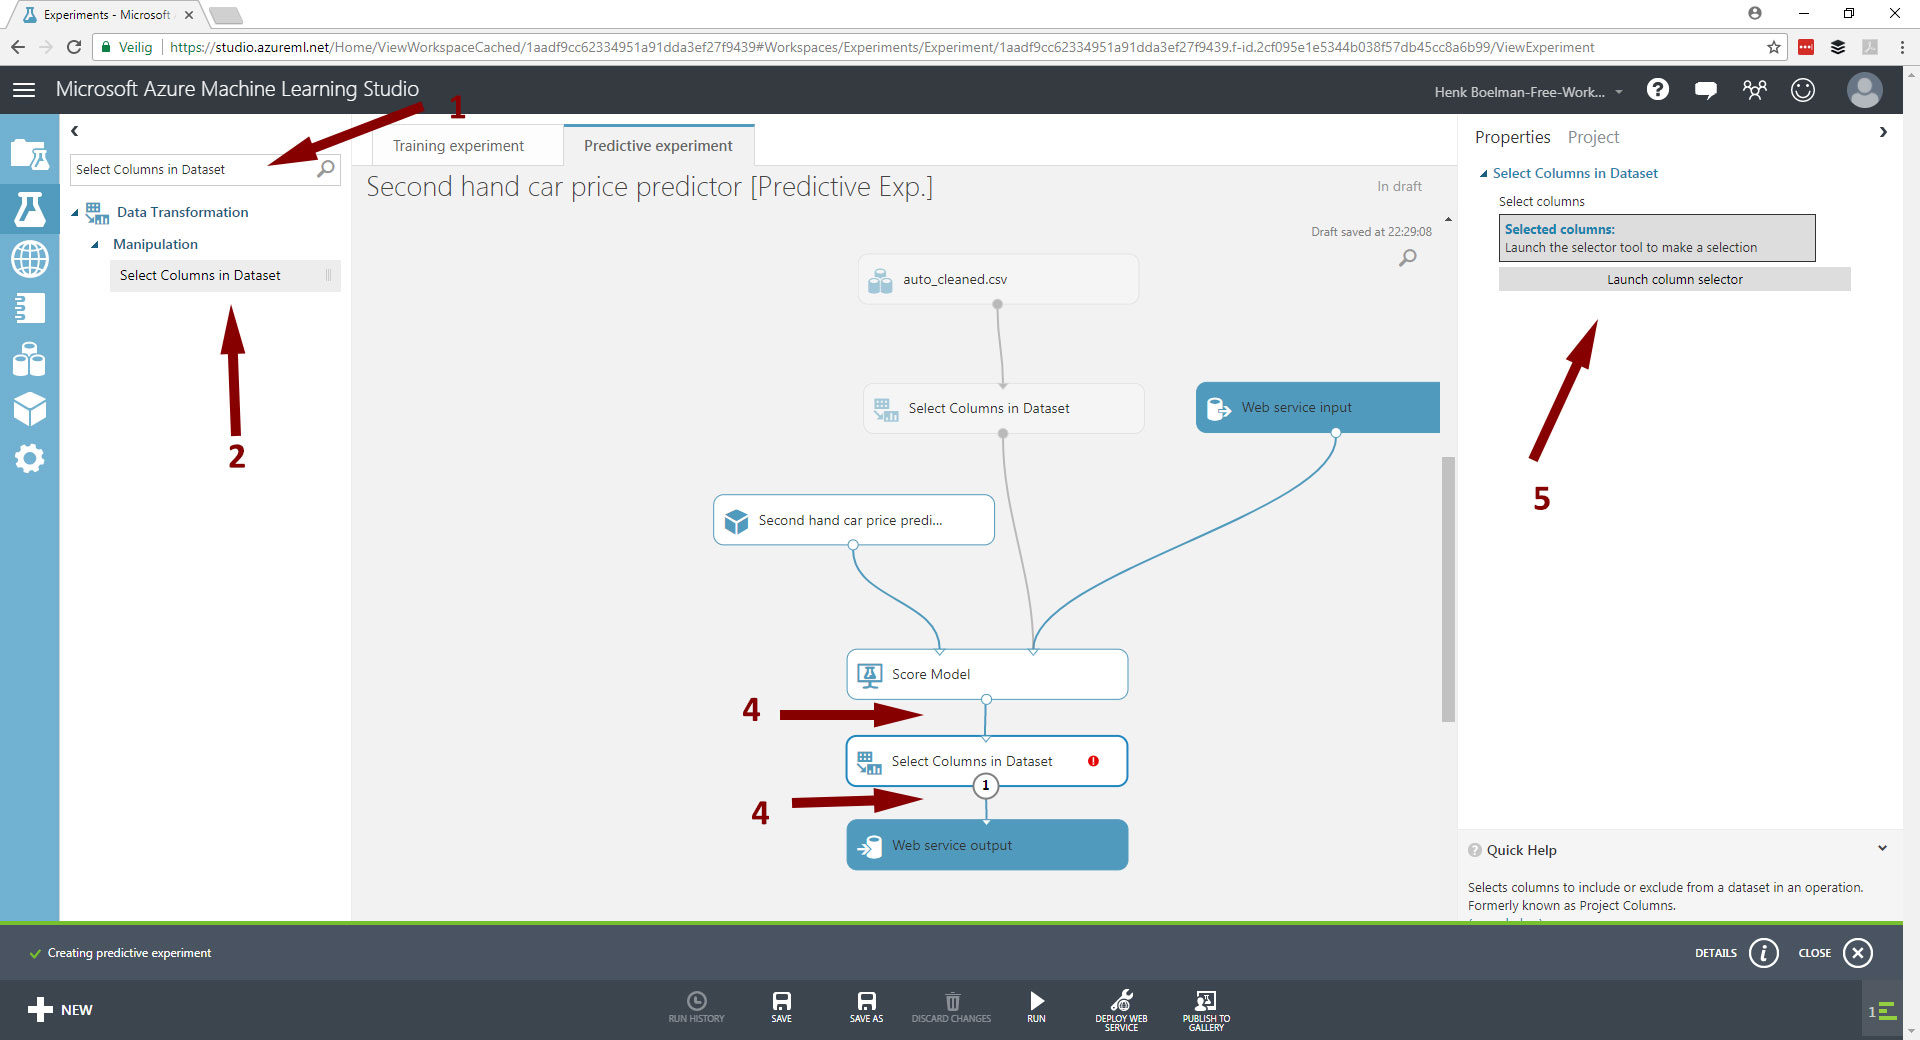
2. Output columns
- In the search box search for: Select Columns in Dataset
- Drag it under the Score Model step
- Delete the line between Score Model and Web service output
- Draw a line from Score Model to Select Columns in Dataset to Web service output
- Click on the Select Columns in Dataset and click on the Launch column selector in the right pane.
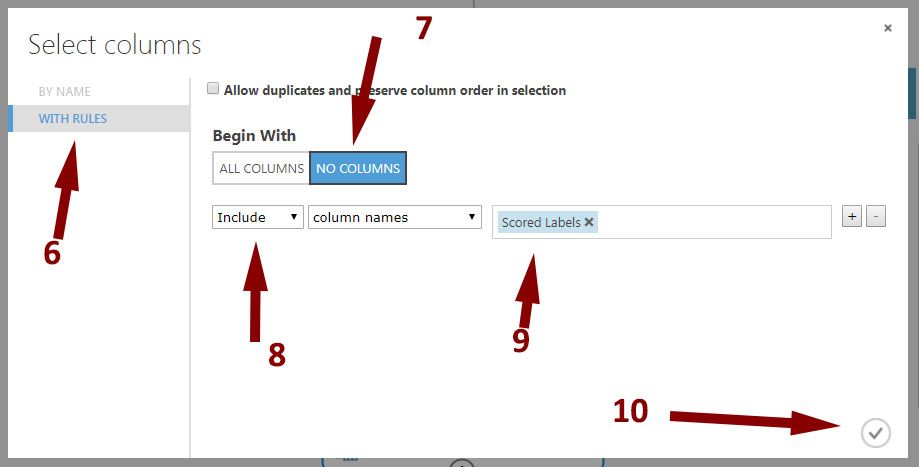
- In the panel click With rules
- Click No Colums
- Select include
- Select the Scored Labels column
- Click the confirm button
- Click save at the bottom
3. Run!
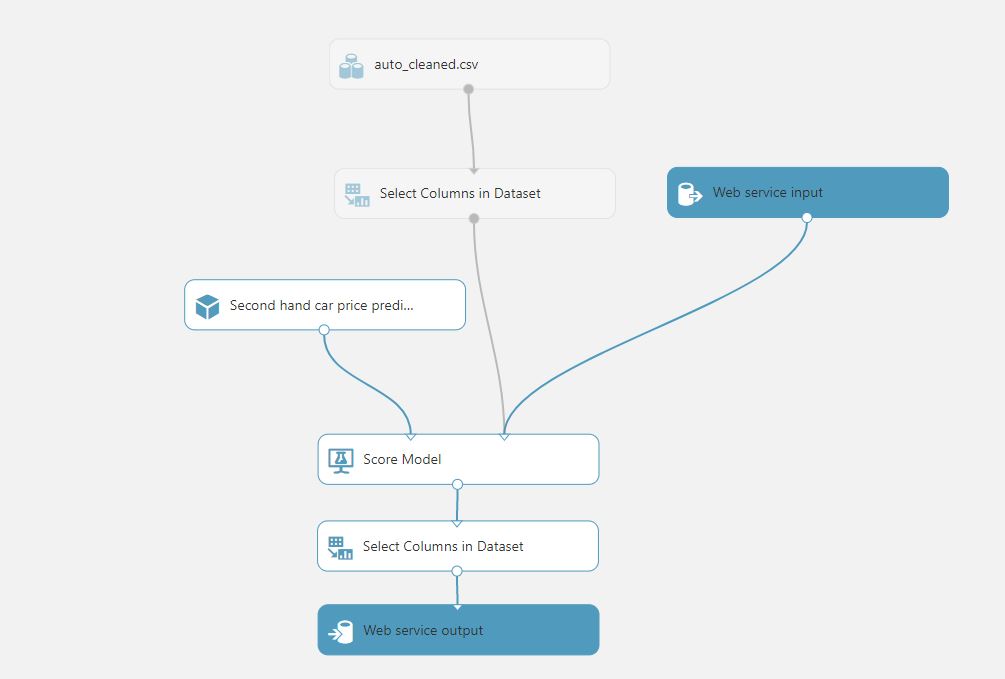
The predictive endpoint now looks like the picture below. To get it working, click Run.
Now it is time to deploy the web service click the bottom Deploy the web service below in the task bar. After a while a new screen opens looking like this:
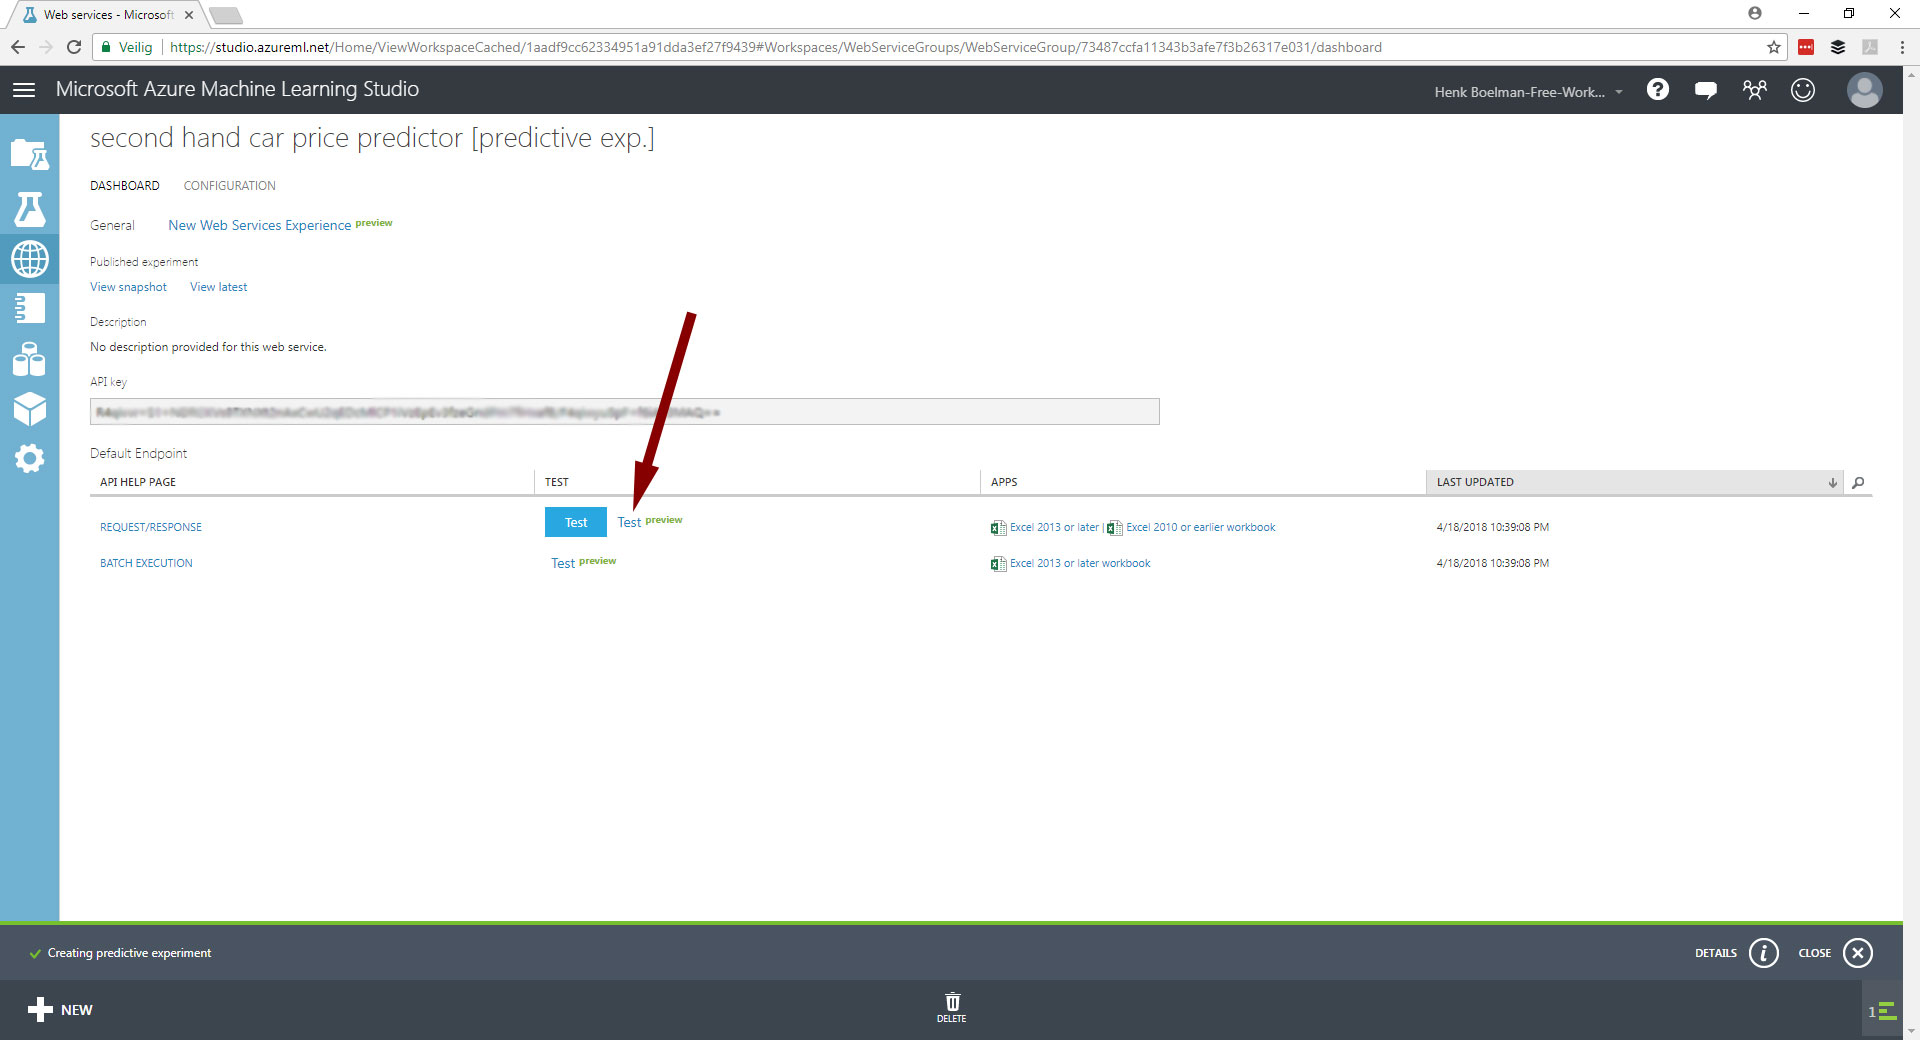
Click on the test link to see the web service in action!
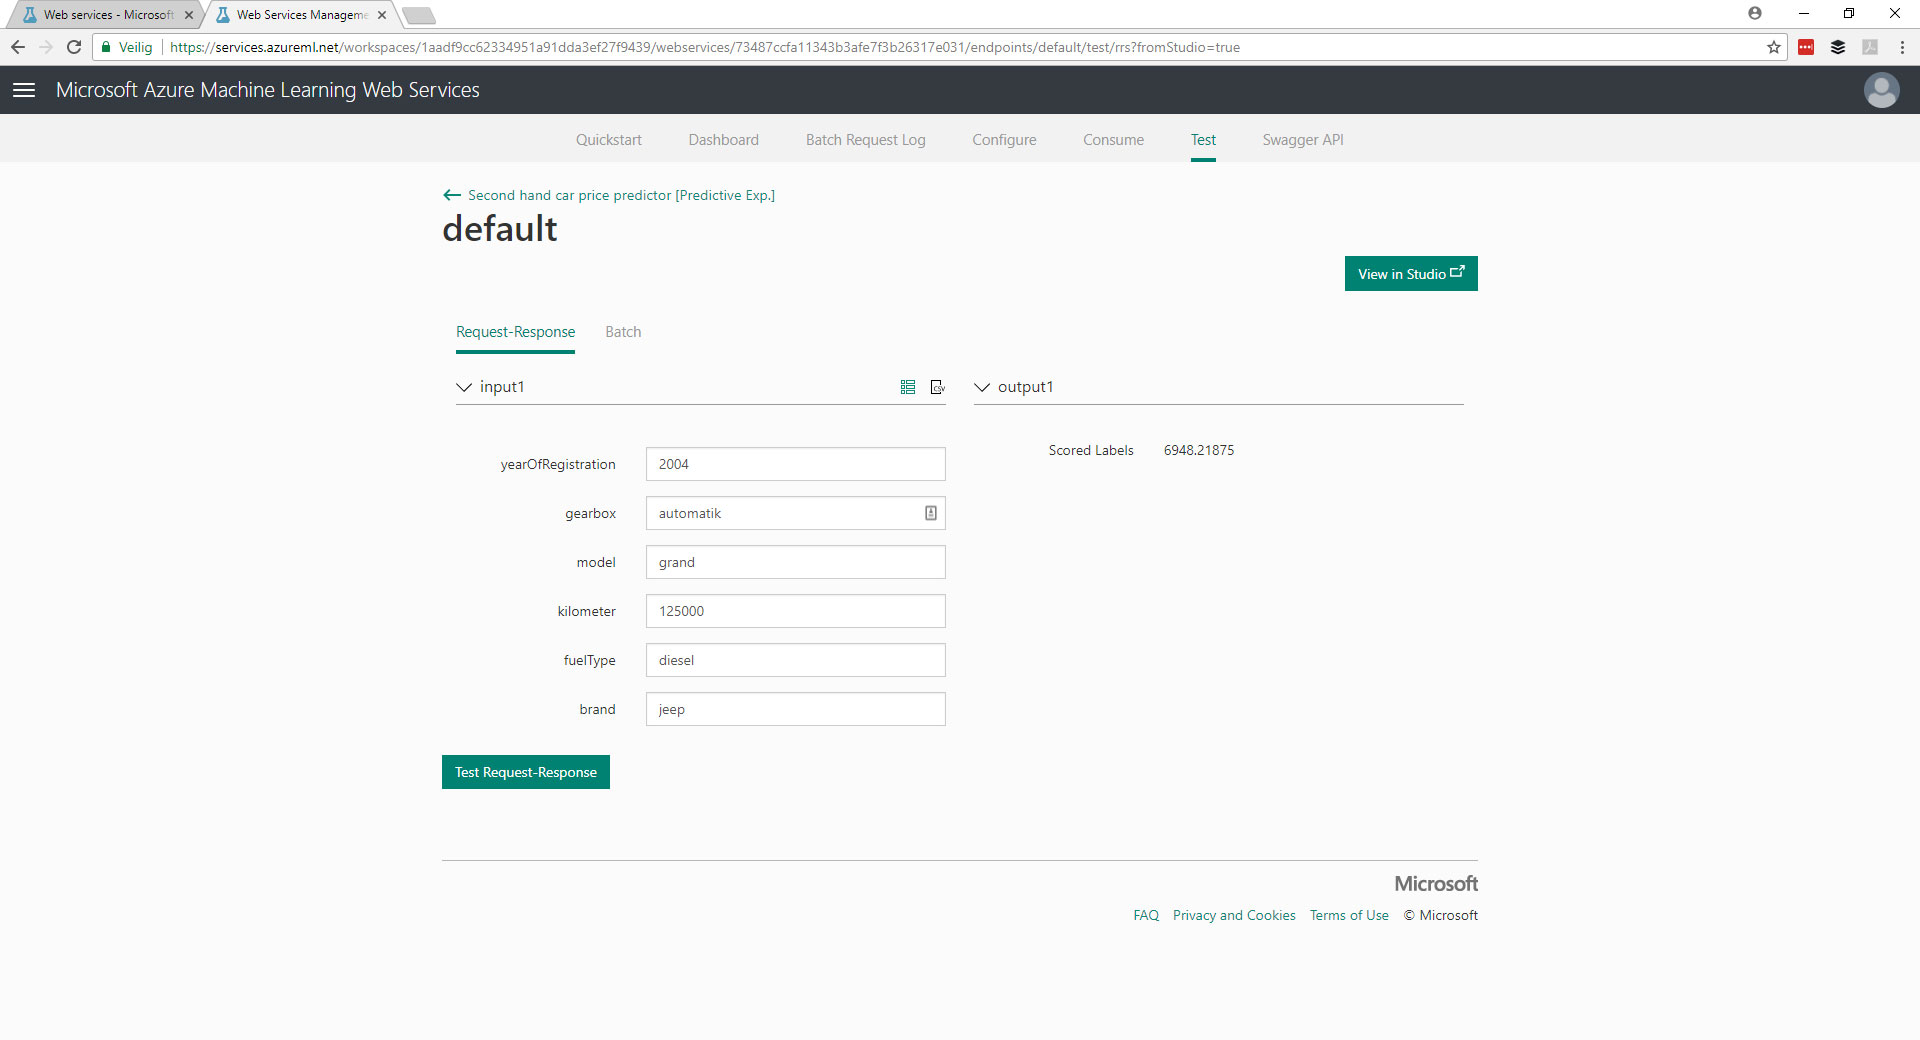
In this screen you can send values to the web service and see the result of the trained model.
Recap
With Microsoft Machine Learning Studio you are able to create a webservice with a trainend predicition model, that you've trained yourself with your own data!