Create an Intelligent Chatbot for Cortana
Voice interfaces are the new thing around and also Microsoft has brought us Cortana. I have a harman/kardon speaker with Cortana on my desk for quite sometime now and wanted to see how I can create something for this device.
In this blog I will give a step by step overview on how to get everything in place so you can start adding your own functionality fast.
Create the bot in Azure
The easiest way to get started is to creating a "Web App Bot"through the Azure Portal. You can do this in the Azure Portal. I know it is a bit the other way around, but it will all tie together.
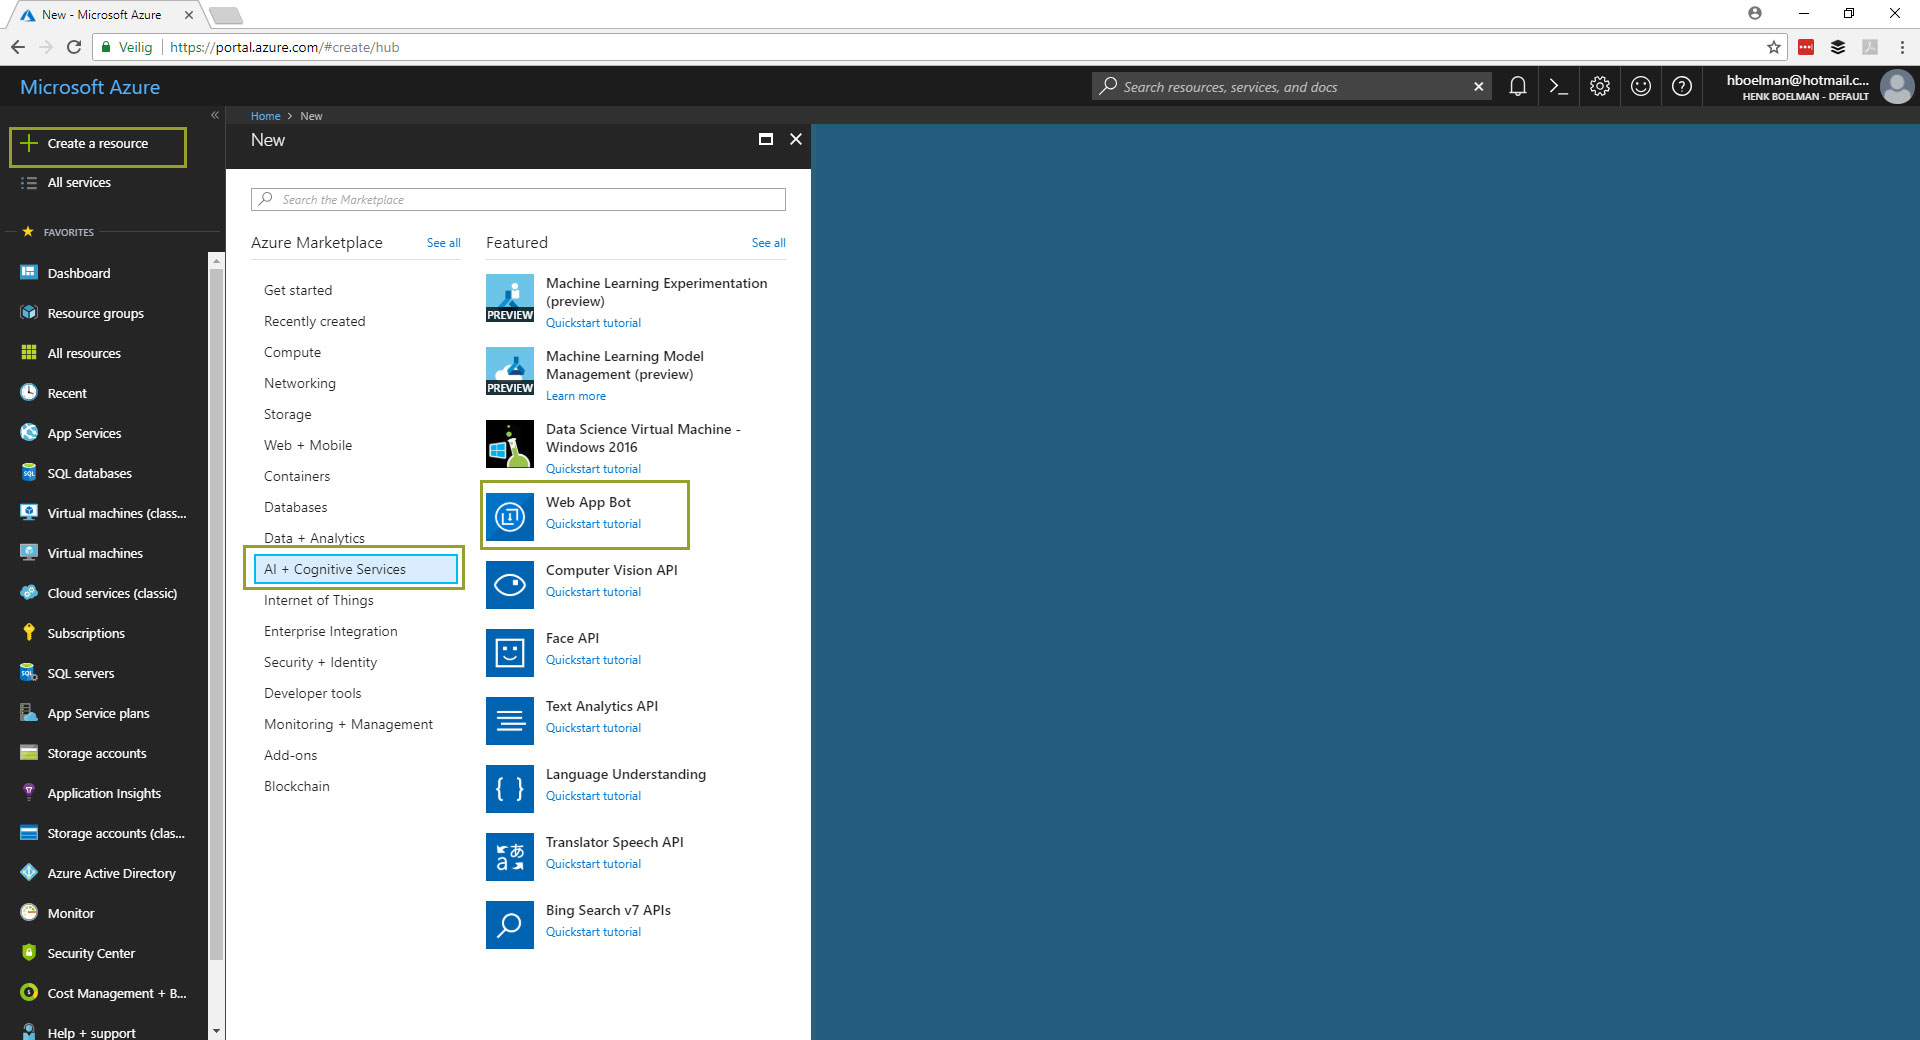
- Click "Create Resource" in top top left.
- Click "AI and Cogntive Services"
- Click "Web App Bot"
In the next screen there is a lot to configured.
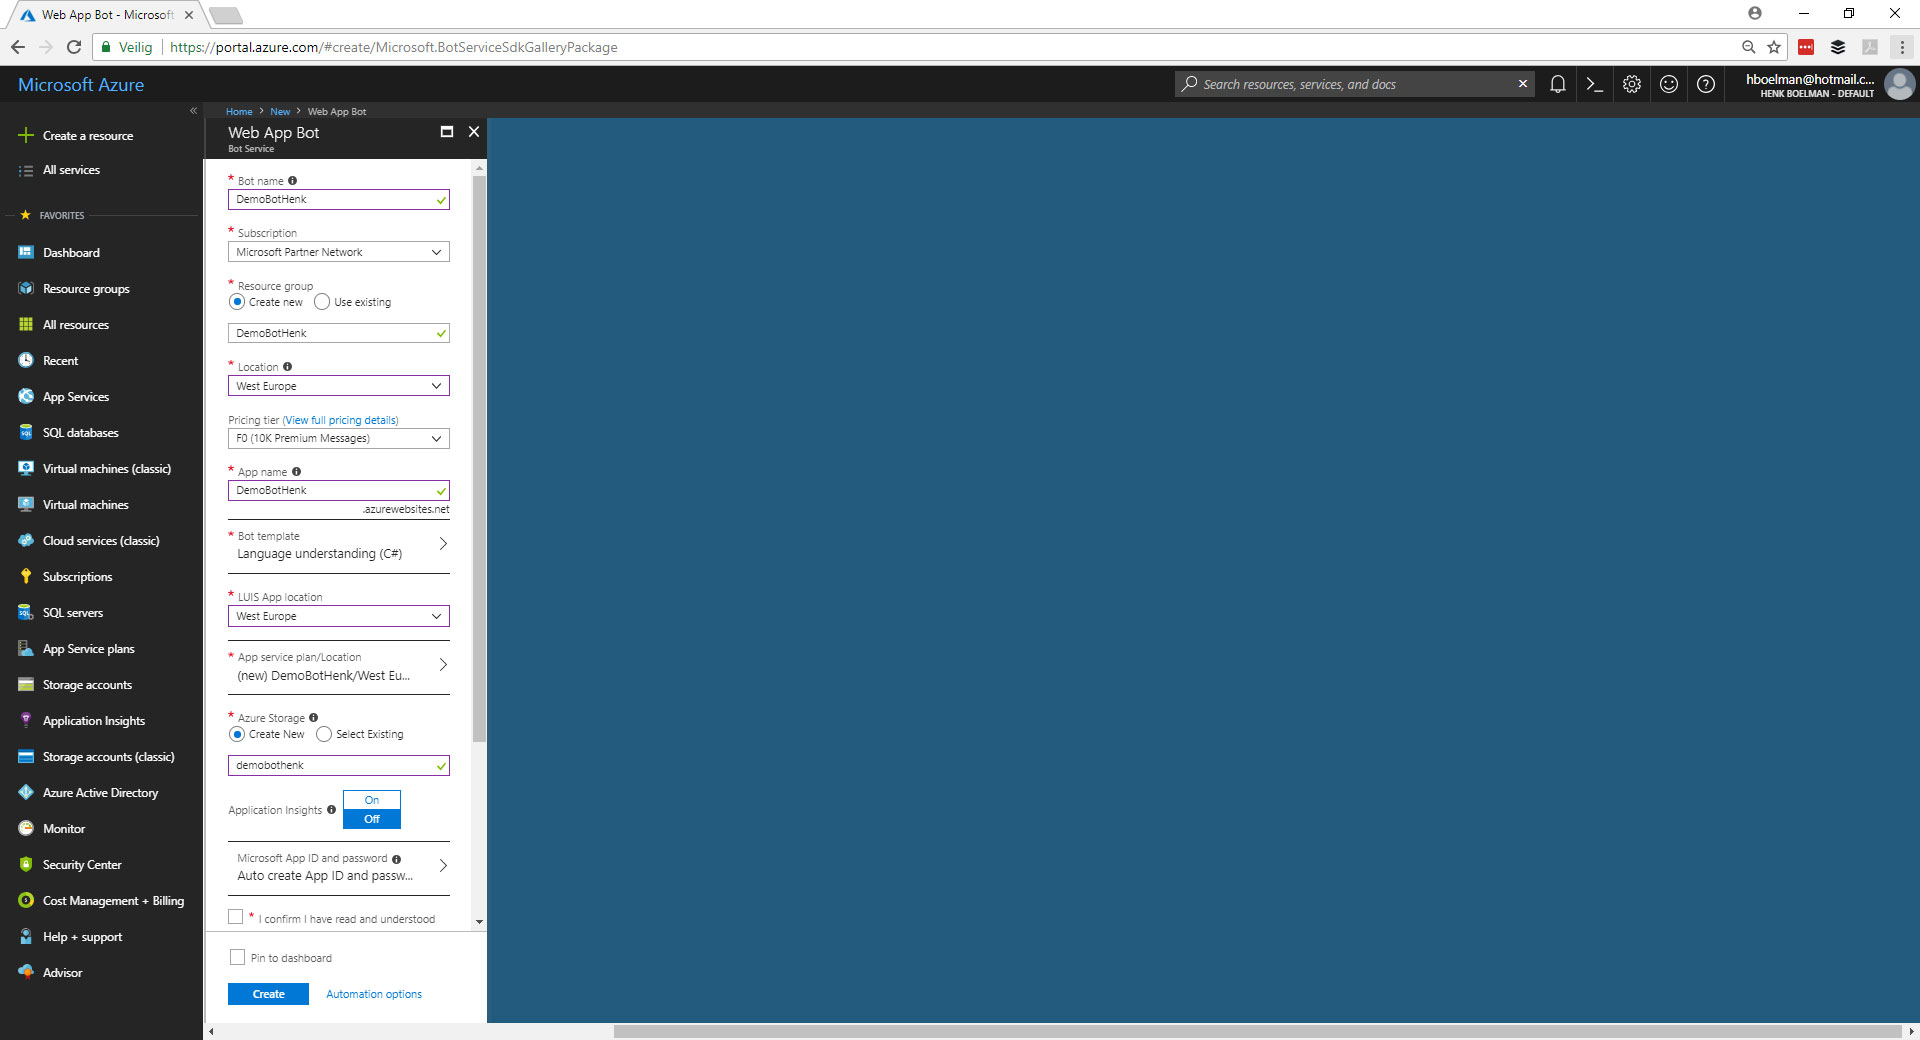
- Bot name: Choose a name for your bot like DemoBotHenk, this name can be changed later.
- Subscription: Choose your subscription
- Resource group: Create a new resource and give it a rememberal name
- Location: Choose the location, this can be the location closest to you for the best performance.
- Pricing Tier: The bot we are going to make will run fine on the free tier (F0). This you can always change later.
- App Name: The setup will create a Web App running on an App Service Plan, this will also be the URL for your bot.
- Bot Template: Open the blade and choose for the "Language understanding" in C#.
- LUIS App Location: Select the closest region for LUIS to the location you selected for you Bot in step 4.
- App Service Plan: Create a new App Service plan, by default this will be a S1 plan, but you can change it to free later on. (but don't forget)
- Azure Storage: Here the state for the bot will be saved. Choose a name.
- Application Insights: At the time of writing the deployment fails when this is turned on, so better turn if off for now.
- Confirm that you have read the notice and do so.
- Create click the create button and wait for a few minuts.
Scaling down the App Service Plan
 When all the resources are created you can go to your resource group. If everything went well there are 4 resources create, The Web App Bot, Web App, App Service Plan and a storage account.
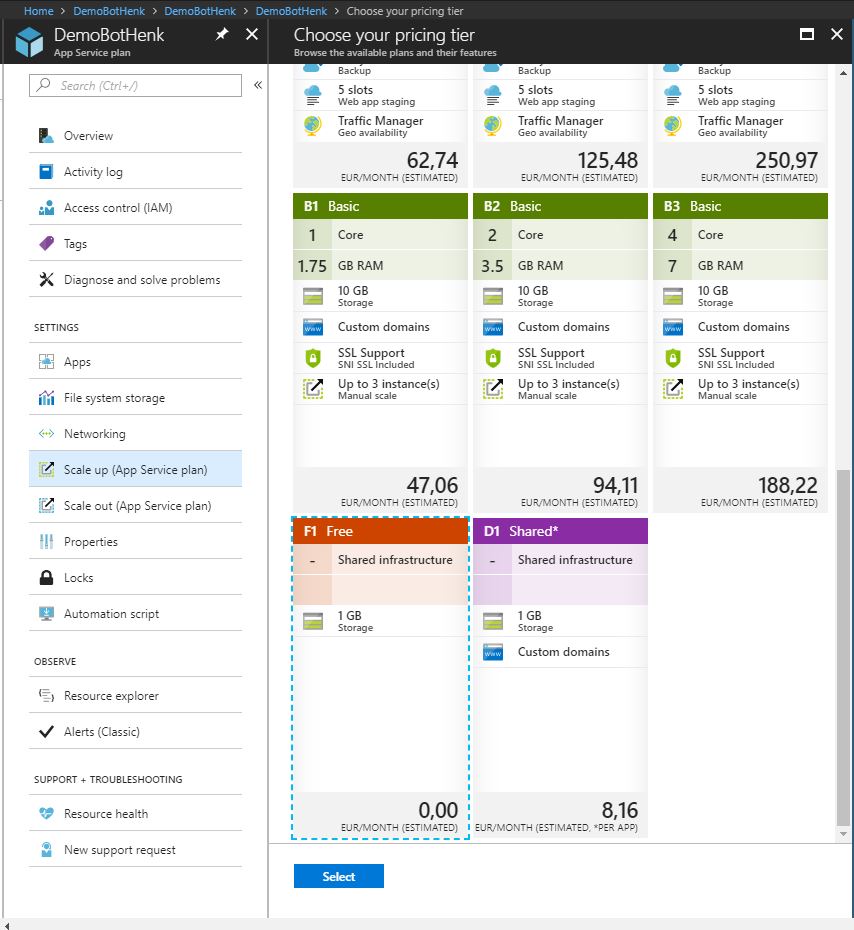
By default the App Service Plan (ASP) is running on a S1 tier, what means it costs around 60 euro's a month. If you just want to play around with your bot a free plan gives you enough resources to do so.
To downscale:
- Select the App Service Plan
- In de left menu select "Scale Up"
- In the blade that opens scroll down and select the free plan.
Give the bot a spin
Because we have choosen a template, the bot should have some basic functionality and we should be able to talk to it. If you go to the "Bot Web App" in the left menu there is an option: Test in Web Chat. Click this menu item and in the bottom of your screen and send you first message: hello, the bot will responde with: You have reached Greeting. You said: Hello.
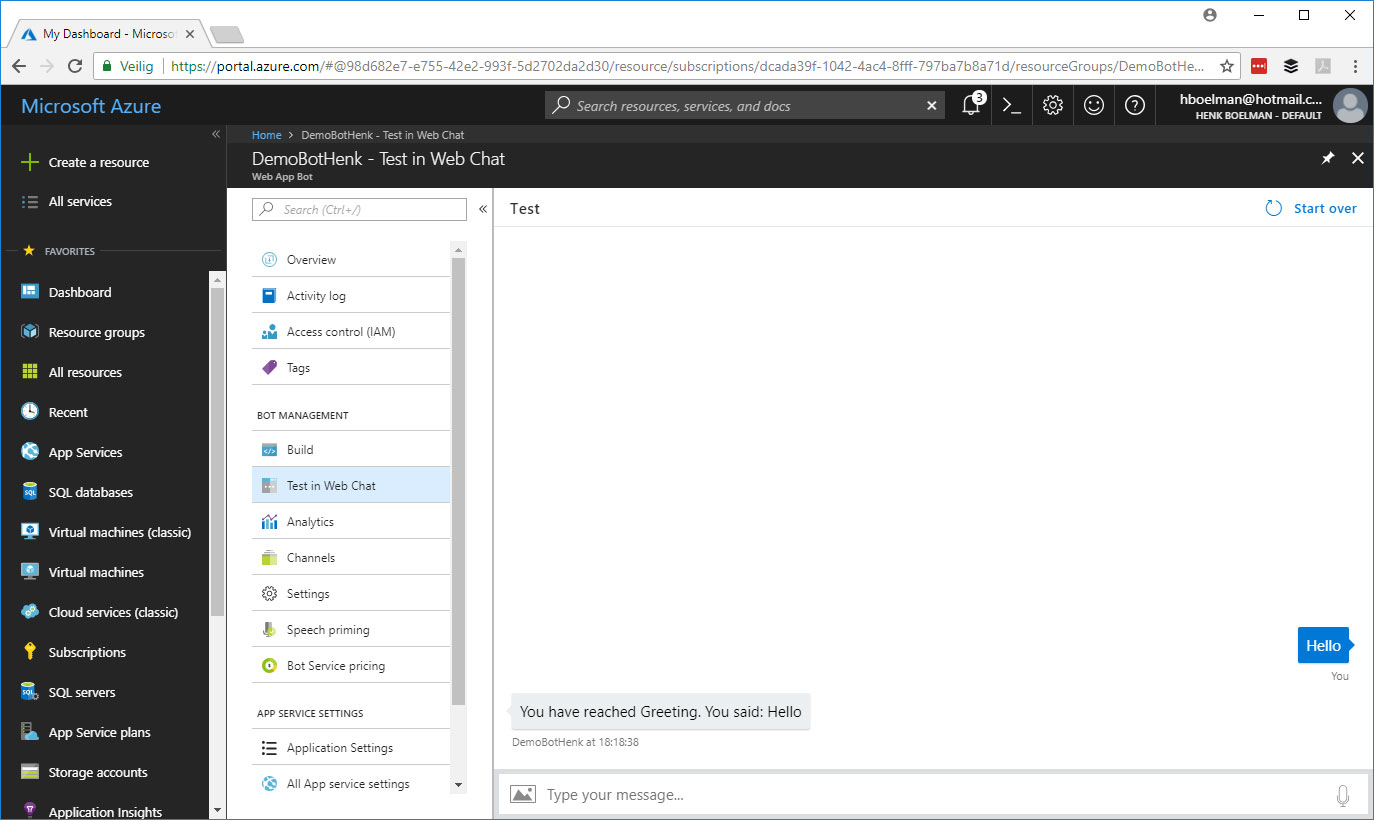
The fist fase is done, you have successfully created a working bot in Azure.
LUIS (Language Understanding)
When we set up the bot we selected that we wanted a LUIS template. When installing the template created automaticly a LUIS endpoint for us.
So what is the use of using LUIS? LUIS is part of the Microsoft Cognitive Services and can map user input to an "Intent" and extract "entities" from the sentence.
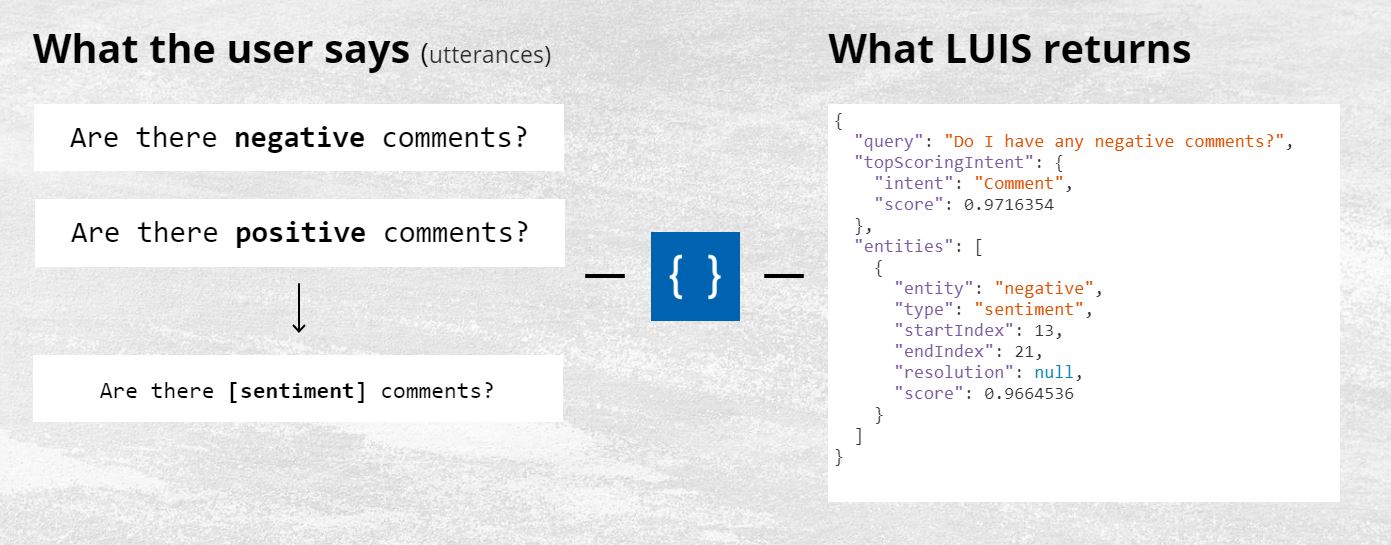
In the above illustration we see that the sentence "are there any negative comments" is send as a text string to the LUIS endpoint. LUIS returns the JSON seen on the right.
LUIS is a machine learning-based service to build natural language into apps, bots, and IoT devices. Quickly create enterprise-ready, custom models that continuously improve.
Customizing the bot
Now we have a running bot let's extend it with our own conversation.
We are going to extend our bot that it can understand de put different colours of lights on and off. Meaning we want to ask: "Can you turn the red light on".
Step 1 - LUIS
The first thing we need to do is create new intent in luis named ControlLED.
- Navigate to https://eu.luis.ai (notice that the URL is region dependent)
- Sign in with the same account as you have created the Web App Bot in Azure.
- Click on the newley create project
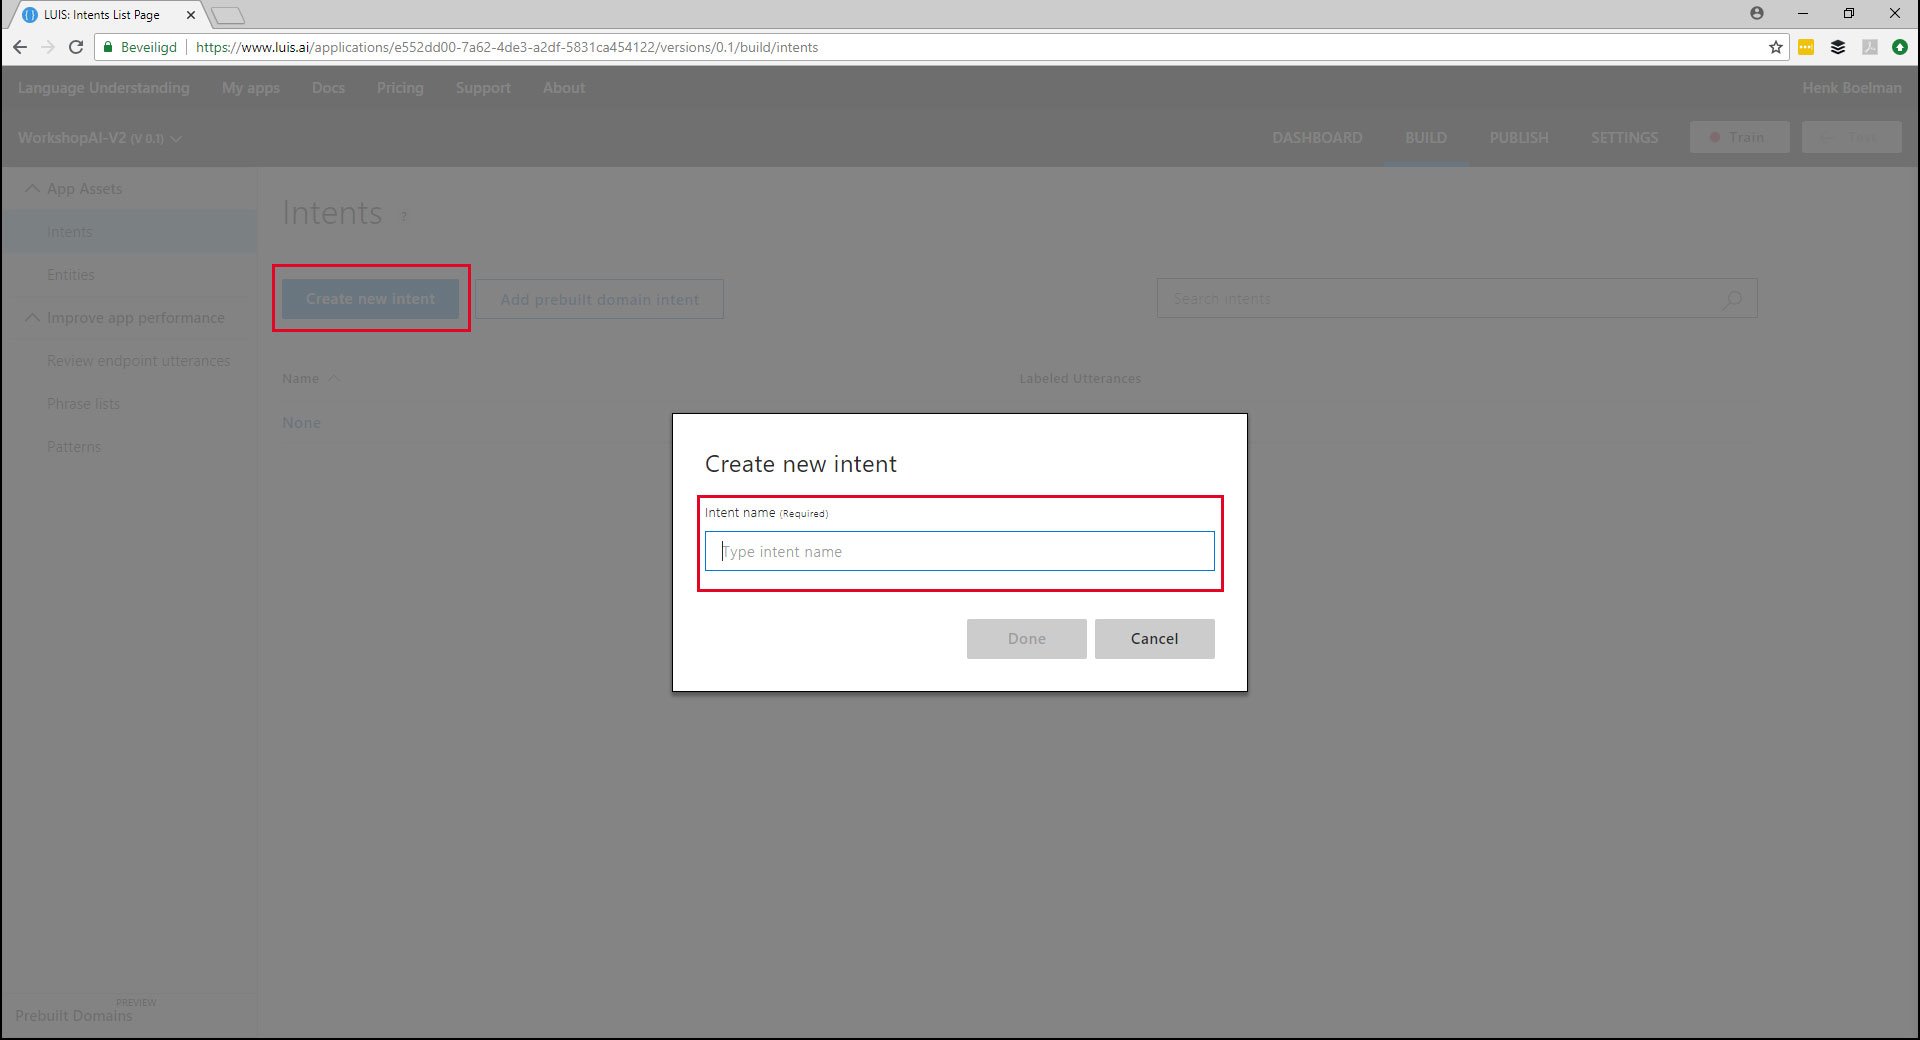
- Click "Create new intent"
- Type the intent name: "ControlLED"
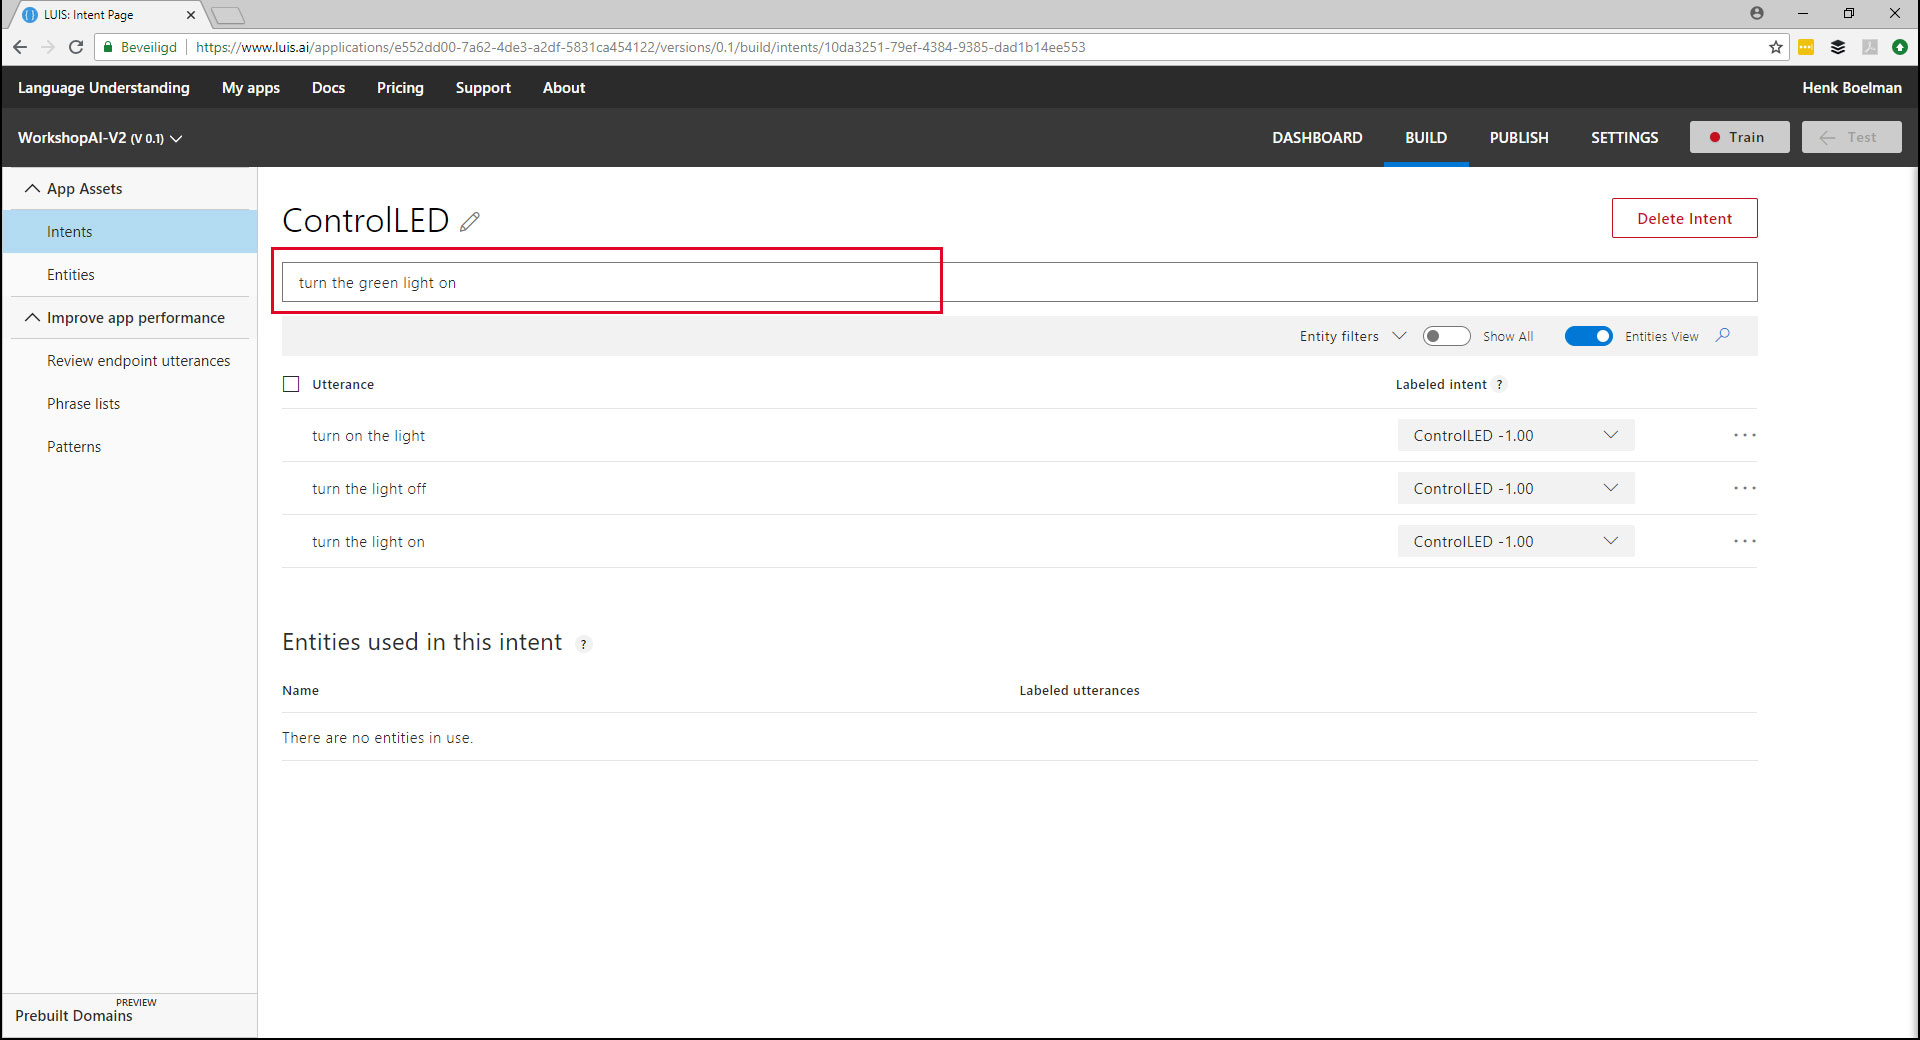
- Enter the following examples:
- Turn the light on
- Turn the light off
- Turn on the light
- Turn the green light on
- Put the light on
- Put the red light off
- Can you turn the green light on
- Click in the left menu "Entities"
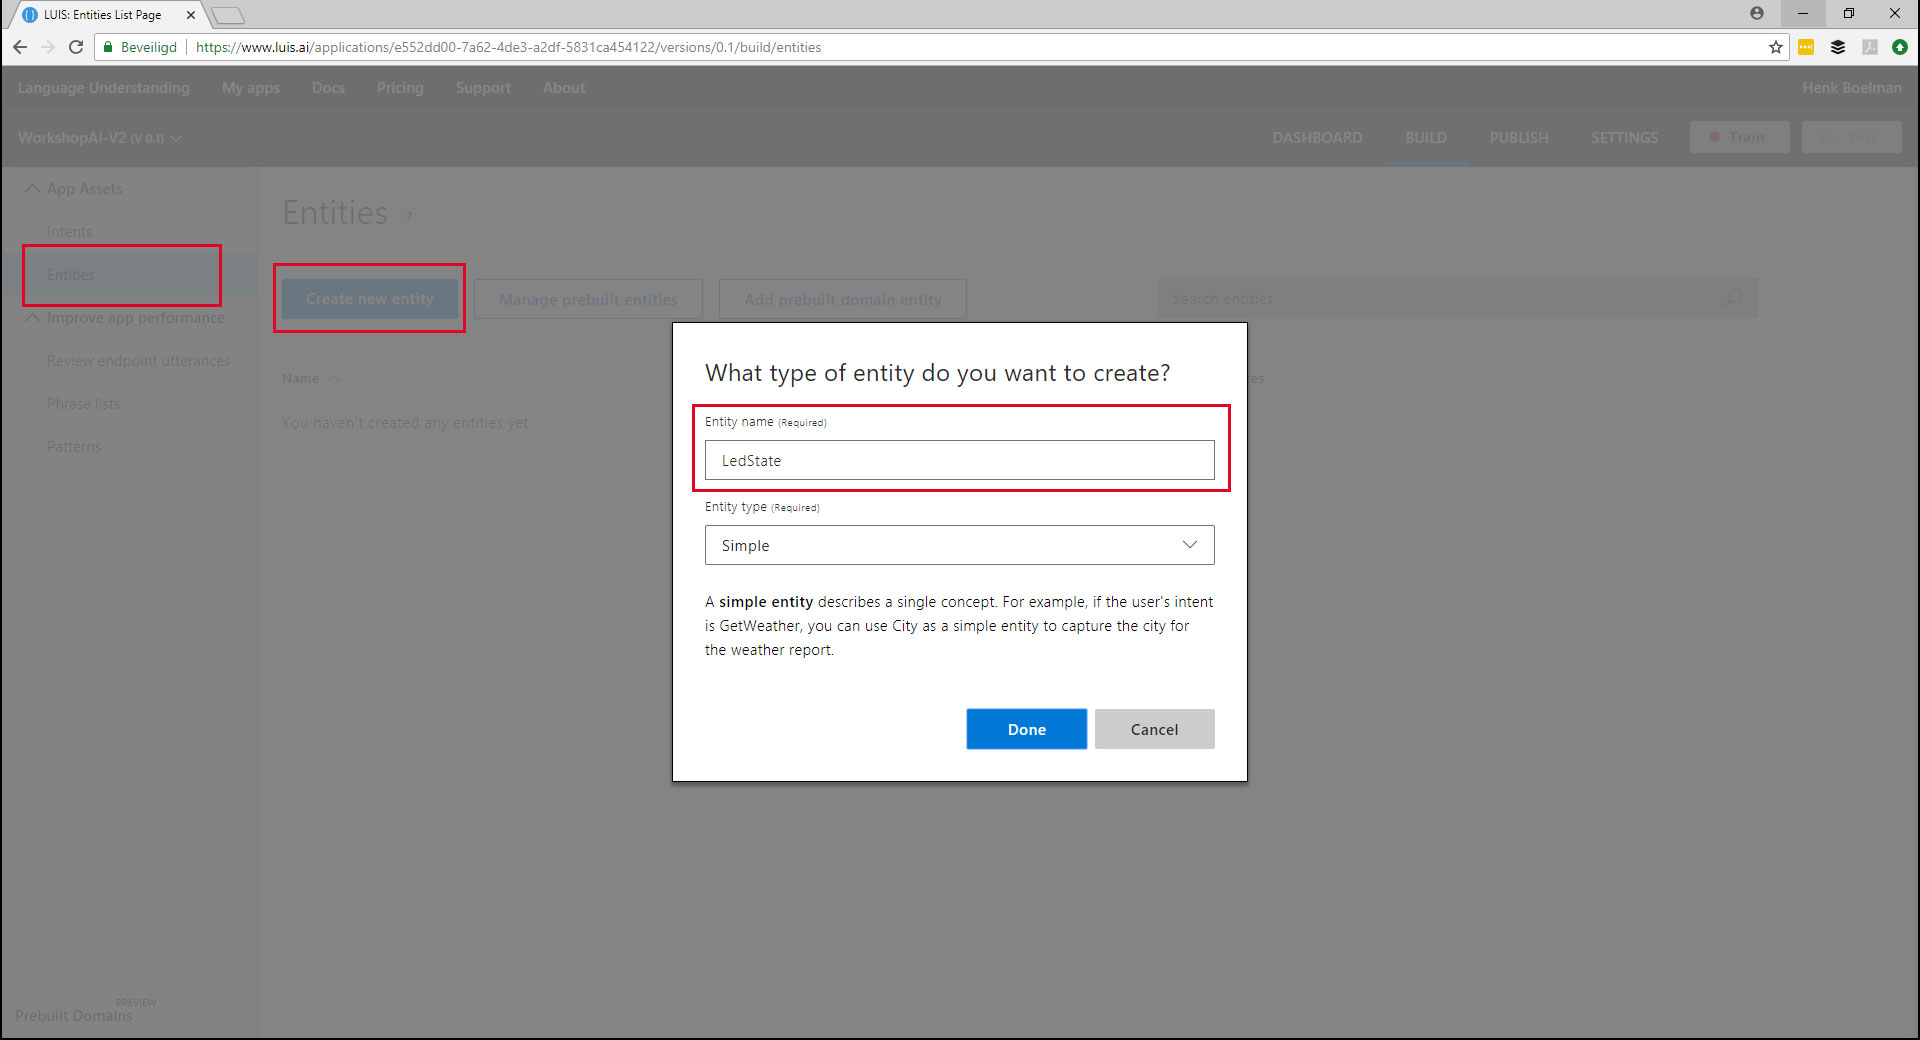
- Click "Create new entity"
- Enter a name: "LedState"
- Click "done"
- Create another Entity "LedColor"
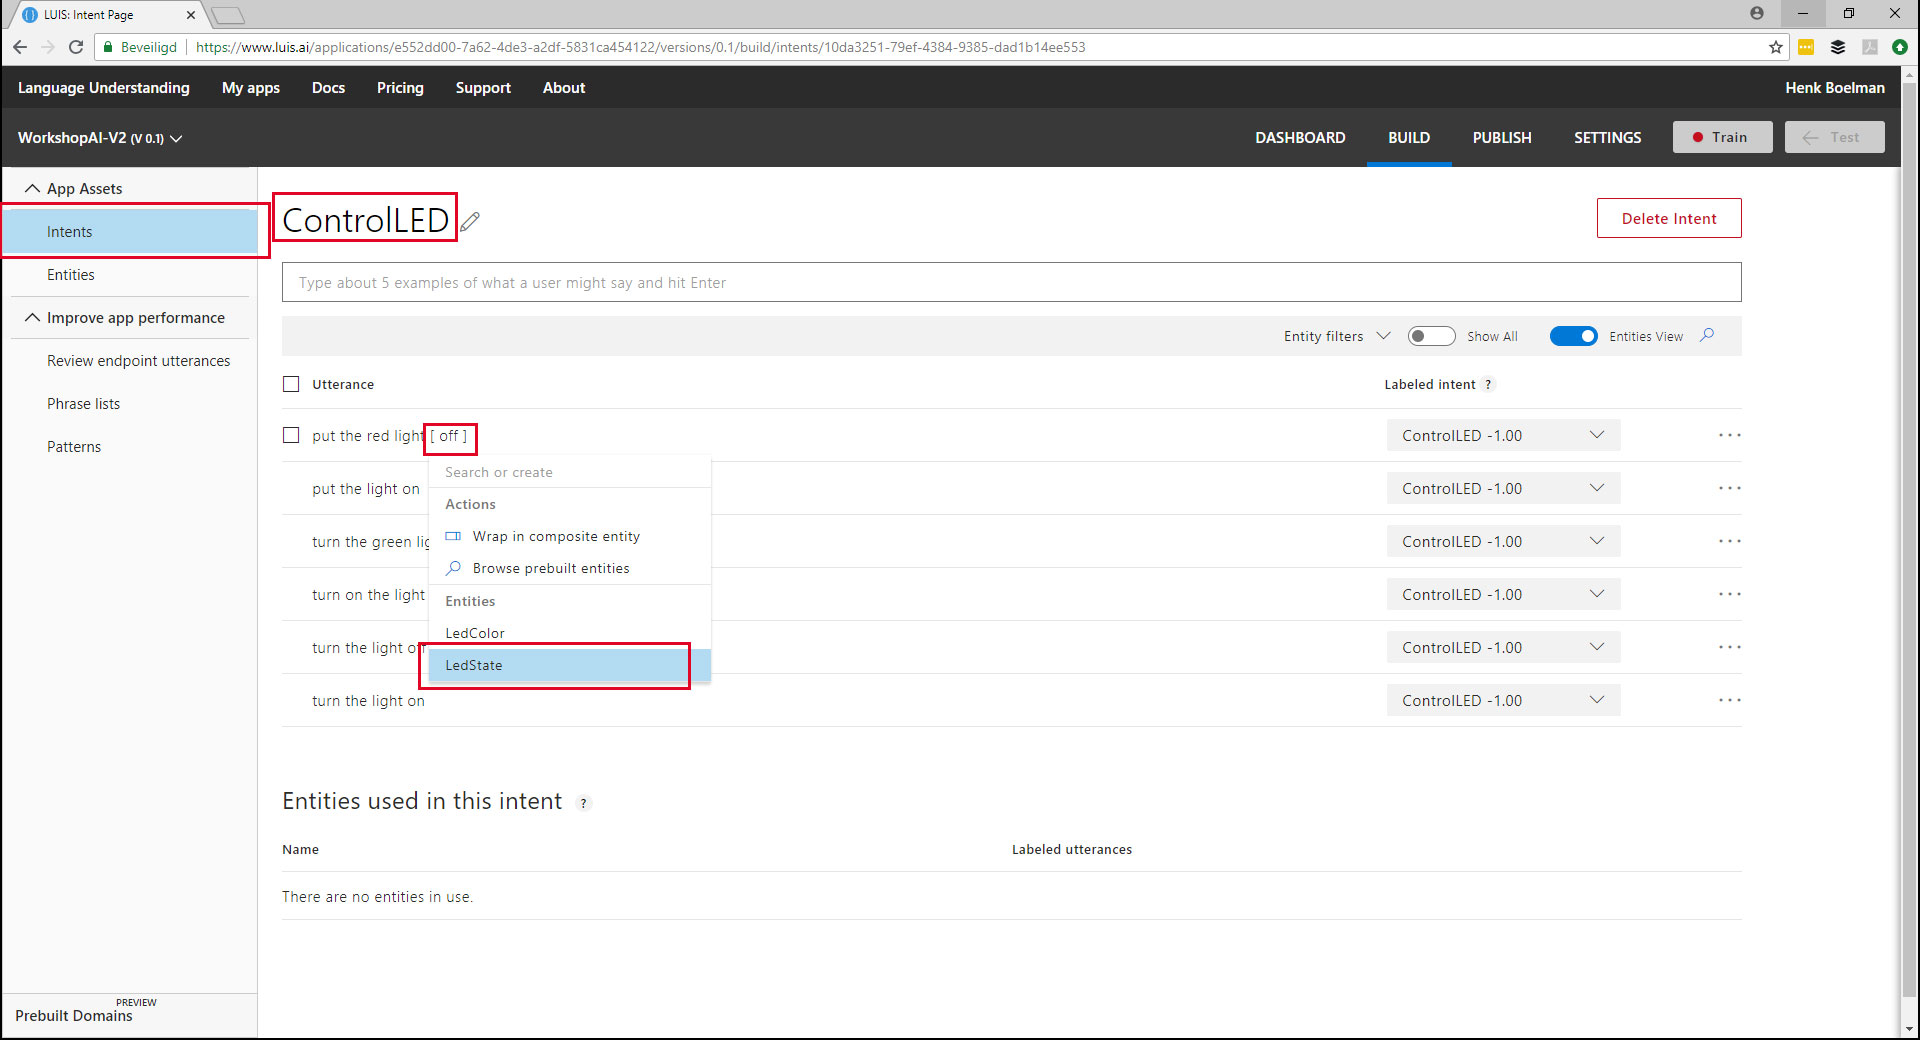
- Open "Intents"
- Open the intent "ControlLED"
- Click on the word "on"
- Select the Entity "LedState" in the dropdown
- Repeat this for all the words: "on" and "off"
- Select all the colors and link them to the entity "LedColor"
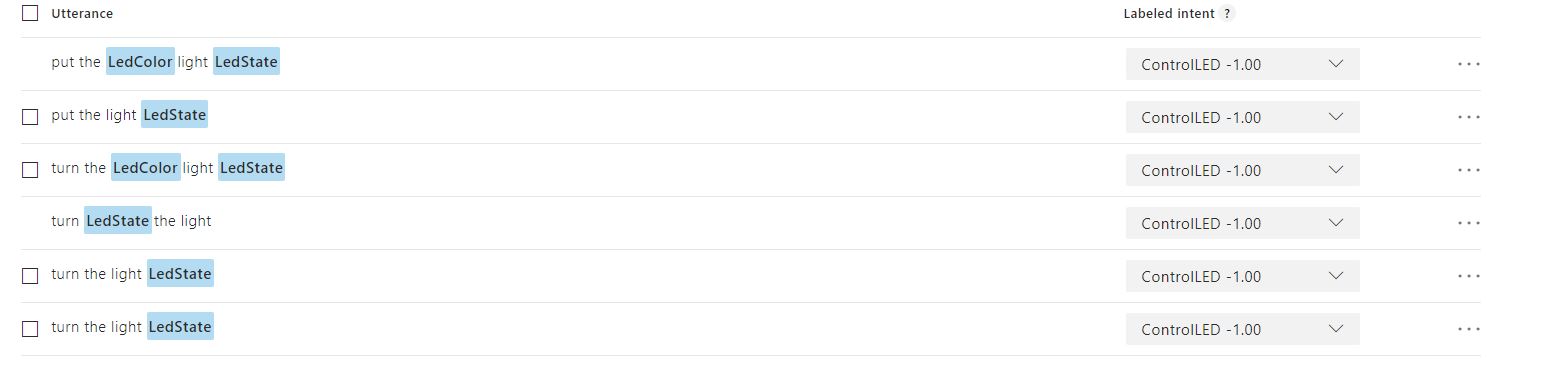
- Your project should look the picture above.
- Click the "train" button in the top right
- When the training is done click the "test" button

- Type the sentence: "turn the yellow light on"
- Notice that the word "yellow" and "on" are mapped to the corresponding entities.
- Try some other sentence
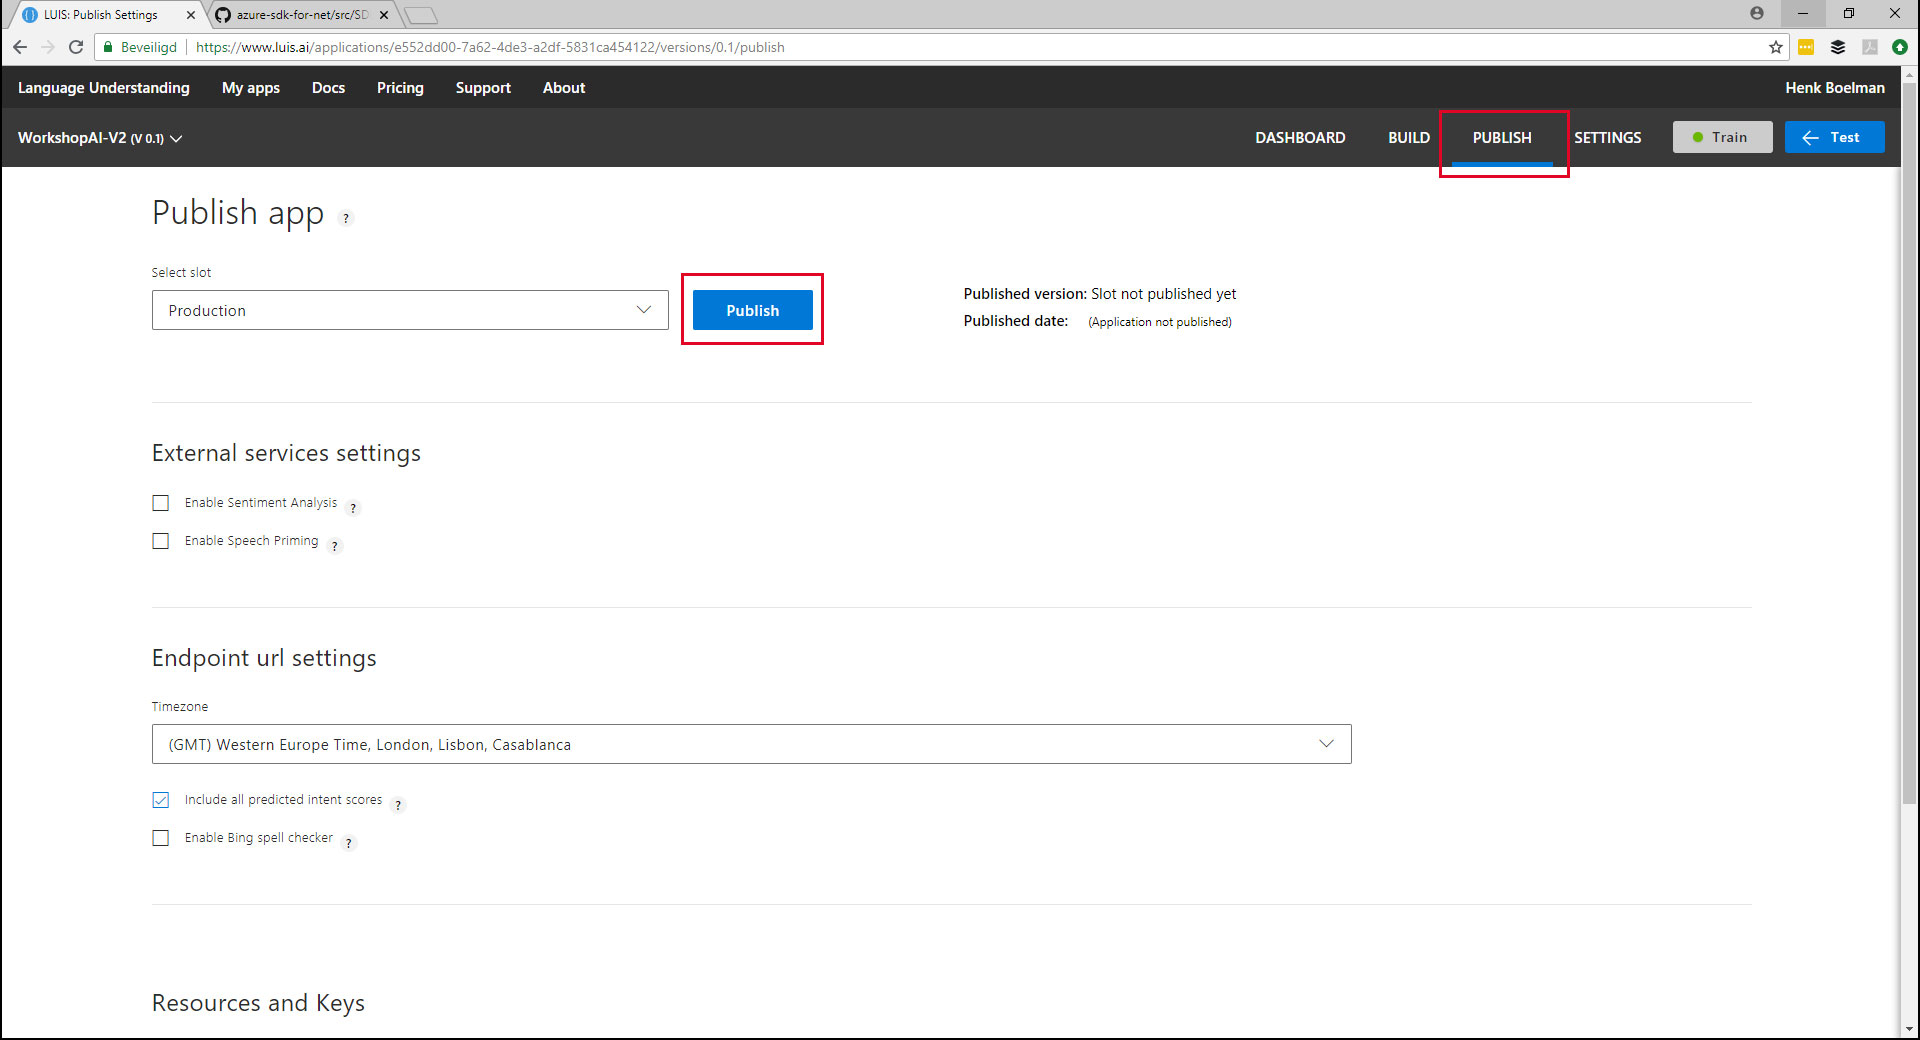
- Open the "publish" section
- Publish the app to production
Test your new LUIS intent
- Open your Web App Bot in the Azure Portal
- Under "BOT MANAGEMENT" open "Build" and click on the "Open online code editor"
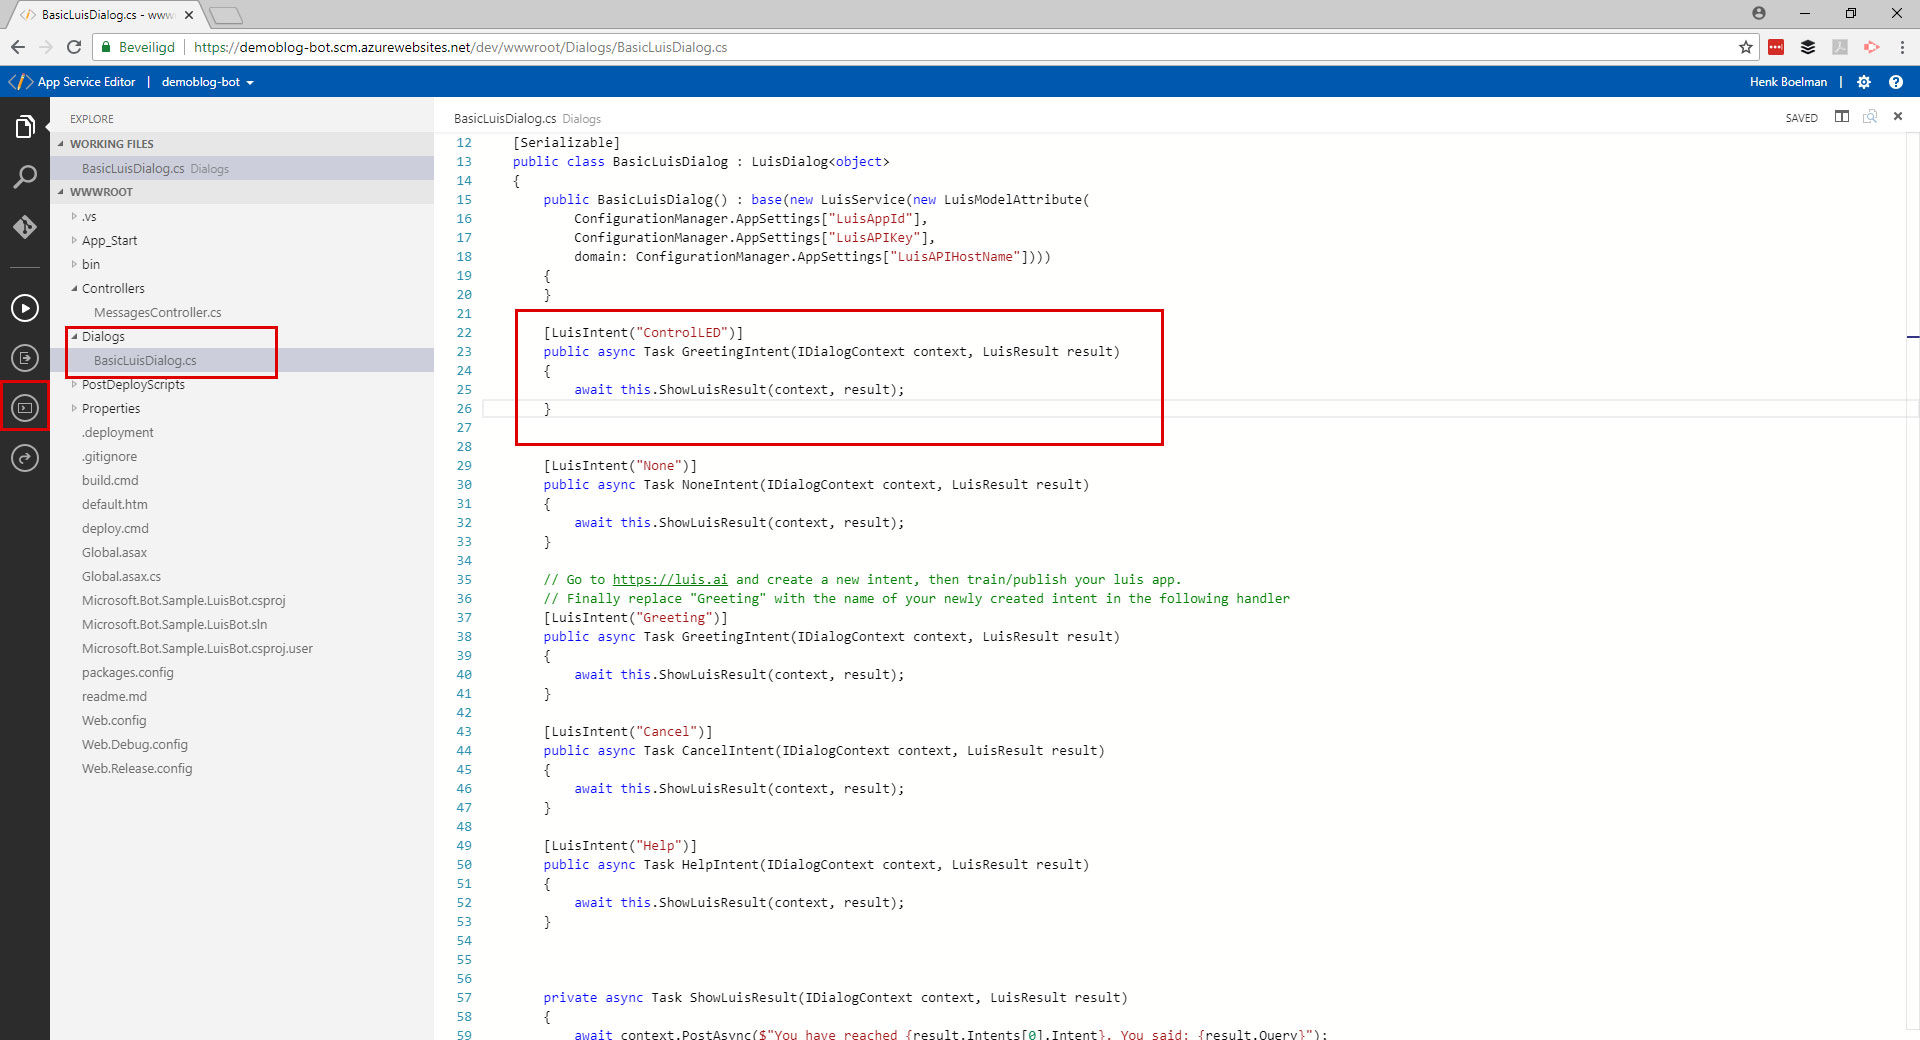
- Open the file: "/dialogs/BasicLuisDialog.cs"
- Add a method to the BasicLuisDialog class:
[LuisIntent("ControlLED")]
public async Task ControlLEDIntent(IDialogContext context, LuisResult result)
{
    await this.ShowLuisResult(context, result);
}
- Right on "build.cmd" and select "run from consule"
- Wait a while for your build te finish
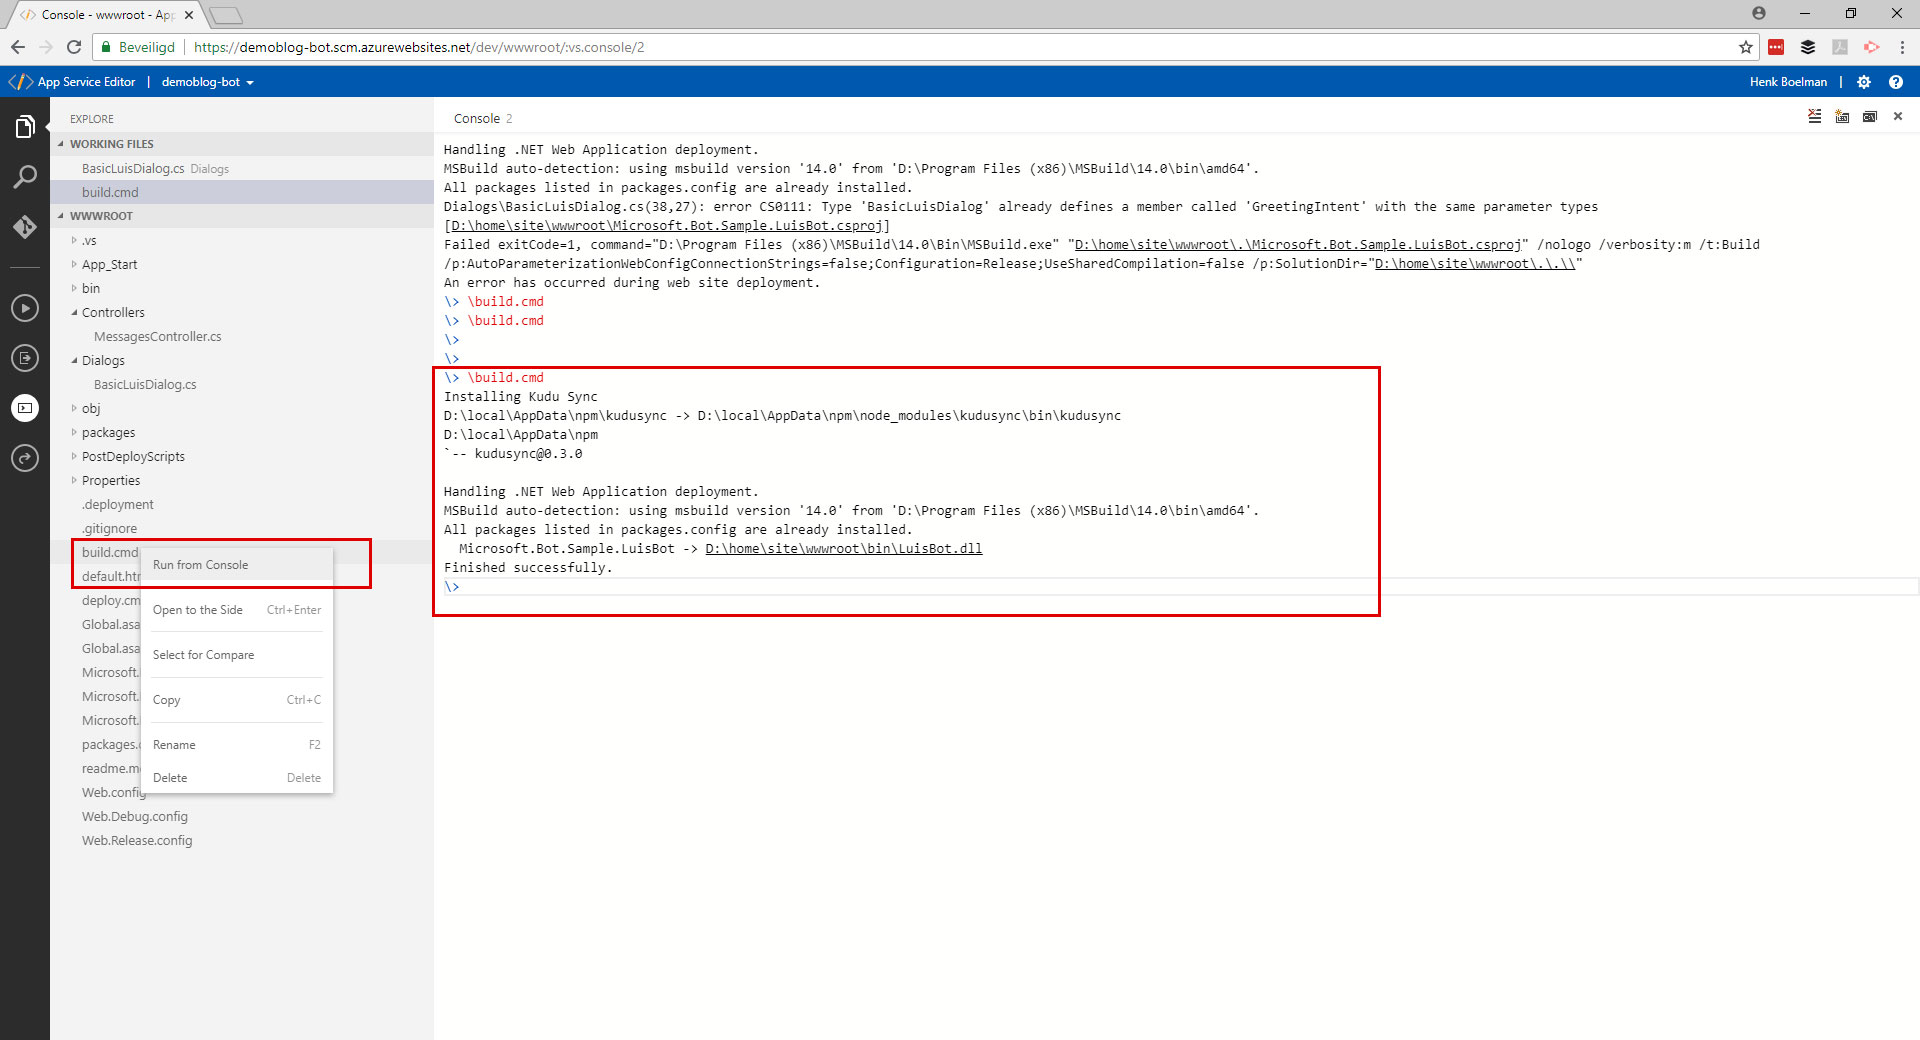
- Open your Web App Bot in the Azure Portal
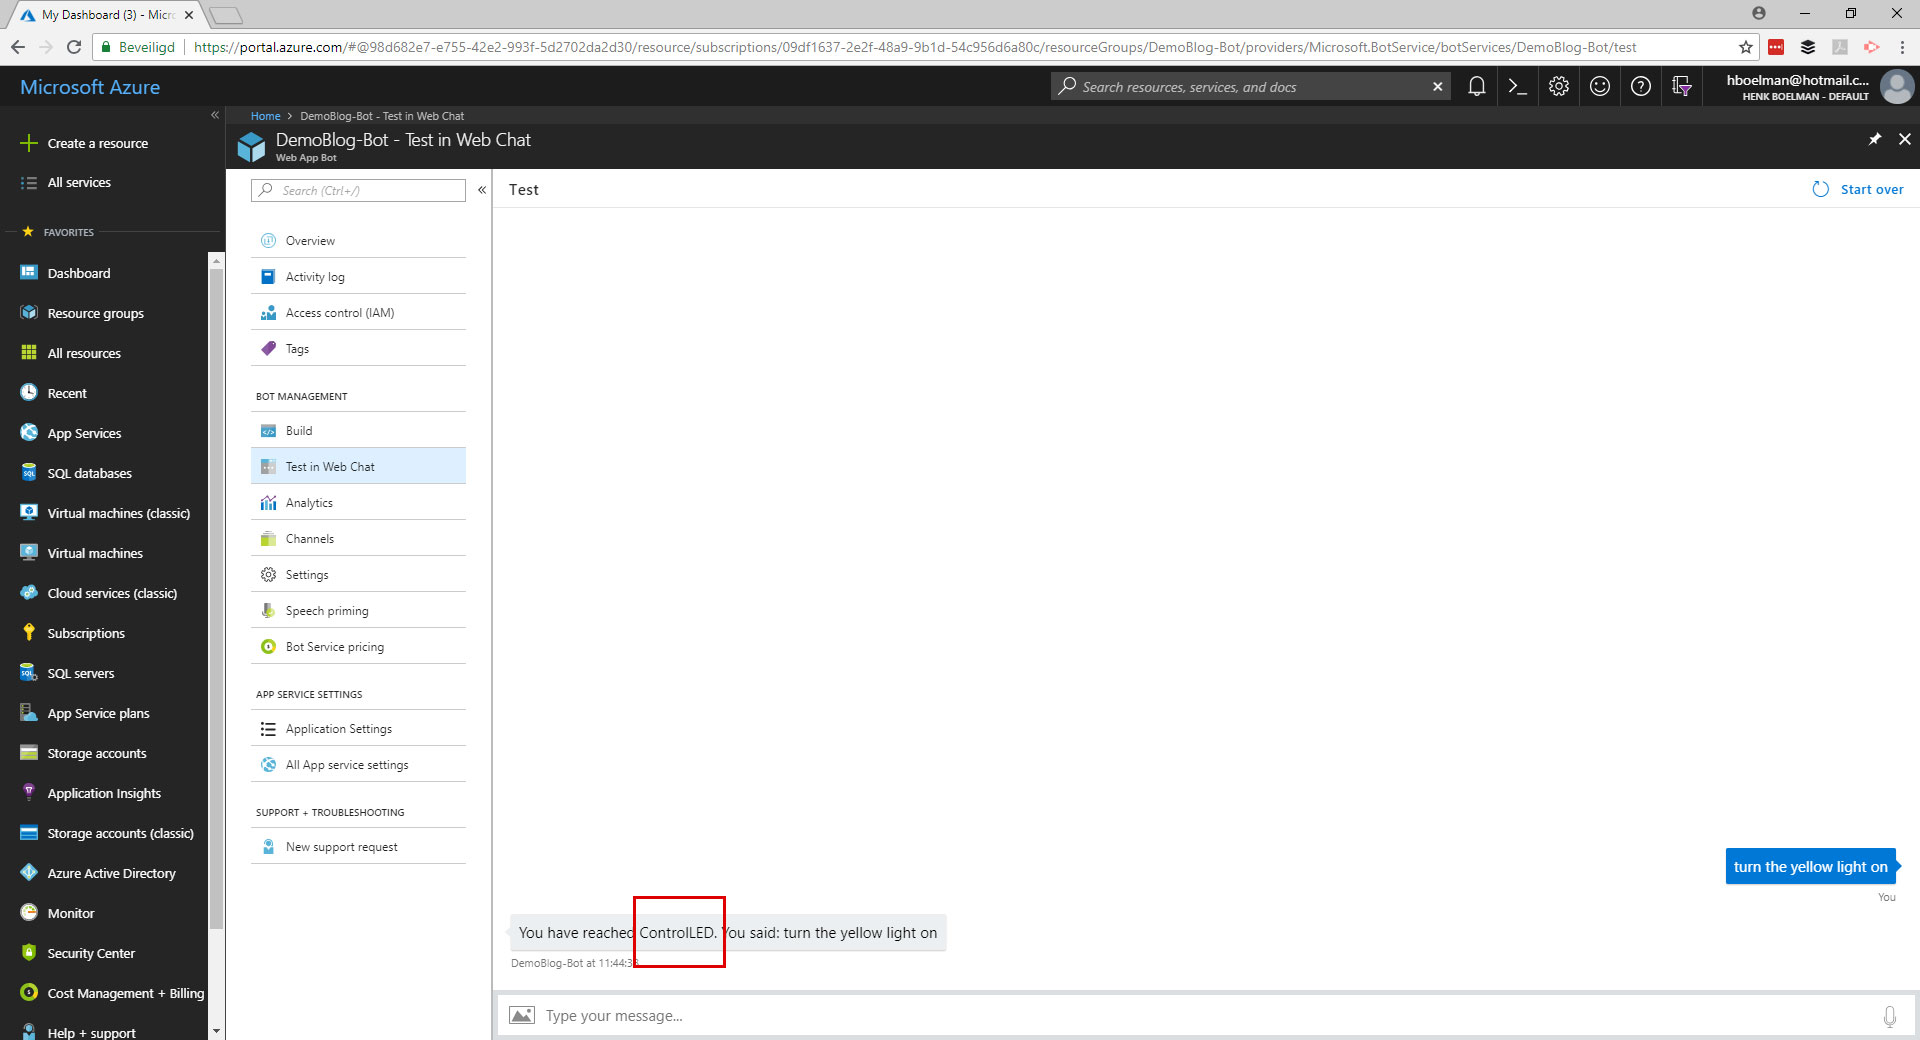
- Under "BOT MANAGEMENT" open "Build" and click on the "Test in Web Chat"
- Ask the bot: "turn the yellow light on"
Now we can create our own intents and edit the source of the bot to react on the intent that LUIS has matched against the user input.
You want to setup a proper CI/CD pipeline for this, when taking it to next level
Add a Cortana Skill
By default we get a web based chat interface when we create a bot this way, but there are more channels available where the bot can be exposed to.
Add speech to the bot (Add speech to messages)
But first we have to add speech capabilities to our response message.
- Replace the "ControlLEDIntent" method in the dialog class with the mehod below.
[LuisIntent("ControlLED")]
public async Task ControlLEDIntent(IDialogContext context, LuisResult result)
{
    var response = context.MakeMessage();

    response.Speak = response.Text = $"I can turn the light on and off for you.";

    await context.PostAsync(response);

    context.Wait(this.MessageReceived);
}
- Right on "build.cmd" and select "run from consule"
- Wait a while for your build te finish
- Under "BOT MANAGEMENT" open "Build" and click on the "Test in Web Chat"
- Ask the bot: "turn the yellow light on" and validate that you get the response: "I can turn the light on and off for you."
Add the Cortana channel
- Open your Web App Bot in the Azure Portal
- Under "BOT MANAGEMENT" open "Channels"
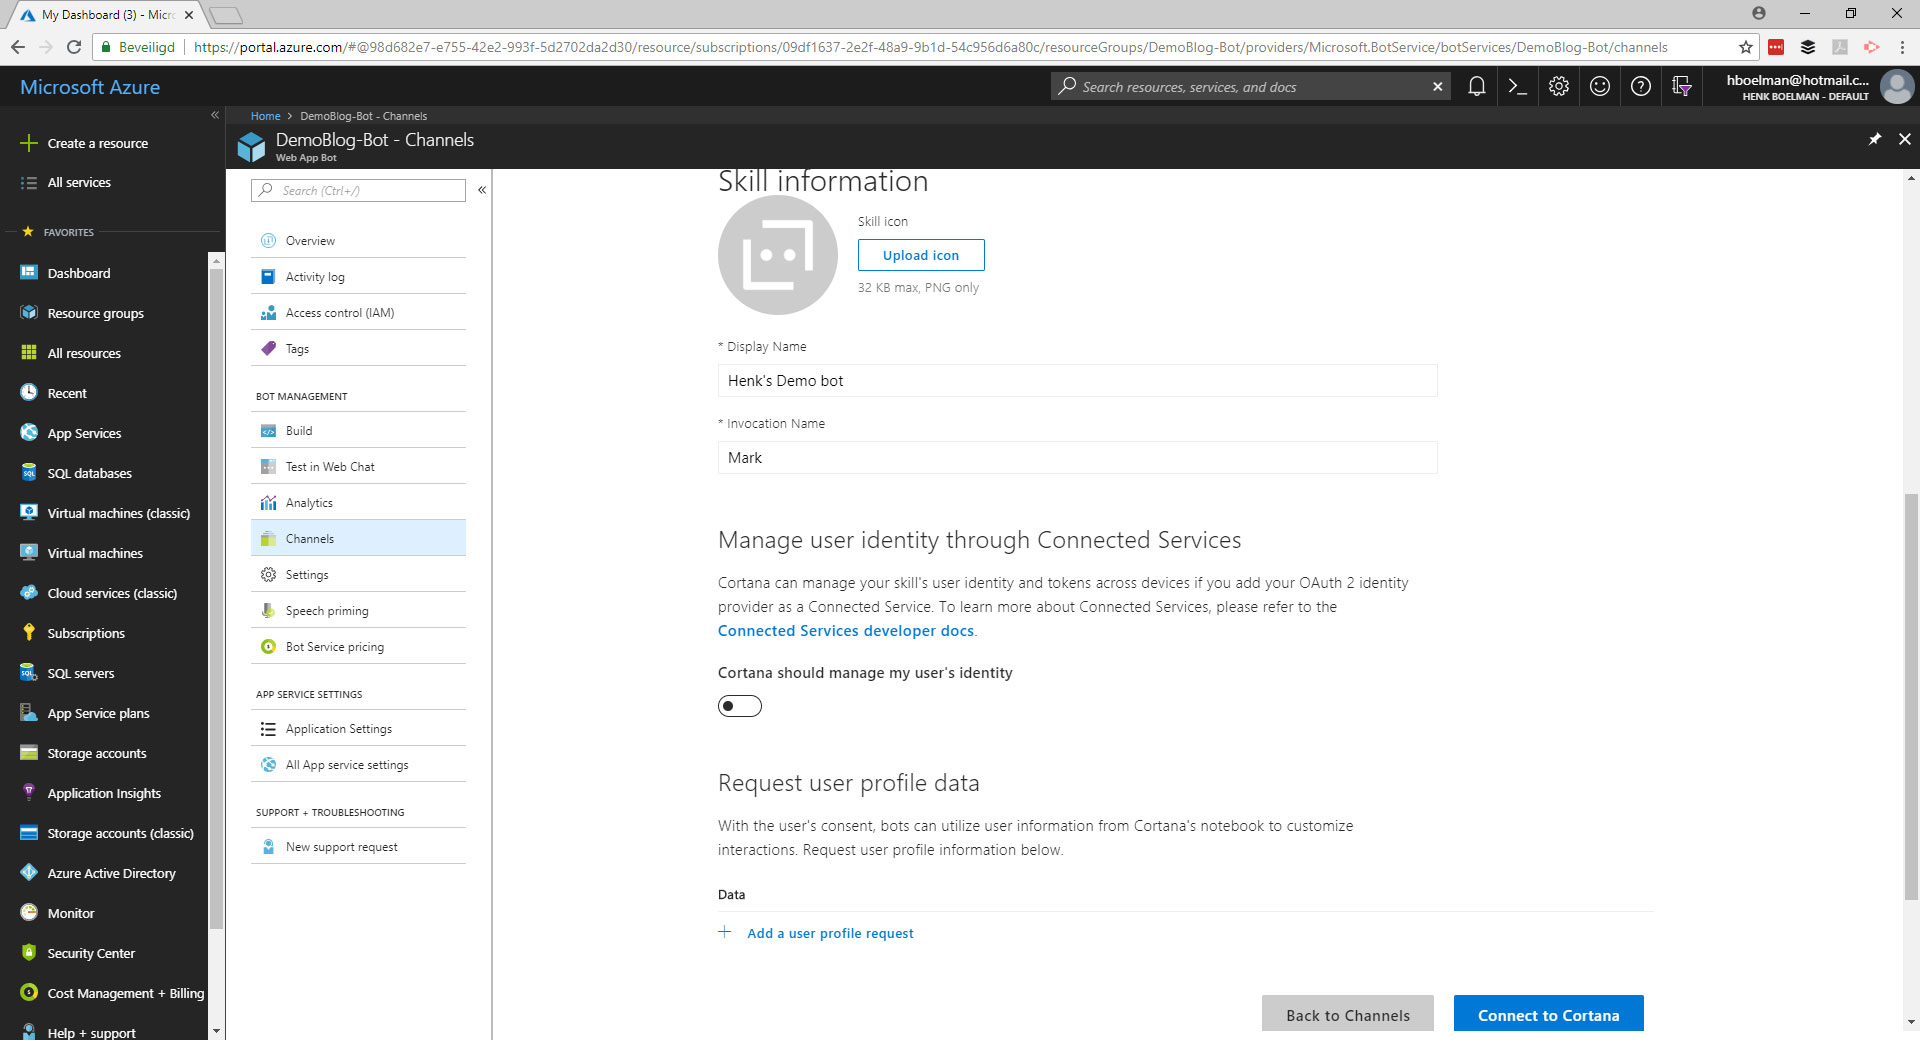
- Add the "Cortana channel"
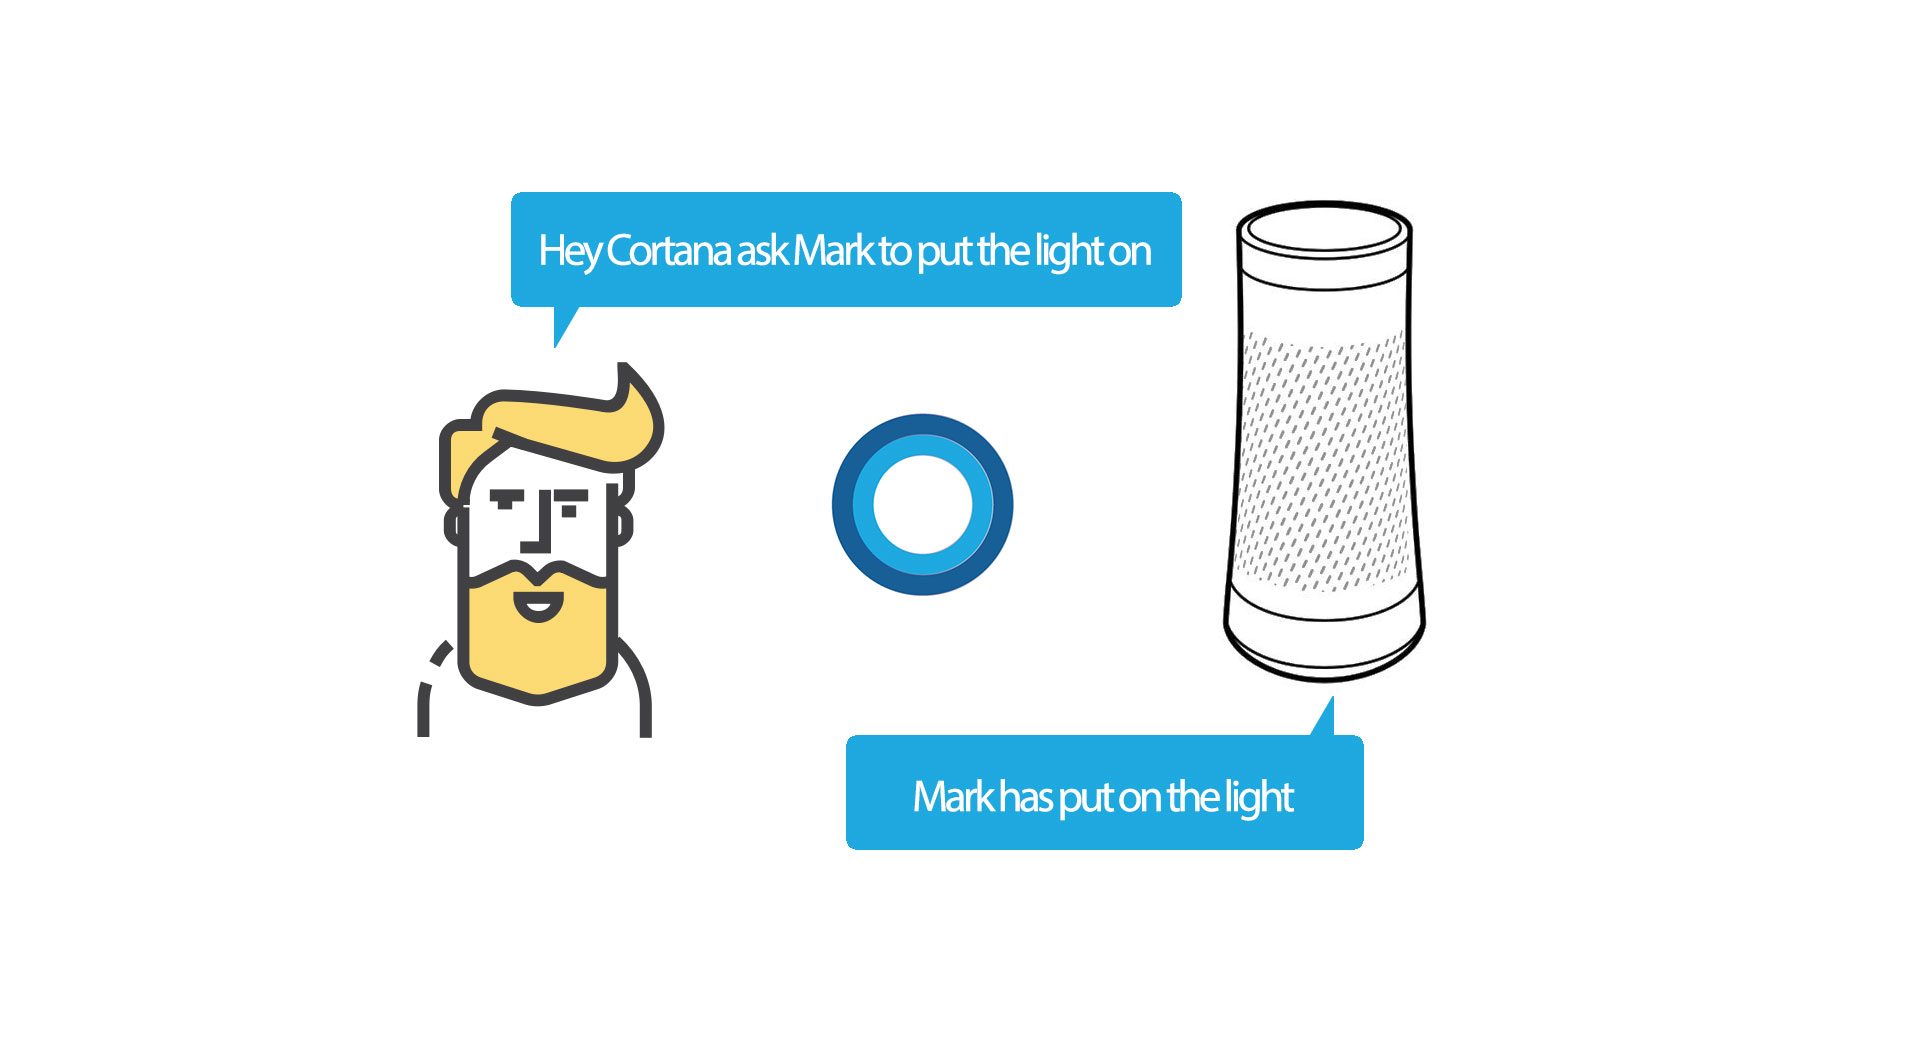
- A new page will load, here you can give your bot a name and a "Invocation Name". This is you you call your bot, so make it something easy like "Mark".
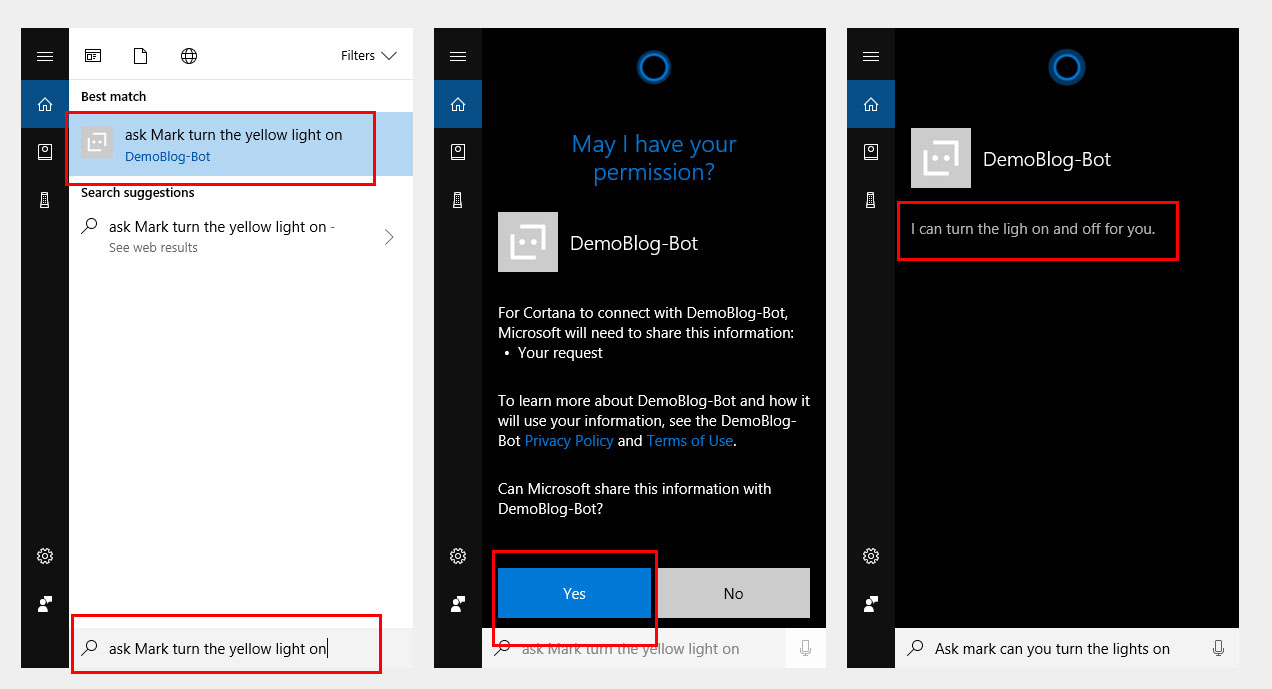
Use the Cortana skill
- Open Cortana on your local computer and type: "ask Mark turn the yellow light on"
- You have to give permission to your newly created Cortana skill. Click "yes"
- Validate that you get the response: "I can turn the light on and off for you."
Connect it to your Speaker
- If your speaker is using the same account as on your local computer, the skill is automaticly activated on your speaker, try and ask your speaker: "Eey Cortana ask Mark turn the yellow light on". She will responde with "I can turn the light on and off for you.".
Now you have create in a very easy way a chatbot that can be used with a Cortana speaker. But this bot can be enabled on many more channels, with just a few clicks. Please remember to setup an decent CI/CD pipeline for you bot!
Any question, please send me a tweet!