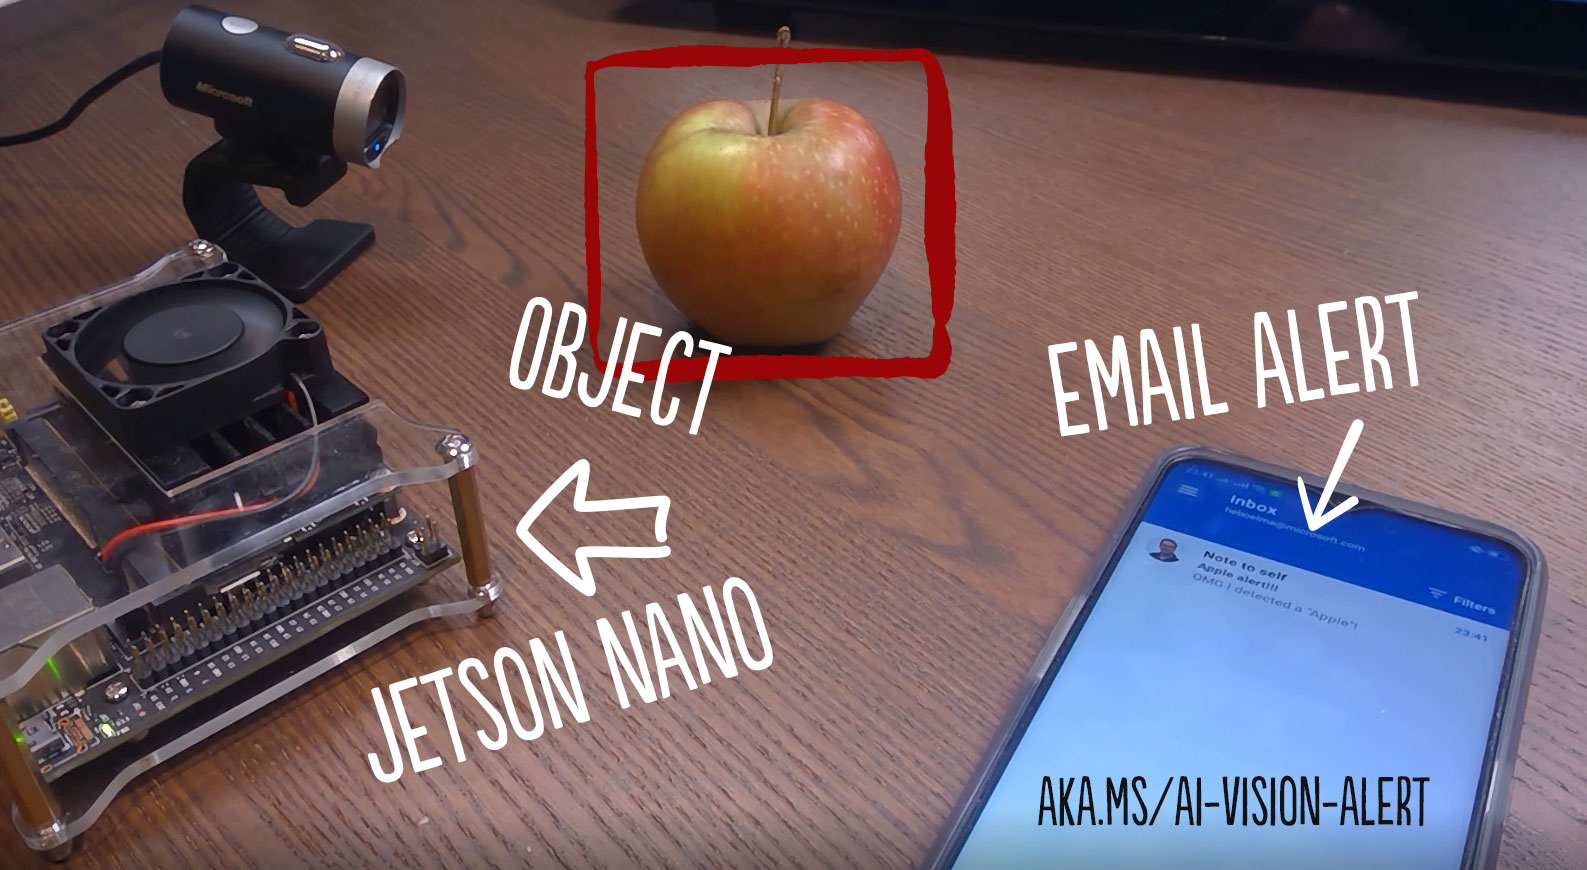
Create your own vision alerting system with IoT Edge, Azure Custom Vision and a Jetson Nano
In this article I will guide you through the steps needed to create your own object alerting system running on an edge device. For this we will use an NVidia Jetson Nano, the Azure Custom Vision service and Azure IoT Edge.
The goal is to process the camera frames locally on the Jetson Nano and only send a message to the cloud when the detected object hits a certain confidence threshold.
Requirements before you start:
- You need an Nvidia Jetson Nano
- A USB camera.
- An Azure Subscription (Get started for free here)
Part 1 - Setup resources in Azure
To get started we need to setup a few resources in Azure. For this we are going to use the Azure CLI. If you don't have the Azure CLI installed on your machine you can follow the tutorial on MS Docs here.
1.1 Create an Azure IoT Hub
The first resource we need is an Azure IoT Hub. We will use this to communicate with our Edge Device. It will give us the ability to deploy our IoT Edge models to the device and give the Edge device the ability to send messages back to the cloud.
Create a Resource Group
az group create --name [resource group name] --location westeurope
Create an IoT Hub
az iot hub create --name [iot hub name] --resource-group [resource group name] --sku S1
1.2 Create an Azure Container Registry
The second resource we need to create is an Azure Container Registry (ACR). In this container registry we will store our IoT Edge modules
Create an Azure Container Registry
az acr create --resource-group [resource group name] --name [container registry name] --sku Basic
Login to your Azure Container Registry First use the CLI to get the credentials from the ACR.
az acr update -n [container registry name] --admin-enabled true
az acr credential show -n [container registry name]
You will need these credentials in part 3.
Learn more about these resources on MS Docs
Part 2 - Setup the Nvidia Jetson Nano
In this part we are going to prepare our Jetson Nano device to run the 3 IoT Edge modules we are going to build later on.
The easiest way to follow along with this walk-through is to connect with SSH to your Jetson Nano.
2.1 Install the latest operating system
Install the latest version of the operating system on the Jetson Nano. The Nvidia learn website has a great tutorial for that. Follow the instructions here. When the device boots and the desktop appears on the screen you can continue with the next step.
2.2 Install IoT Edge on the Jetson Nano
ARM64 builds of IoT Edge are currently being offered in preview and will eventually go into General Availability. We will make use of the ARM64 builds to ensure that we get the best performance out of our IoT Edge solutions.
Run the code below on the Nvidia Jetson device to install IoT Edge
# You can copy the entire text from this code block and
# paste in terminal. The comment lines will be ignored.

curl -sL https://aka.ms/InstallAzureCLIDeb | sudo bash
sudo apt-get -y install libssl-dev libffi-dev jq python-pip
pip install iotedgedev
sudo mv ~/.local/bin/iotedgedev /usr/local/bin

# Download and install the standard libiothsm implementation
curl -L https://github.com/Azure/azure-iotedge/releases/download/1.0.8-rc1/libiothsm-std_1.0.8.rc1-1_arm64.deb -o libiothsm-std.deb && sudo dpkg -i ./libiothsm-std.deb

# Download and install the IoT Edge Security Daemon
curl -L https://github.com/Azure/azure-iotedge/releases/download/1.0.8-rc1/iotedge_1.0.8.rc1-1_arm64.deb -o iotedge.deb && sudo dpkg -i ./iotedge.deb

# Run apt-get fix
sudo apt-get install -f
Now that IoT Edge is installed we need to connect the device to the IoT Hub. For this we need to setup a device in the IoT hub and retrieve the connection string. We can retrieve this connection string using the Azure CLI with the azure-iot extension.
# First add the azure-iot extension.
az extension add --name azure-iot

# Create a new IoT Edge device
az iot hub device-identity create --device-id [device id] --hub-name [hub name] --edge-enabled

# List all IoT Edge devices
az iot hub device-identity list --hub-name [hub name]

# Get the Connection string
az iot hub device-identity show-connection-string --device-id [device id] --hub-name [hub name]
Once you have obtained the connection string, open the configuration file on the Jetson Nano:
sudo nano /etc/iotedge/config.yaml
Find the provisioning section of the file and uncomment the manual provisioning mode. Update the value of device_connection_string with the connection string from your IoT Edge device.
provisioning:
  source: "manual"
  device_connection_string: "<ADD DEVICE CONNECTION STRING HERE>"

# provisioning:
#   source: "dps"
#   global_endpoint: "https://global.azure-devices-provisioning.net"
#   scope_id: "{scope_id}"
#   registration_id: "{registration_id}"
You will also want to configure the default IoT Edge agent configuration to pull the 1.0.8-rc1 version of the agent. While in the configuration file, scroll down to the agent section and update the image value to the following:
agent:
  name: "edgeAgent"
  type: "docker"
  env: {}
  config:
    image: "mcr.microsoft.com/azureiotedge-agent:1.0.8-rc1"
    auth: {}
Restart the iot-edge service
service iotedge restart
See if your device is connected to the IoT Hub
az iot hub device-identity show --device-id [device id] --hub-name [hub name]
Look in the response for:
"connectionState": "Connected"
More details on setting up Azure IoT Edge on the Jetson Nano
2.3 Enable GPU support in Docker
AI models run faster if they can use the power of a GPU. To get the support for the GPU in Docker on the Jetson Nano you have to adjust a few settings.
Disable the UI
By default the Nano runs a visual interface. This takes up resources, which are needed to run the AI models.
sudo systemctl set-default multi-user.target
Get more power
Set the Nano in high-power (10W) mode:
sudo nvpmodel -m 0
NVidia runtime
Set the NVidia runtime as a default runtime in Docker.
Your /etc/docker/daemon.json file should look like this.
{
  “default-runtime”: “nvidia”,
  “runtimes”: {
    “nvidia”: {
      “path”: “nvidia-container-runtime”,
      “runtimeArgs”: []
     }
   }
}
Run your updates
Update your Nano OS and packages to the latest versions
sudo apt-get update
sudo apt-get dist-upgrade
Add current user to docker group
Add a current user to the docker group to use docker commands without sudo,
following this guide: https://docs.docker.com/install/linux/linux-postinstall/.
sudo groupadd docker
sudo usermod -aG docker $USER
newgrp docker
Reboot your device
sudo reboot
Test your GPU support
docker run -it jitteam/devicequery ./deviceQuery
The response should look like this:

If the last line doesn't say "Result = PASS" follow the instructions on screen to enable GPU support in Docker.
Now you are ready to run Docker containers that support Tensorflow with GPU.
3. Create the IoT Edge modules
Start with cloning the repository that contains the sample IoT Edge modules and deployment config.
git clone https://github.com/hnky/iot-edge-custom-vision-jetson-nano
The repo has the following structure:
- modules => The folder that holds 3 IoT Edge modules
- deployment.template.json => Template from which the deployment config is created.
- .env => your secrets
Building the containers can take a while
Login to your ACR First we need to login to our container registry on the Jetson Nano
docker login [container registry name].azurecr.io
3.1 Azure Custom Vision Module
This module contains a small webserver that exposes a model created with the Azure Custom Vision service through an API on port 80. This container contains a simple model with 3 classes: Apple, Banana or Negative.
Build the container and push to ACR
cd modules/CustomVisionModule
docker build . -f Dockerfile.arm64v8 -t [container registry name].azurecr.io/customvisionmodule:latest-arm64v8
docker push [container registry name].azurecr.io/customvisionmodule:latest-arm64v8
Test the container
# Run the container
docker run -p 127.0.0.1:80:80 -d [container registry name].azurecr.io/customvisionmodule:latest-arm64v8

# Send a test image of a banana to the containers
curl -X POST http://127.0.0.1/url -d '{ "url": "https://www.wievultuwbroodtrommel.nl/205-large_default/banaan.jpg"}'
Stop the container
# List all the containers and locate the Container ID
docker container list

# Stop the container
docker container stop [container id]
Learn more If you want to learn how to create your own model and run it as a container on the Jetson Nano you can read this blog .
3.2 Camera Module
This module grabs the camera frames and sends the images to the Computer Vision module and puts the result in the local IoT hub.
cd modules/CameraModule
docker build . -f Dockerfile.arm64v8 -t [container registry name].azurecr.io/cameramodule:latest-arm64v8
docker push [container registry name].azurecr.io/cameramodule:latest-arm64v8
3.3 Alert Module
This module grabs the result of the local IoT hub and sends it to the Azure IoT hub if the threshold of 60% is reached for one of the classes (Apple, Banana or Negative).
cd modules/AlertModule
docker build . -f Dockerfile.arm64v8 -t [container registry name].azurecr.io/alertmodule:latest-arm64v8
docker push [container registry name].azurecr.io/alertmodule:latest-arm64v8
4. Deploy the modules to the IoT Edge
Create a deployment
Update the .env file with your credentials.
nano .env
Generate the deployment manifest from the deployment.template.json.
iotedgedev genconfig -f deployment.template.json -P arm64v8
Copy the generated manifest file 'config/deployment.config' to your computer running the Azure CLI.
az iot edge set-modules --device-id [device id] --hub-name [hub name] --content deployment.config
Check on the Jetson Nano if the modules are up and running.
iotedge list
To see the messages that the alert module is sending, you can use the command below
iotedge logs alert-module
To view the output of the camera module you can open a web browser and enter the IP address of the Jetson Nano on port 5012 (http://x.x.x.x:5012/). You will see a small preview of the captured frame.
Learn more about module composition and deployment
- Learn how to deploy modules and establish routes in IoT Edge
- Develop your own IoT Edge modules
- Deploy Azure IoT Edge modules with Azure CLI
5. Create a Logic app that sends an Alert
5.1 Create a logic app resource
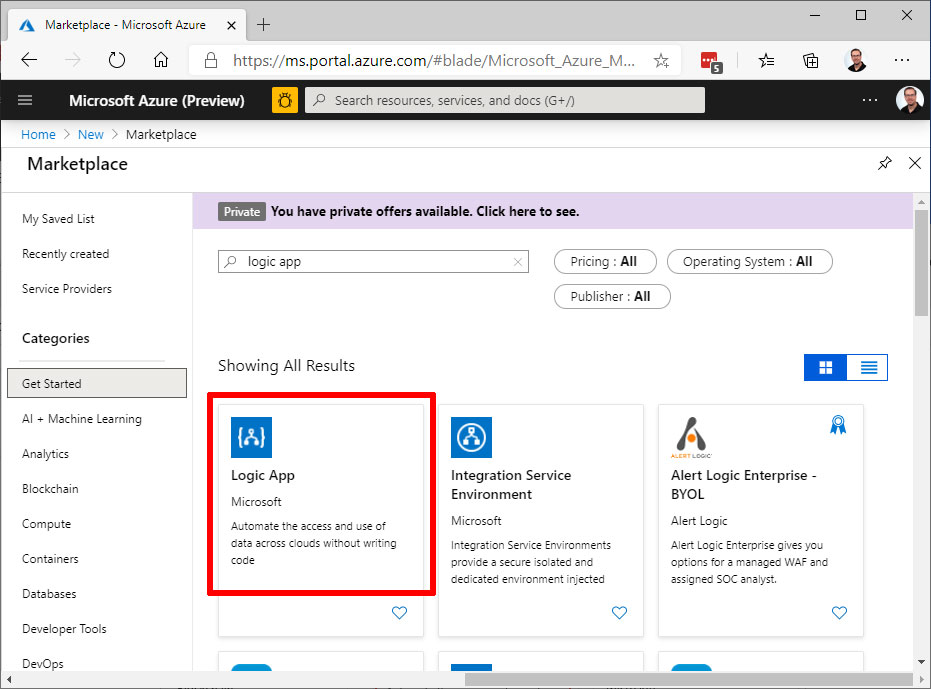
In the Azure portal, select 'Create a resource', then type "logic app" in the search box and select return. Select Logic App from the results.
On the next screen, select Create.
Give your logic app a name that's unique in your subscription, then select the same subscription, resource group, and location as your IoT hub.
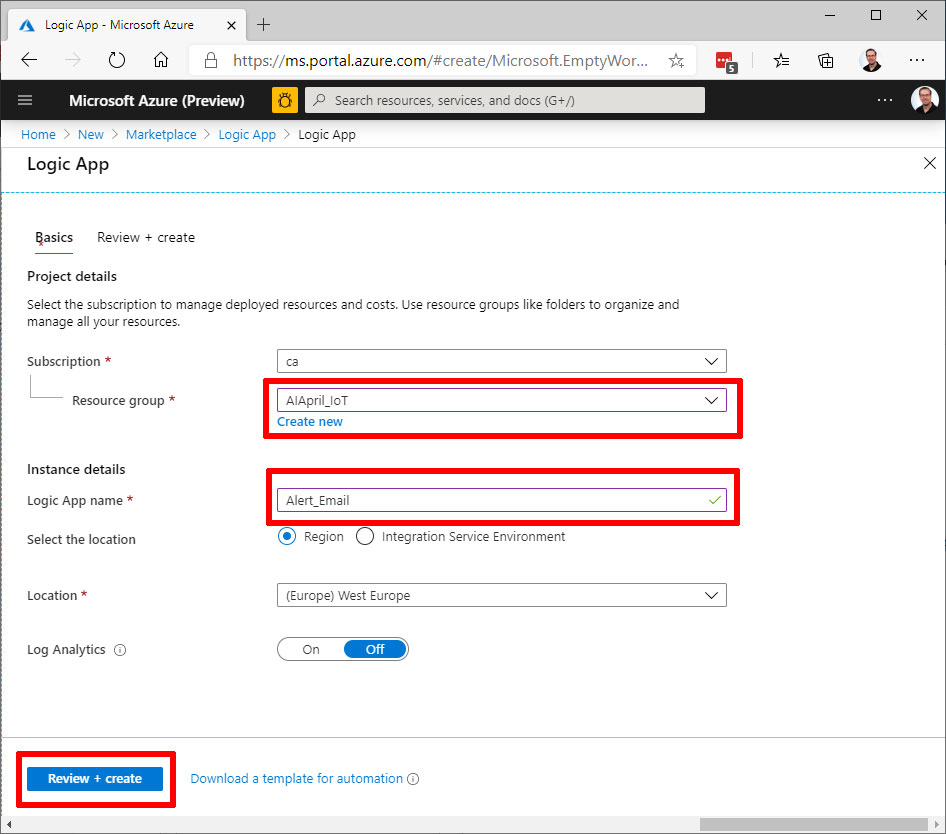
Select Create.
Once the resource is created, navigate to your logic app. To do this, select Resource groups, then select the resource group you created for this tutorial. Then find the logic app in the list of resources and select it.
In the Logic Apps Designer, page down to see Templates. Choose 'Blank Logic App' so that you can build your logic app from scratch.
Select a trigger
A trigger is a specific event that starts your logic app. For this tutorial, the trigger that sets off the workflow is receiving a request over HTTP.
In the connectors and triggers search bar, type HTTP.
Select Request - When an HTTP request is received as the trigger.

- Select Use sample payload to generate schema.

-Paste the following sample JSON code into the text box, then select Done:
[
  {
    "id": "fc52510d-e9b7-da86-c7af-c05b7b820554",
    "topic": "/SUBSCRIPTIONS/431DBAE5-40CA-438A-8DAF-77D7D5580B41/RESOURCEGROUPS/AIAPRIL_IOT/PROVIDERS/MICROSOFT.DEVICES/IOTHUBS/AIAPRILIOTHUB",
    "subject": "devices/AIAprilDevice/alert-module",
    "eventType": "Microsoft.Devices.DeviceTelemetry",
    "eventTime": "2020-04-19T18:52:03.247Z",
    "data": {
      "properties": {},
      "systemProperties": {
        "correlation-id": "test-1234",
        "message-id": "d2b805e5-cef5-4eea-a9fc-536516408bfd",
        "iothub-content-type": "application/json",
        "iothub-content-encoding": "utf-8",
        "iothub-connection-device-id": "AIAprilDevice",
        "iothub-connection-module-id": "alert-module",
        "iothub-connection-auth-method": "{\"scope\":\"module\",\"type\":\"sas\",\"issuer\":\"iothub\",\"acceptingIpFilterRule\":null}",
        "iothub-connection-auth-generation-id": "637228229021652362",
        "iothub-enqueuedtime": "2020-04-19T18:52:03.247Z",
        "iothub-message-source": "Telemetry"
      },
      "body": {
        "tag": "Apple"
      }
    },
    "dataVersion": "",
    "metadataVersion": "1"
  }
]
- You may receive a pop-up notification that says, 'Remember to include a Content-Type header set to application/json in your request.' You can safely ignore this suggestion, and move on to the next section.
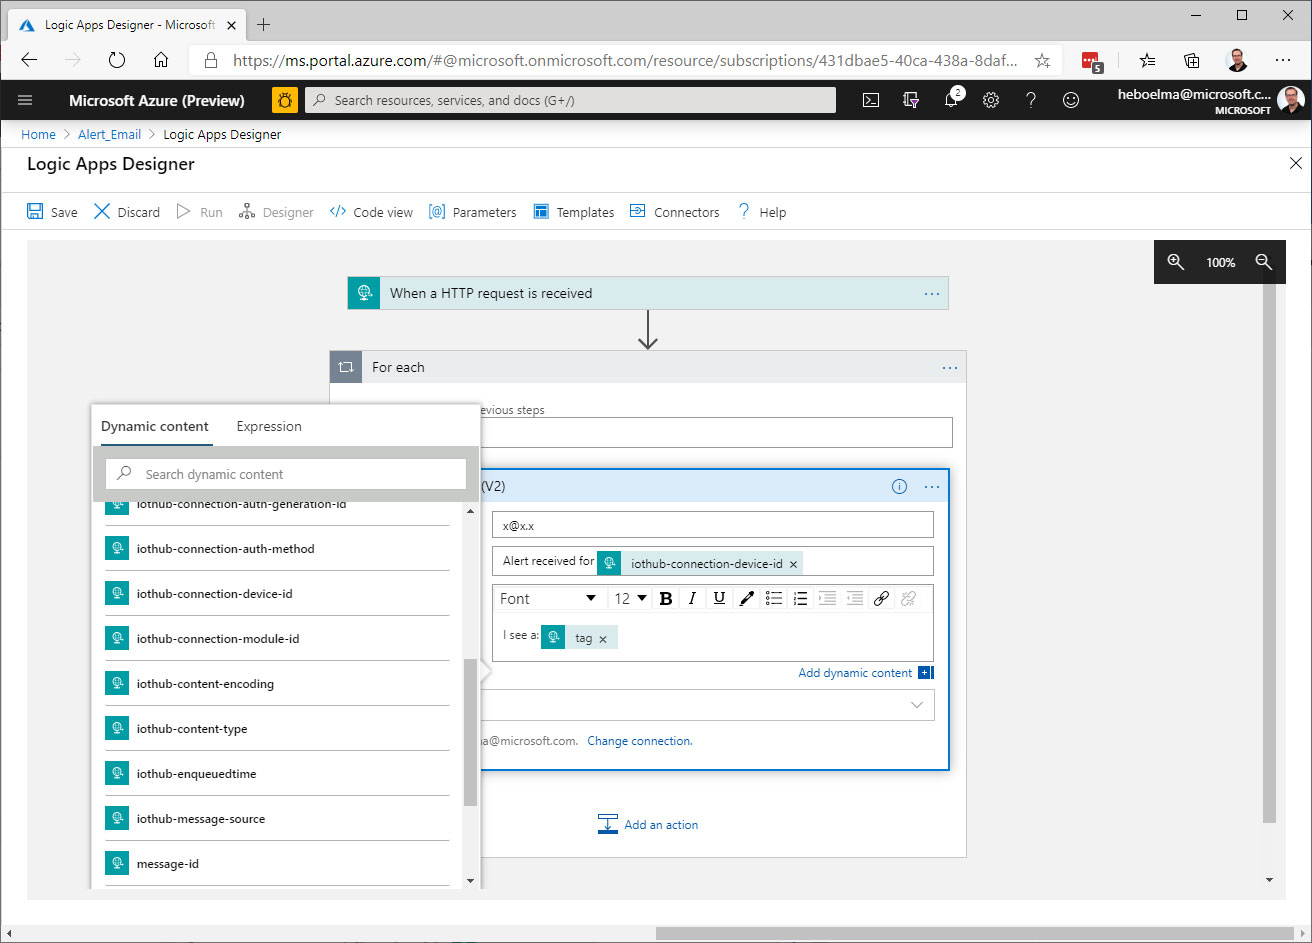
Create an action
Actions are any steps that occur after the trigger starts the logic app workflow. For this tutorial, the action is to send an email notification from your email provider.
- Select New step. This opens a window to Choose an action.
- Search for Email.
- Based on your email provider, find and select the matching connector. This tutorial uses Office 365 Outlook. The steps for other email providers are similar.
- Save your logic app.
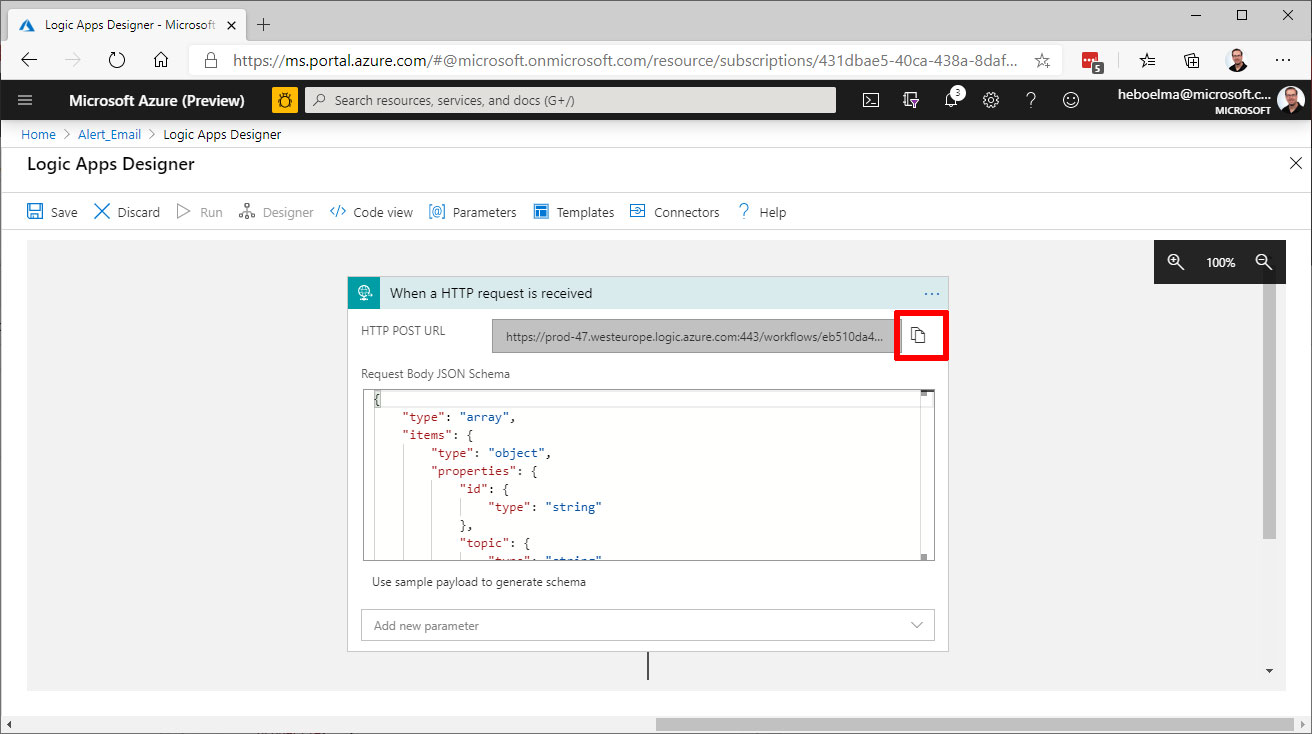
Copy the HTTP URL
Before you leave the Logic Apps Designer, copy the URL that your logic app is listening to for a trigger. You use this URL to configure Event Grid.
- Expand the 'When a HTTP request is received trigger' configuration box by clicking on it.
- Copy the value of HTTP POST URL by selecting the copy button next to it.
5.3 Configure subscription for IoT Hub events
In this section, you will configure your IoT Hub to publish events as they occur.
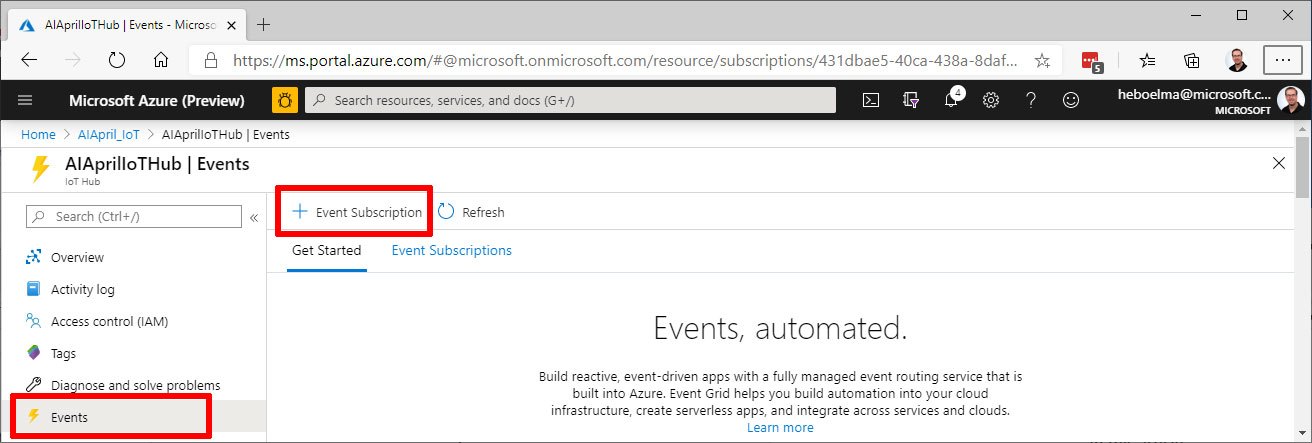
In the Azure portal, navigate to your IoT hub. You can do this by selecting Resource groups, then select the resource group for this tutorial, and then select your IoT hub from the list of resources.
Select Events and Select Event subscription.
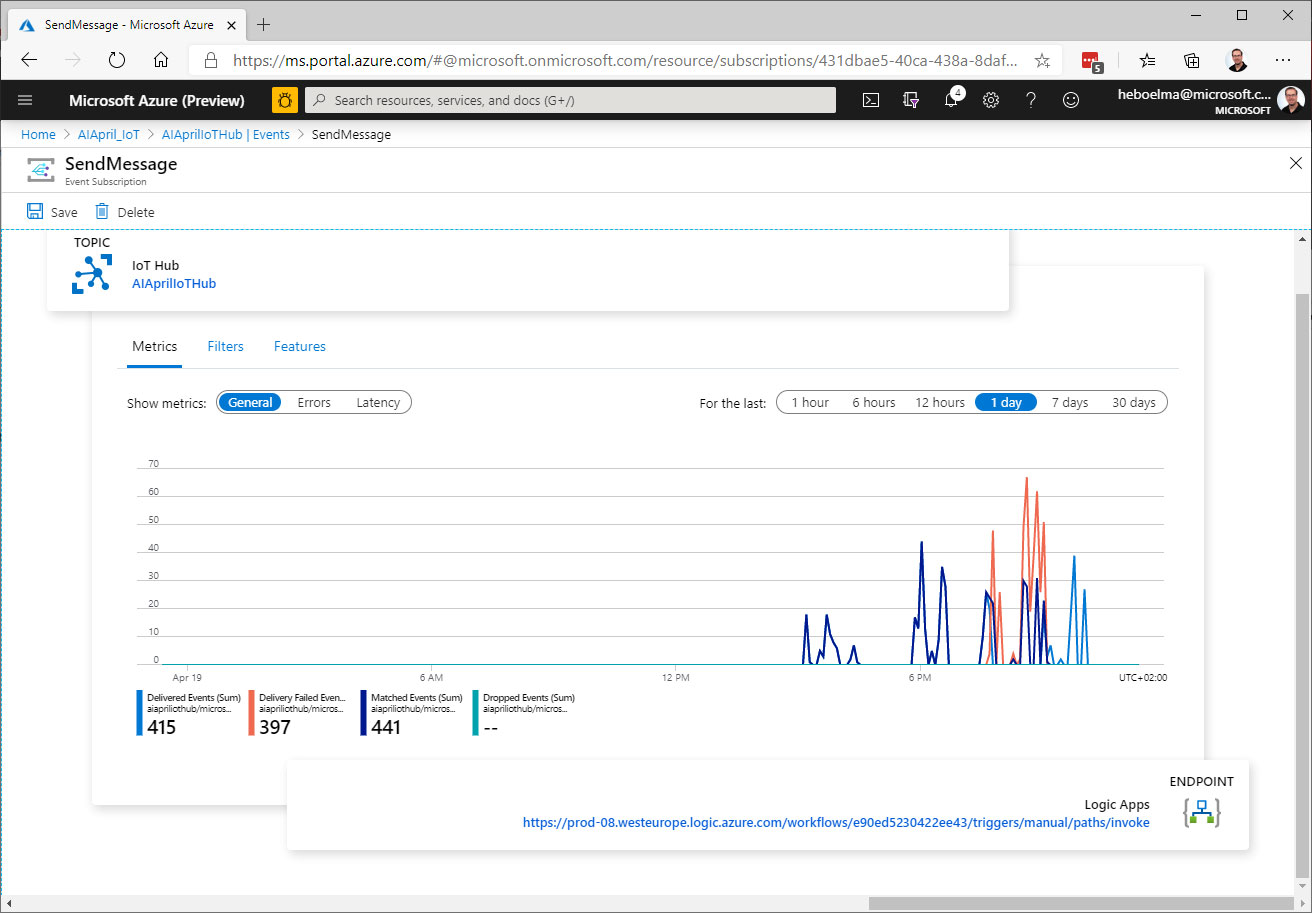
- Create the event subscription with the following values:
Event Types, uncheck all of the choices except Device Telemetry
Endpoint Details: Select Endpoint Type as Web Hook, select an endpoint and paste the URL that you copied from your logic app. Finally confirm selection.
Continue learning
Further reading
** Work in progress **
- https://github.com/janza/docker-python3-opencv/blob/master/Dockerfile
- https://github.com/Azure/azure-iot-sdk-python/blob/master/azure-iot-device/samples/async-edge-scenarios/send_message_to_output.py
- https://github.com/toolboc/IntelligentEdgeHOL
- https://dev.to/azure/getting-started-with-iot-edge-development-on-nvidia-jetson-devices-2dfl
- https://www.youtube.com/watch?v=_K5fqGLO8us
- https://www.youtube.com/watch?v=gMJgsQ13SKs&feature=youtu.be Extended information on running GPU enabled Custom Vision on the Jetson Nano