Create your first model with Azure Custom Vision and Python
Welcome to this first article in the AI for Developer series, in this series of articles I will share tips and tricks around Azure AI with you. My name is Henk Boelman, a Cloud Advocate at Microsoft based in the Netherlands, focusing on AI for developers.
In this first article I want to share with you how you can create a classification model using the Custom Vision service with the Python SDK.
Why Python and not the visual interface?
The answer to that is simple, if you build the training process in code you can version it for instance on Github. Having your code versioned means you can read back what you have done, work ina team on it and run it again if you need to.
Let’s dive into the code! Before we start, I assume you have Python 3.6 installed.
Create resources in Azure
The first thing you need to do is create an Azure Custom Vision service. If you don’t have an Azure subscription you can get $200 credit for the first month.
You can create an Azure Custom Vision endpoint easily through the portal, but you can also use the Azure CLI for this. If you don' t have the Azure cli installed you can install it using pip.
pip install azure-cli
The first step is to login to your Azure subscription, select the right subscription and create a resource group for the Custom Vision Endpoints.
az login
az account set -s <SUBSCRIPTION_ID>
az group create --name CustomVision_Demo-RG --location westeurope
The Custom Vision Service has 2 types of endpoints. One for training the model and one for running predictions against the model.
Let’s create the two endpoints.
az cognitiveservices account create --name CustomVisionDemo-Prediction --resource-group CustomVision_Demo-RG --kind CustomVision.Prediction --sku S0 --location westeurope –yes
az cognitiveservices account create --name CustomVisionDemo-Training --resource-group CustomVision_Demo-RG --kind CustomVision.Training --sku S0 --location westeurope –yes
You can use the Azure CLI to easily get the training key and the prediction key for the endpoints.
az cognitiveservices account keys list --name CustomVisionDemo-Training --resource-group CustomVision_Demo-RG
az cognitiveservices account keys list --name CustomVisionDemo-Prediction  --resource-group CustomVision_Demo-RG
Now that we have created the endpoints we can start with training the model.
It all starts with a question
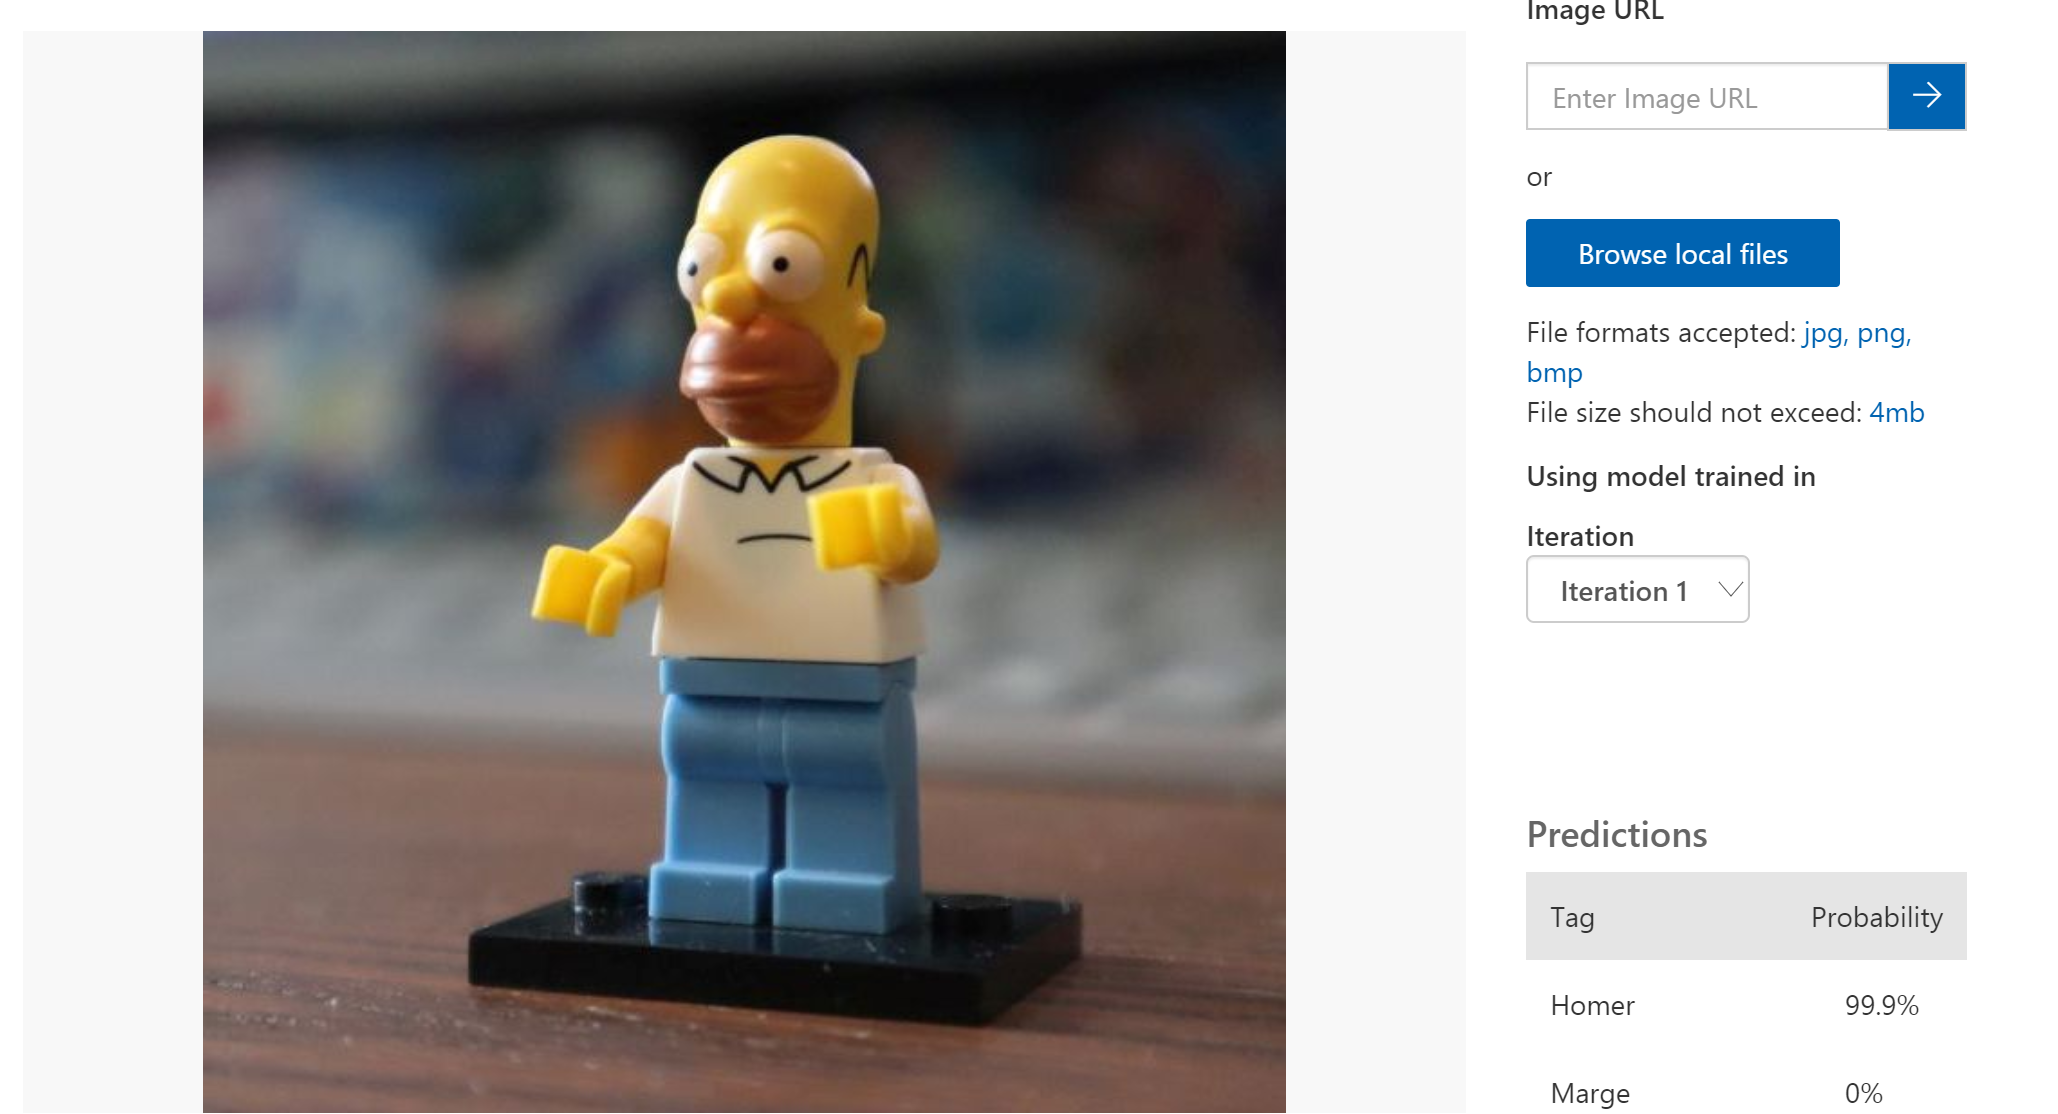
Every Machine Learning journey starts with a question you want to have answered. For this example, you are going to answer the question: Is it a Homer or a Marge Lego figure.
Now that we know what to ask the model, we can go on to the next requirement; that is data. Our model is going to be a classification model, meaning the model will look at the picture and scores the pictures against the different classes. So, the output will be I’m 70% confident this is Homer and 1% confident that this is Marge. By taking the class with the highest score and setting a minimum threshold for the confidence score we know what is on the picture.
I have created a dataset for you with 50 pictures of a Homer Simpson Lego figure and 50 pictures of a Marge Simpsons Lego figure. I have taken the photos with a few things in mind, used a lot of different backgrounds and took the photos from different angles. I made sure the only object in the photo was Homer or Marge and the quality of the photos was somehow the consistent.
Train the model
For the training we are going the use the Custom Vision Service Python SDK, you can install this package using pip.
pip install azure-cognitiveservices-vision-customvision
Create a new Python file called 'train.py' and start adding code.
Start with importing the packages needed.
from azure.cognitiveservices.vision.customvision.training import CustomVisionTrainingClient
from azure.cognitiveservices.vision.customvision.training.models import ImageFileCreateEntry
Next, create variables for the Custom Vision endpoint, Custom Vision training key and the location where the training images are stored.
cv_endpoint = "https://westeurope.api.cognitive.microsoft.com"
training_key = "<INSERT TRAINING KEY>"
training_images = "LegoSimpsons/TrainingImages"
To start with the training, we need to create a Training Client. This method takes as input the endpoint and the training key.
trainer = CustomVisionTrainingClient(training_key, endpoint= cv_endpoint)
Now you are ready to create your first project. The project takes a name and domain as input, the name can be anything. The domain is a different story. You can ask for a list of all possible domains and choose the one closest to what you are trying to accomplish. For instance if you are trying to classify food you pick the domain “Food” or “Landmarks” for landmarks. Use the code below to show all domains.
for domain in trainer.get_domains():
  print(domain.id, "\t", domain.name)
You might notice that some domains have the word “Compact” next to them. If this is the case it means the Azure Custom Vision Service will create a smaller model, which you will be able to export and run locally on your mobile phone or desktop.
Let’s create a new project with the domain set to “General Compact”.
project = trainer.create_project("Lego - Simpsons - v1","0732100f-1a38-4e49-a514-c9b44c697ab5")
Next you need to create tags, these tags are the same as classes mentioned above. When you have created a few tags we can tag images with them and upload the images to the Azure Custom Vision Service.
Our images are sorted per tag/class in a folder. All the photos of Marge are in the folder named 'Marge' and all the images of Homer are in the folder named 'Homer'.
In the code below we do the following steps:
- We open the directory containing the folders with training images.
- Loop through all the directories found in this folder
- Create a new tag with the folder name
- Open the folder containing the images
- Create, for every image in that folder, an ImageFileEntry that contains the filename, file content and the tag.
- Add this ImageFileEntry to a list.
image_list = []
directories = os.listdir(training_images)

for tagName in directories:
 	tag = trainer.create_tag(project.id, tagName)
 	images = os.listdir(os.path.join(training_images,tagName))
 	for img in images:
 		with open(os.path.join(training_images,tagName,img), "rb") as image_contents:
 			image_list.append(ImageFileCreateEntry(name=img, contents=image_contents.read(), tag_ids=[tag.id]))
Now you have a list that contains all tagged images. So far no images have been added to the Azure Custom Vision service, only the tags have been created.
Uploading images goes in batches with a max size of 64 images per batch. Our dataset is 100 images big, so first we need to split the list into chunks of 64 images.
def chunks(l, n):
 	for i in range(0, len(l), n):
 		yield l[i:i + n]
batchedImages = chunks(image_list, 64)
Now we have our images split in batches of 64, we can upload them batch by batch to the Azure Custom Vision Service. Note: This can take a while!
for batchOfImages in batchedImages:
 	upload_result = trainer.create_images_from_files(project.id, images=batchOfImages)
From this point, there are only two steps remaining before you can access the model through an API endpoint. First you need to train the model and finally you must publish the model, so it is accessible through a prediction API. The training can take a while, so you can create a while loop after the train request that checks the status of the model training every second.
import time
iteration = trainer.train_project(project.id)
while (iteration.status != "Completed"):
 	iteration = trainer.get_iteration(project.id, iteration.id)
 	print ("Training status: " + iteration.status)
 	time.sleep(1)
Now you have reached the final step, we can publish the model. Its then available in a prediction API and ready to be consumed from an application.
Every time you train your model its called an iteration. Often you have to retrain your model when you have new data or when you find out that in the real world your model is behaving different than expected.
The concept of the Custom Vision Service is that you can publish an iteration of your model under a specific name. This means that you can have multiple versions of your model available for your application to use, for instance you can a-b test your model very quickly with this.
To publish an iteration of your model you call the publish_iteration method, this method requires a few parameters.
Project ID and Iteration ID, these are values from the previous steps. You can choose a name for publication of your model, for instance 'latest' or 'version1 . The last parameter you need is the 'resource identifier' of the resource where you want to publish it to. This is the resource identifier of the Azure Custom Vision Prediction resource we created at the beginning with our AZ command.
You can use this command to retrieve all the details about the Prediction resource you created:
az cognitiveservices account show --name CustomVisionDemo-Prediction --resource-group CustomVision_Demo-RG
You can copy the value that is behind the field ID, it looks like this:
/subscriptions/<SUBSCRIPTION-ID>/resourceGroups/<RESOURCE_GROUP_NAME>/providers/Microsoft.CognitiveServices/accounts/<RESOURCE_NAME>")
When you have the resource ID, paste it in the variable below and call the 'publish_iteration' method.
publish_iteration_name = ''
resource_identifier = ''
trainer.publish_iteration(project.id, iteration.id, publish_iteration_name, resource_identifier)
Now you have successfully trained and published your model!
A small recap of what have we done:
- You created an Azure Resource group containing an Azure Custom Vision service training and prediction endpoint
- You have created a new Project
- In that project you have created tags
- You have uploaded images in batches of 64 and tagged them
- You have trained an iteration of your model
- You have published the iteration to a prediction endpoint
Let’s test the model!
Using the model in an application is as easy as calling an API. You could do just a json post to the endpoint, but you can also use the methods in the Custom Vision Python SDK, which will make things a lot easier.
Create a new file called 'predict.py'
Start with importing the dependencies you need to do a prediction.
from azure.cognitiveservices.vision.customvision.prediction import CustomVisionPredictionClient
The next thing you need is the prediction key. This is the key from the resource where you have published the model to. You can use this az command to list the keys
az cognitiveservices account keys list --name CustomVisionDemo-Prediction --resource-group CustomVision_Demo-RG
When you have your prediction key you can create a prediction client. For this client you also need the endpoint. You can run the az command below and copy the url behind the field “endpoint”.
az cognitiveservices account show --name CustomVisionDemo-Prediction --resource-group CustomVision_Demo-RG
Now you have the prediction key and the endpoint you can create the PredictionClient.
predictor = CustomVisionPredictionClient(prediction_key, endpoint=ENDPOINT)
You have multiple options to classify an image. You can send a URL or you can send the binary image to the endpoint. By default the Azure Custom Vision service keeps a history of all the images posted to the endpoint. The images and their predictions can be reviewed in the portal and used to retrain your model. But sometimes you don’t want the images to be kept in history and therefore it is possible to disable this feature.
I have uploaded 2 images you can use for testing, but feel free to use a search engine to find other images of Marge and Homer.
To classify an image using a URL and keep the history you call the 'classify_image_url' method. You give it the project id and iteration name from a few steps above and provide the URL to the image.
results = predictor.classify_image_url(project.id,publish_iteration_name,url="https://missedprints.com/wp-content/uploads/2014/03/marge-simpson-lego-minifig.jpg")
To show the score for the different classes on the screen you can use the code below to loop through the results and display the tag name and confidence score for the image.
for prediction in results.predictions:
 	print("\t" + prediction.tag_name + ": {0:.2f}%".format(prediction.probability * 100))
Now you are all done and have your own classification model running in the cloud! Here is a recap of what you have achieved:
- We asked a question
- Collected data
- Created an Azure Custom Vision Service endpoint
- Created a new Project
- Tagged and uploaded content
- Trained the model
- Published the iteration so it can be used in an API
- Ran predictions against the model using the API
In the rest of this series of articles we will use this model for different solutions! Stay tuned!